How to register WooCommerce guest users on checkout automatically
To automatically register WooCommerce guest users on checkout, you can use custom PHP code to create a user profile in the background and create an account after checkout without the need for a separate user registration form. You can use the customer data from the checkout fields of your WooCommerce store to replace the user registration form and create a WooCommerce customer account page.
Allowing guest checkouts in WooCommerce is great for your sales conversions. It will enable customers to checkout quickly without creating and logging in to their accounts. But once you don’t create user accounts, you’ll lose a lot of data and potential customer analysis opportunities.
In an ideal world, we’d be able to allow users to order quickly, but also we’d offer them an account once they enter their data. This will enable you to keep in touch with your users and build relationships with them. Unfortunately, currently, there isn’t a way of doing this by default with WooCommerce, and we couldn’t find any free plugin that does this.
Registering WooCommerce guest users on checkout automatically simplifies the checkout process for customers by removing the need to create or log in to an account, reduces cart abandonment, and increases sales conversions.
Our goal for today’s tutorial is to provide a third option by allowing automatic account creation for guest users via some custom PHP code. We’ll enable guest checkout, but we’ll also automatically create a user profile in the background and create an account after checkout automatically without the need for a separate user registration form. We’ll use the customer data from the checkout fields of your WooCommerce store to replace the user registration form and create a WooCommerce customer account page.
Let’s get right into it!

Preparation: Enabling guest checkout in WooCommerce
Guest checkout in WooCommerce is a feature that allows customers to purchase products without creating an account. It simplifies the customer checkout process by removing the need to create an account, reducing cart abandonment, and increasing sales conversions.
To add this code, we’ll need two other factors. The first is enabling the guest checkout in our WooCommerce store. You can do that under WooCommerce > Settings > Checkout > Checkout Process > Enable guest checkout:

The second step is an excellent addition to ensure your code won’t be lost in future WordPress theme updates. We’ll add your code to a child theme. If you don’t know what a Child Theme is, we recommend checking the WordPress guides about child themes. You can alternatively create a plugin and add your code to the plugin, but since using child themes is more accessible and it’s most likely that you already have one installed, we will use this method.
You don’t need to code anything to create a child theme – install a plugin such as the One Click Child Theme. Once you’ve made a child theme, we’ll use your child theme’s functions.php file to add our code.
How to register WooCommerce Customers programmatically on checkout
To register WooCommerce customers programmatically on checkout, you can use the add_action() function to create a new user account directly after checkout and auto-login. You can then use the wp_insert_user() function to create a new user with the email as the username and a newly created password. Finally, you can use the wp_set_current_user() and wp_set_auth_cookie() functions to auto-login the user.
Detecting if the current order is from a guest user
The first task of our code is detecting if the current order is coming from a guest user. We can do this during the WooCommerce checkout process by using different WooCommerce pages. To do that, we’ll add a snippet that takes action when the customer is on the thank you page. This page is shown to the customer right after the WooCommerce checkout page. This way, you’ll execute this code even if the order payment is still pending (depending on the payment method).
Since there is no direct function to detect if a user is a guest, we’ll check if a user is already registered with this email.
This is the code to do it:
function wc_register_guests( $order_id ) {
	// get all the order data
	$order = new WC_Order($order_id);

	//get the user email from the order
	$order_email = $order->billing_email;

	// check if there are any users with the billing email as user or email
	$email = email_exists( $order_email );
	$user = username_exists( $order_email );

	// if the UID is null, then it's a guest checkout
	if( $user == false && $email == false ){
		// perform guest user actions here
	}

}

//call our wc_register_guests() function on the thank you page
add_action( 'woocommerce_thankyou', 'wc_register_guests', 10, 1 );
Creating a user account
Once we know the current user is a guest, we can create a new WooCommerce account. We’ll use the email as a username and email and generate a password for that. You can use any password now, as the user won’t get access to it directly.
// random password with 12 chars
$random_password = wp_generate_password();

// create new user with email as username & newly created pw
$user_id = wp_create_user( $order_email, $random_password, $order_email );
Emailing your user at their email address would be a good idea. This email can tell them that even though they have ordered as a guest, they can still create a password for their account. In this way, they’ll be able to place new orders or check the status of the current ones. For the password reset function, you can use WordPress password reset mechanics. Just send them a link to yoursite.com/wp-login.php?action=lostpassword. This is the section of the WooCommerce login page that is responsible for customer password reset.
Please note that although we created the account after checkout, the payment might not have been confirmed. You can also make a statement after the payment has been completed, but that process will depend on your specific setup, WooCommerce settings, and payment process.
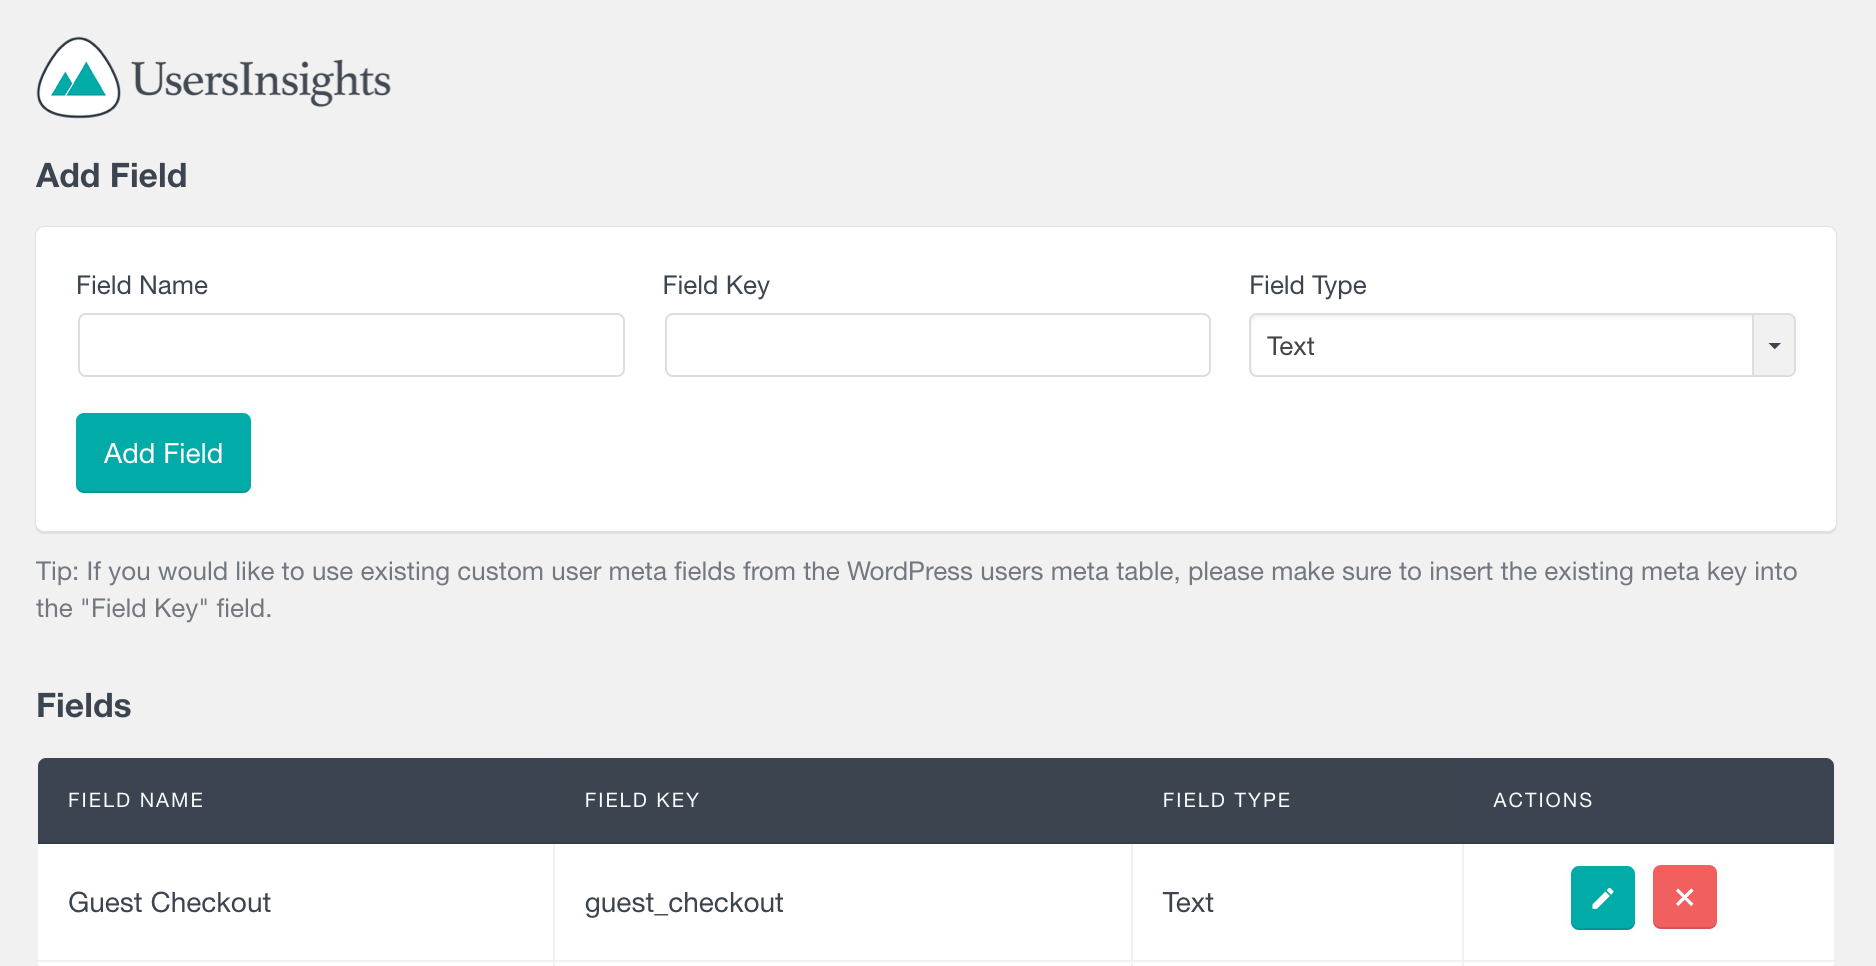
Add custom fields to the user account
WooCommerce has a lot of custom fields added to your users. It’s also a good idea to add them so you can read this data later and autofill in future orders. Also, adding a custom field to mark these users as previously guest users would be nice. You can use the same technique to load other custom data from your Woocommerce checkout form, like data from WooCommerce custom checkout fields, and store it in your customer account.
This is the code to do it.
//WooCommerce guest customer identification
update_user_meta( $user_id, 'guest', 'yes' );

//user's billing data
update_user_meta( $user_id, 'billing_address_1', $order->billing_address_1 );
update_user_meta( $user_id, 'billing_address_2', $order->billing_address_2 );
update_user_meta( $user_id, 'billing_city', $order->billing_city );
update_user_meta( $user_id, 'billing_company', $order->billing_company );
update_user_meta( $user_id, 'billing_country', $order->billing_country );
update_user_meta( $user_id, 'billing_email', $order->billing_email );
update_user_meta( $user_id, 'billing_first_name', $order->billing_first_name );
update_user_meta( $user_id, 'billing_last_name', $order->billing_last_name );
update_user_meta( $user_id, 'billing_phone', $order->billing_phone );
update_user_meta( $user_id, 'billing_postcode', $order->billing_postcode );
update_user_meta( $user_id, 'billing_state', $order->billing_state );

// user's shipping data
update_user_meta( $user_id, 'shipping_address_1', $order->shipping_address_1 );
update_user_meta( $user_id, 'shipping_address_2', $order->shipping_address_2 );
update_user_meta( $user_id, 'shipping_city', $order->shipping_city );
update_user_meta( $user_id, 'shipping_company', $order->shipping_company );
update_user_meta( $user_id, 'shipping_country', $order->shipping_country );
update_user_meta( $user_id, 'shipping_first_name', $order->shipping_first_name );
update_user_meta( $user_id, 'shipping_last_name', $order->shipping_last_name );
update_user_meta( $user_id, 'shipping_method', $order->shipping_method );
update_user_meta( $user_id, 'shipping_postcode', $order->shipping_postcode );
update_user_meta( $user_id, 'shipping_state', $order->shipping_state );
Link past orders to the new user account.
The last step missing in our code is linking past orders to this new account. Users can manage their orders via the “My Account” page.
Thankfully, WooCommerce got us covered. They have a function to this task in particular. You can use this code for that:
// link past orders to this newly created customer
wc_update_new_customer_past_orders( $user_id );

Unlock the Full Potential of Your WooCommerce Customer Data
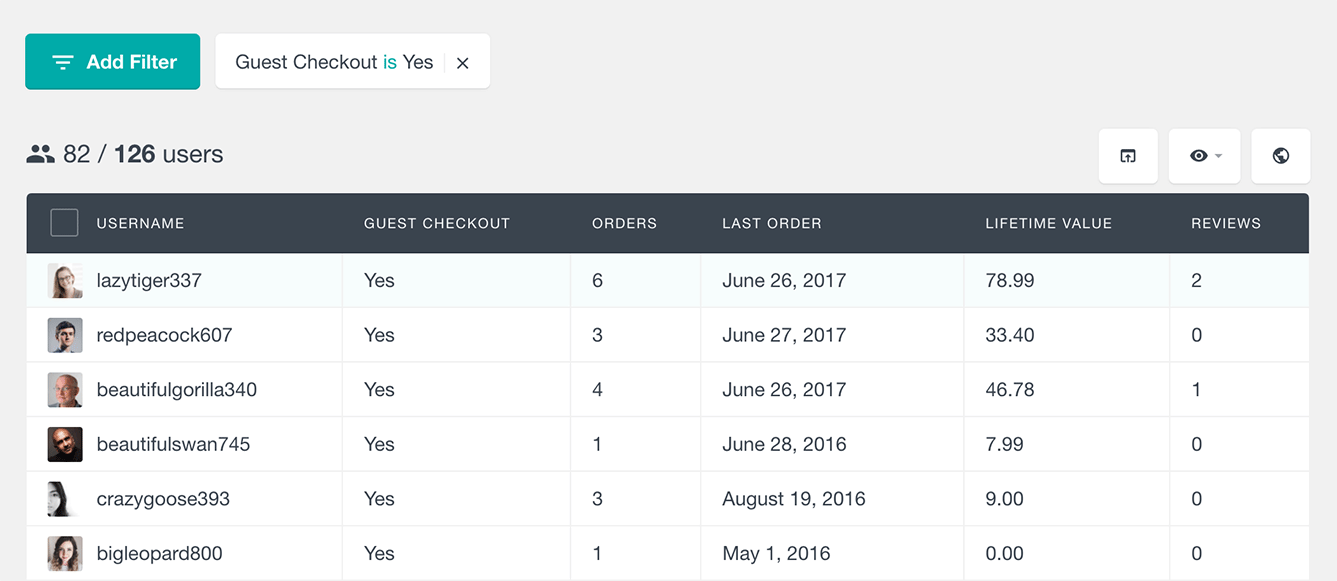
Reading the custom fields data
Now that we have created all the custom fields, we can just read these fields’ data by using something such as Users Insights. For example, you can list all guest users once you map that newly created custom field:
Just filter all users with your value (in our case, it’s “Yes”). You can also filter out all users that aren’t guests by using a “Guest Checkout is not set” filter.
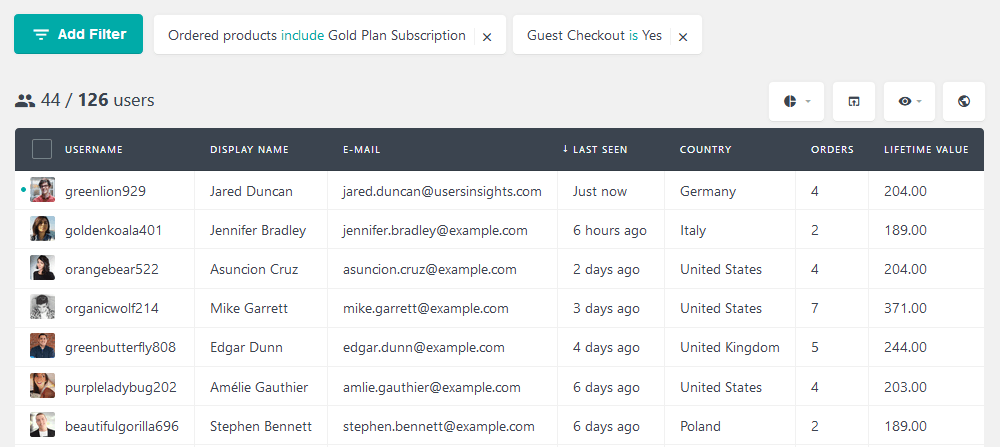
Creating advanced filters with your customer data
In addition to the custom fields created in this tutorial, we can use many more filters. For instance, it is possible to filter all users who have bought a certain WooCommerce product and who are guests.
Since the account creation is automatic, maybe these users haven’t visited your store in a while. You can check if that’s the case with the “last seen filter”, which can even be combined with the “last order”. In this way, we can check users who have ordered and haven’t come back.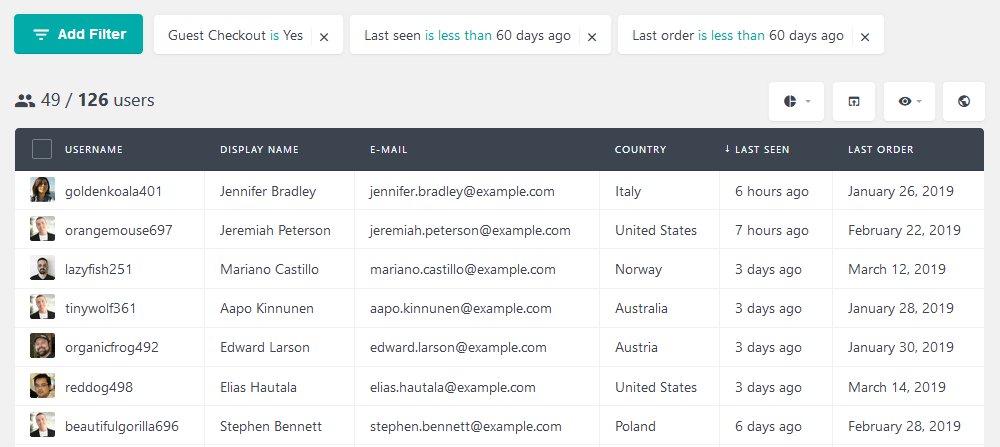
As usual, it is a good idea to develop a better customer relationship. For that, you can export these users and contact them using MailChimp. This allows you to remind them of your store and offer them a good offer.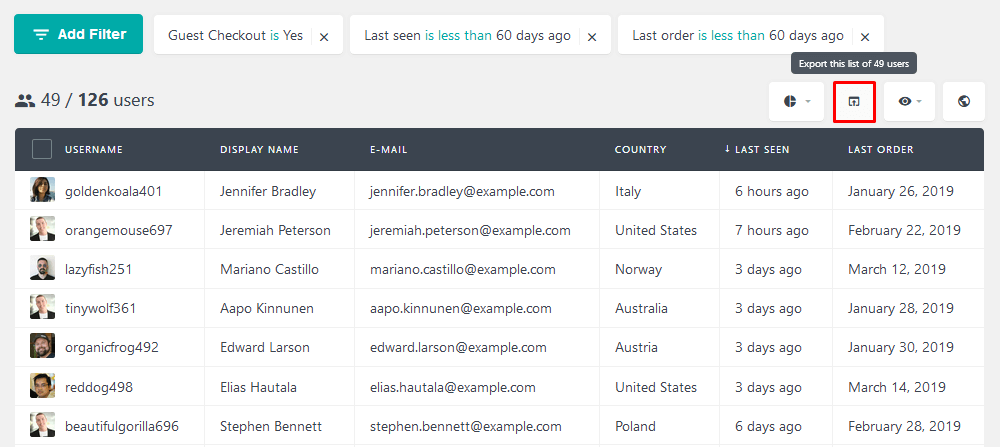
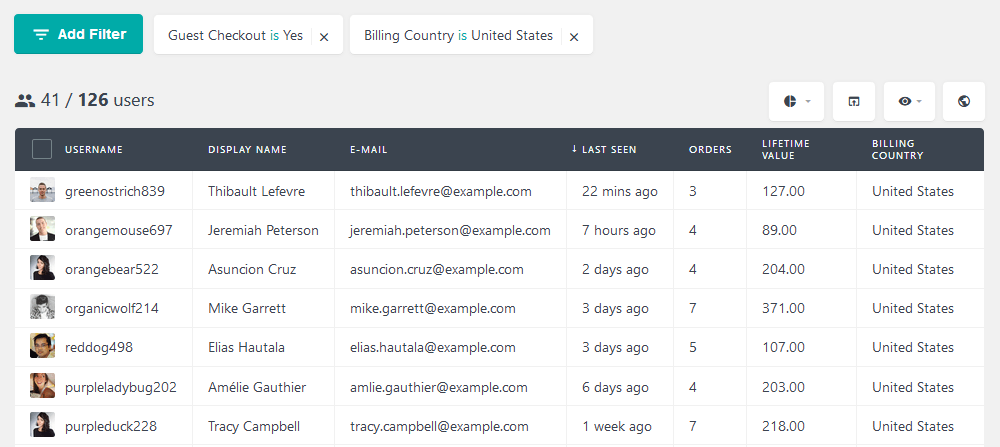
Furthermore, it is possible to filter users based on their location. In addition to the GeoLocation API, you can use the WooCommerce location information. The user fields, such as billing country and city, are available as columns and filters in Users Insights. Thus, it is possible to filter all users from a specific billing location.
Maybe you can get yourself repeating the same searches over and over. In these cases, the segment feature may come in handy. For instance, if you report all US users who placed an order last month, you can save that segment. This allows you to repeat the same search with a single click.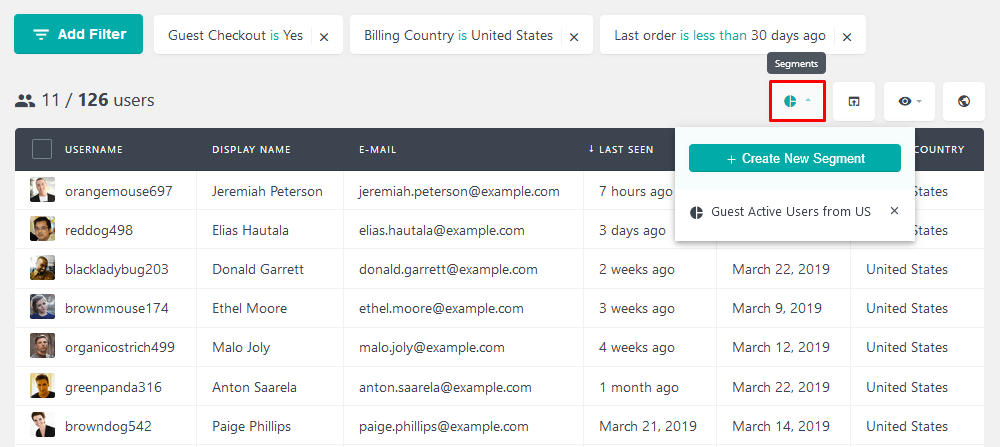
Wrapping up
Today, we looked into the limitations of a pure guest checkout. We proposed a solution with a bit of custom code. This is the final code you can copy & paste into your child theme’s functions.php file:
function wc_register_guests( $order_id ) {
	// get all the order data
	$order = new WC_Order($order_id);

	//get the user email from the order
	$order_email = $order->billing_email;

	// check if there are any users with the billing email as user or email
	$email = email_exists( $order_email );
	$user = username_exists( $order_email );

	// if the UID is null, then it's a guest checkout
	if( $user == false && $email == false ){

		// random password with 12 chars
		$random_password = wp_generate_password();

		// create new user with email as username & newly created pw
		$user_id = wp_create_user( $order_email, $random_password, $order_email );

		//WC guest customer identification
		update_user_meta( $user_id, 'guest', 'yes' );

		//user's billing data
		update_user_meta( $user_id, 'billing_address_1', $order->billing_address_1 );
		update_user_meta( $user_id, 'billing_address_2', $order->billing_address_2 );
		update_user_meta( $user_id, 'billing_city', $order->billing_city );
		update_user_meta( $user_id, 'billing_company', $order->billing_company );
		update_user_meta( $user_id, 'billing_country', $order->billing_country );
		update_user_meta( $user_id, 'billing_email', $order->billing_email );
		update_user_meta( $user_id, 'billing_first_name', $order->billing_first_name );
		update_user_meta( $user_id, 'billing_last_name', $order->billing_last_name );
		update_user_meta( $user_id, 'billing_phone', $order->billing_phone );
		update_user_meta( $user_id, 'billing_postcode', $order->billing_postcode );
		update_user_meta( $user_id, 'billing_state', $order->billing_state );

		// user's shipping data
		update_user_meta( $user_id, 'shipping_address_1', $order->shipping_address_1 );
		update_user_meta( $user_id, 'shipping_address_2', $order->shipping_address_2 );
		update_user_meta( $user_id, 'shipping_city', $order->shipping_city );
		update_user_meta( $user_id, 'shipping_company', $order->shipping_company );
		update_user_meta( $user_id, 'shipping_country', $order->shipping_country );
		update_user_meta( $user_id, 'shipping_first_name', $order->shipping_first_name );
		update_user_meta( $user_id, 'shipping_last_name', $order->shipping_last_name );
		update_user_meta( $user_id, 'shipping_method', $order->shipping_method );
		update_user_meta( $user_id, 'shipping_postcode', $order->shipping_postcode );
		update_user_meta( $user_id, 'shipping_state', $order->shipping_state );

		// link past orders to this newly created customer
		wc_update_new_customer_past_orders( $user_id );
	}

}

//add this newly created function to the thank you page
add_action( 'woocommerce_thankyou', 'wc_register_guests', 10, 1 );
Conclusion
Registering WooCommerce guest users on checkout automatically has several benefits. It simplifies the checkout process for customers by removing the need to create or log in to an account, reduces cart abandonment, and increases sales conversions. By enabling guest checkout, customers can quickly place an order without the hassle of creating an account, which can be a significant barrier to purchase. Additionally, creating a customer account during checkout provides valuable data that can help you better understand the needs of your customers and build a relationship with them. By automating the registration process, you can streamline the shopping experience and improve customer satisfaction.
We hope you enjoyed this article, and see you next time!