Creating a WooCommerce customer login shortcode, page and widget
This article will show you how to create a WooCommerce customer login shortcode. We will also explore all aspects of WooCommerce customer login in this comprehensive guide, covering various methods for users to access your online store and the underlying reasons behind each approach.
The WooCommerce customer login form is an integral part of WordPress user management, serving as a secure gateway for customers to access their accounts on WooCommerce-powered websites, improving personalized experiences, order tracking, and faster online transactions.

WooCommerce’s original solution uses a login form in the user profile and other pages. But this still doesn’t have the flexibility aspect that we need, especially when it comes to replacing the default WooCommerce login page. That’s why, in this article, we will explore the different WooCommerce login options and customize the WooCommerce login method by creating our custom login form shortcode that will allow you to create your own WooCommerce custom login page without a plugin.
Let’s get started!
Different types of WooCommerce login setups
When it comes to the login setup, WooCommerce store can be structured in a few different ways to meet its customers’ requirements.
1. Public WooCommerce store
A public WooCommerce store is the default and most common setup. Anyone can browse your products and there is no hidden WooCommerce content. Customers can buy as guests without having to log in or optionally sign up and create an account during the guest checkout. A public WooCommerce store with guest checkout is the most popular choice among customers for fast purchases and minimizing abandoned carts by requiring minimal personal info and no customer login and password. While this is good for speed (customers can do a quick WooCommerce checkout), the trade-off is limited customer data for marketing and customer analysis. The debate around guest checkout is a common topic among store owners, and we’ll discuss it at the end of this article.
2. Public WooCommerce store with required user registration
This is similar to the default setup in that all products are public and can be browsed by anyone. However, customers must register (by creating a customer account via a dedicated WooCommerce registration page or by automatically creating a customer account on the checkout page) or log into their account page to make a purchase. They can log in via their custom WooCommerce login page or a WooCommerce social login plugin. Having a public WooCommerce store that makes it mandatory for customers to create an account is a strategic eCommerce approach; it promotes repeat purchases through an integrated login process for smooth transactions. This setup allows for order history, personalized recommendations, and loyalty promotions. However, customers have to manage an extra user account, give up personal information, and the purchase barrier of account setup during checkout.
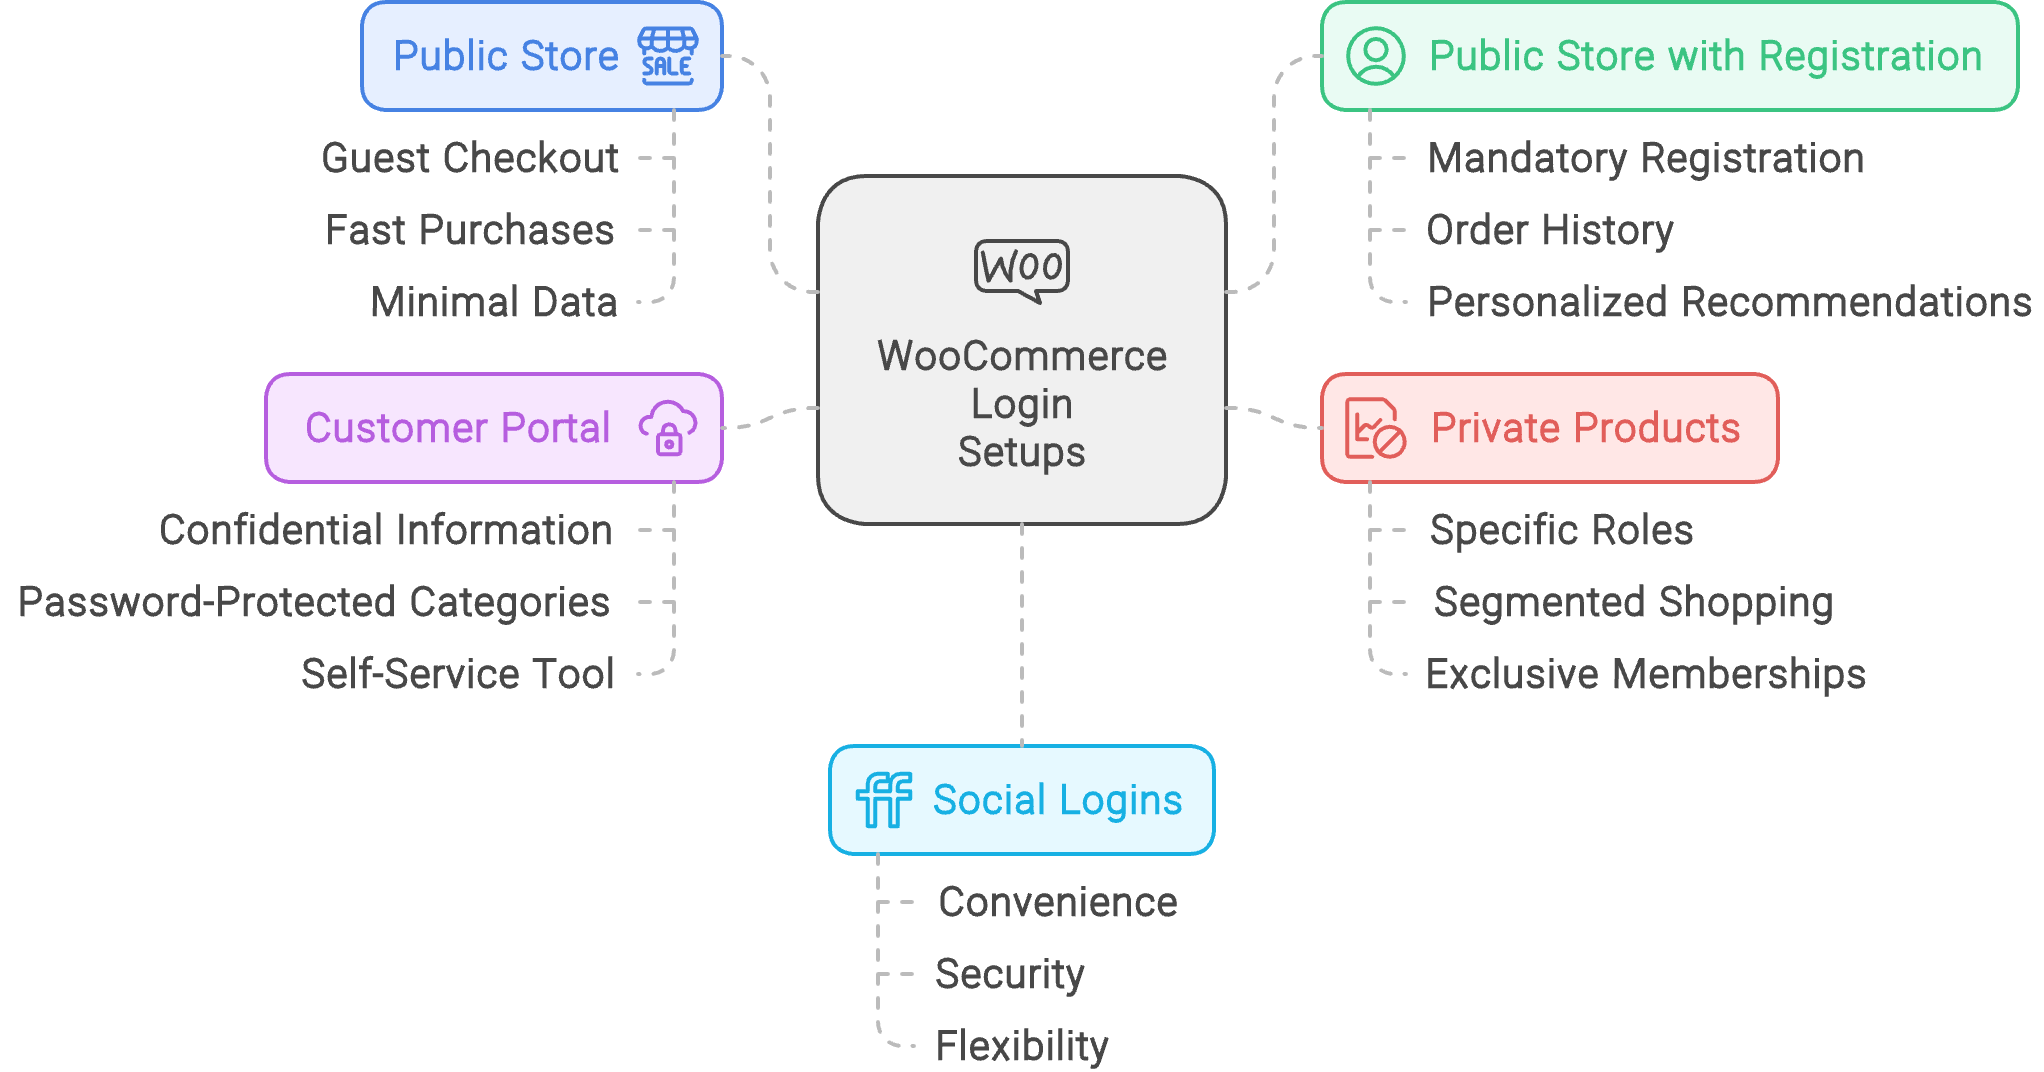
3. Private and protected WooCommerce products and product categories
With this setup, customers can view your products and make purchases on your WooCommerce site, but only customer accounts created to view specific products have access to certain things. For example, all customers can purchase from any public area of your website that doesn’t contain hidden content. Only customer accounts with specific roles and privileges can view and purchase certain products or receive special customer service. Creating a private WooCommerce store with mandatory login, whether through exclusive memberships or closed sections for members, emphasizes exclusivity and specialized access. Similarly, a customer portal with protected product categories allows segmented shopping experiences, but both models require users to set up accounts and work best in specific niches.
4. WooCommerce Customer Portal
A WooCommerce client portal is a private, secure WooCommerce customer area on your website where you can share and exchange confidential information. It provides tools that help your clients share information with you and each other and communicate efficiently. The WooCommerce customer portal usually has password-protected product categories. It can be valuable as a self-service tool in a private customer area. This allows specific users or user roles to access certain areas of the WooCommerce store. Customers can view and purchase products from the public areas of the shop, while only those with the correct credentials can access the protected categories. Creating private WooCommerce stores, whether through exclusive memberships or complete store privacy requiring login or a password, is a popular approach for exclusivity. Success depends on a top-tier product or service portfolio.
5. Social Logins for WooCommerce Store
Integrating social logins into your WooCommerce store presents a streamlined approach to customer access. Various plugins authenticate users through their social media accounts, reducing the login hassle and shortening the path to purchase. Additionally, with the WooCommerce login feature, customers can effortlessly log in during the checkout process, providing flexibility in registration options and catering to the 77% of users who prefer social media logins for their convenience and security, especially when utilizing the official WooCommerce extension.
Tracking WooCommerce customer logins
Analyzing how often customers log in using the Users Insights last seen report can help determine the most suitable WooCommerce login setup for your store. If customers frequently log in, a setup like a Customer Portal or required user registration may enhance user experience and personalization. Conversely, if logins are infrequent, a public store or social logins might be more appropriate to streamline access and reduce friction. This analysis ensures your login setup aligns with customer behavior and preferences.
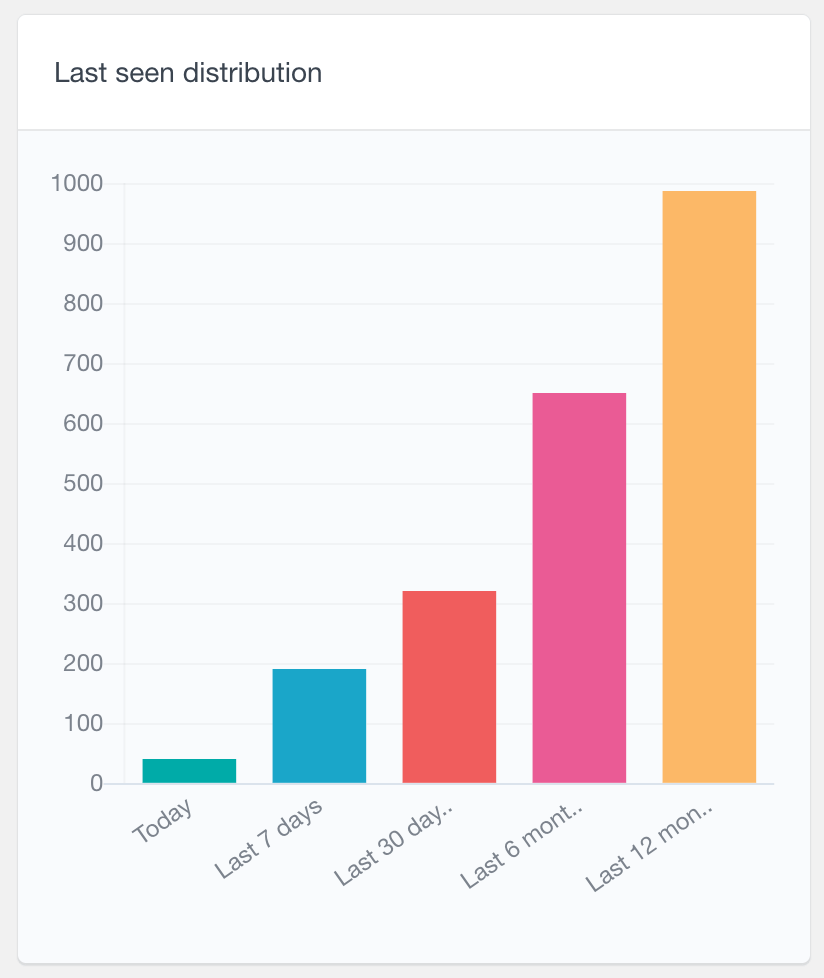 If you’re using the Activity module, there is a “Last seen” report showing you how many users have logged in in the most recent periods, such as Today, Last 7 days, Last 30 days, etc.
Default WooCommerce customer login options
WooCommerce has some out-of-the-box options for user login, including the default WooCommerce login page. Usually, the login form is presented whenever you visit a WooCommerce page for registered users.
The first instance is the “My Account” page, usually under /my-account. Here, you can see the login and registration forms.
Depending on your setup, the checkout page may also contain the login form. The main difference here is the inline opening form. Therefore, once you click “log in”, the form opens up as an accordion. That’s a great solution to save space and keep users on the checkout workflow.
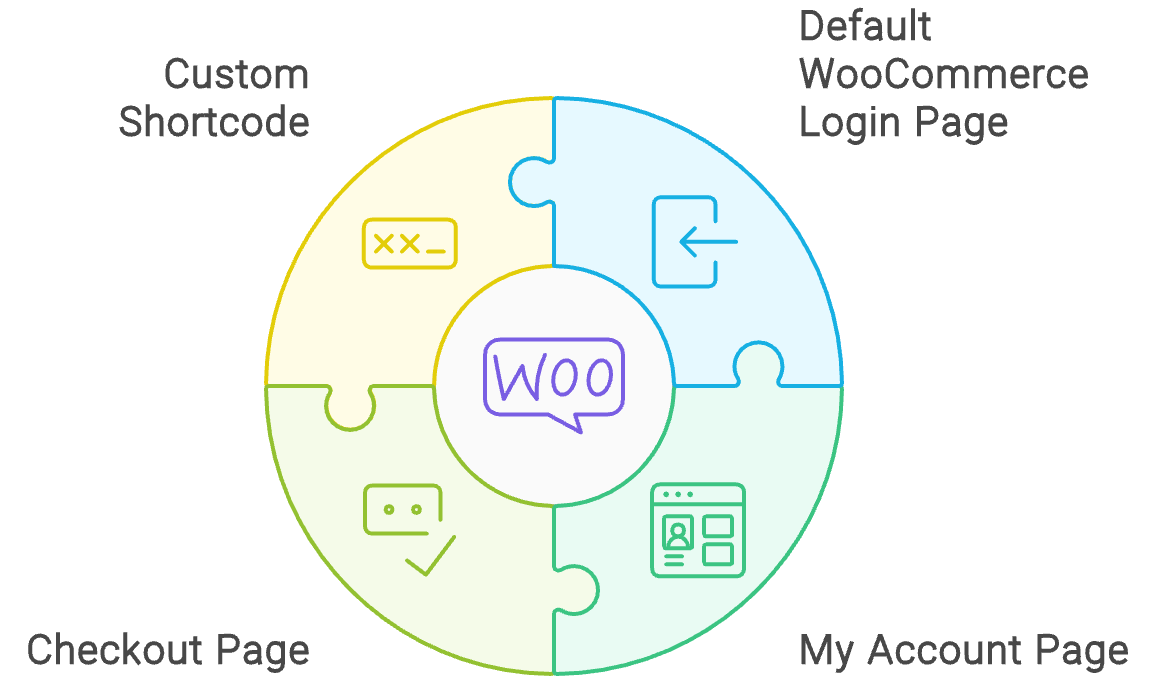
If you want the login form by itself, though, WooCommerce does not offer that option. Now, let’s build our shortcode to change this. By default, anyone can browse your products, and there is no hidden WooCommerce content.
By default anyone can browse your products and there is no hidden WooCommerce content.
How to customize the user login in WooCommerce
There are a few different ways that you can use to customize your WooCommerce login page. The first and the most obvious is using a dedicated WordPress theme that provides an out-of-the-box custom login page. The other alternative is to customize your login page using a dedicated user registration WordPress plugin. To create a customer login page, you must install and configure a WordPress plugin like the User Registration plugin. If they haven’t logged in before, you can then use this plugin to create a customer login or registration form. Since both of these ways are pretty straightforward in this tutorial, we will focus on creating a custom WooCommerce login form and shortcode programmatically with some custom code.

Unlock the Full Potential of Your WooCommerce Customer Data
How to create a WooCommerce login shortcode
The first step in our shortcode is to register the shortcode in the WordPress add_shortcode() function. This is its primary structure, along with the main points in our code:
function my_render_wc_login_form( $atts ) {
  //TODO: 1. Check if the user is logged in
  //TODO: 2. Use WooCommerce login form if present, if not - use WordPress login form
}
add_shortcode( 'my_wc_login_form', 'my_render_wc_login_form' );
The name is what you use in your square brackets – in this case, the code registers a shortcode that can be used as [my_wc_login_form]. And the function name is what WordPress calls to render the shortcode content.
By this point, the code will not do anything. Now let’s start implementing the above-listed steps one by one.
1. Check if the user is logged in
We want to check if users are logged in, and if they are – we’ll display a welcome message. If users aren’t logged in, then we do our magic to display the form.
if ( ! is_user_logged_in() ) {
  //login form code to be placed here
} else {
  return "Hello there! Welcome back.";
}
You can also check if a user is logged in with Users Insights. You will need to just apply the last seen filter and set the days field to less than one:

The green dot on the left side from the user profile picture is indicated in that the WooCommerce user is currently online.
2. Display login form
For the non-logged-in users, we can display our login form. But we need to know if the WooCommerce functions that render the form are available. We can do this by using the function_exists() function.
This code renders the login form:
if ( function_exists( 'woocommerce_login_form' ) &&
    function_exists( 'woocommerce_output_all_notices' ) ) {
  //render the WooCommerce login form
  ob_start();
  woocommerce_output_all_notices();
  woocommerce_login_form();
  return ob_get_clean();
} else {
  //render the WordPress login form
  return wp_login_form( array( 'echo' => false ));
}
- the
woocommerce_login_form()the function prints the form markup. Thewoocommerce_output_all_notices()function will print any login errors, such as invalid username/password errors. - we use
ob_start()andob_get_clean()since the WooCommerce functions echo the markup, and the shortcode is supposed to return the markup instead of printing it. - if the WooCommerce login functions are not present, we render the default WordPress login with the
wp_login_form()function
Important: please keep in mind that the WooCommerce functions that we used here might change in the future. Therefore it is always highly recommended to always test your code after updating your WooCommerce plugin.
And this is the final version of our code:
function my_render_wc_login_form( $atts ) {
  if ( ! is_user_logged_in() ) {
    if ( function_exists( 'woocommerce_login_form' ) &&
        function_exists( 'woocommerce_output_all_notices' ) ) {
      //render the WooCommerce login form
      ob_start();
      woocommerce_output_all_notices();
      woocommerce_login_form();
      return ob_get_clean();
    } else {
      //render the WordPress login form
      return wp_login_form( array( 'echo' => false ));
    }
  } else {
    return "Hello there! Welcome back.";
  }
}
add_shortcode( 'my_wc_login_form', 'my_render_wc_login_form' );
At this point, you might ask yourself – why use the WooCommerce login form functions instead of directly using the WordPress login form function? There are a few advantages of using the WooCommerce form, such as:
- Consistent input element style – since the form uses the default WooCommerce classes for its elements, it will look the same way as the other WooCommerce login forms on your site
- Better error handling – if the authentication fails, the WooCommerce form will display a message on the same page, while the WordPress form will redirect your users to the default WordPress login page
Now, let’s use the login shortcode on your site.
How to use the WooCommerce login shortcode
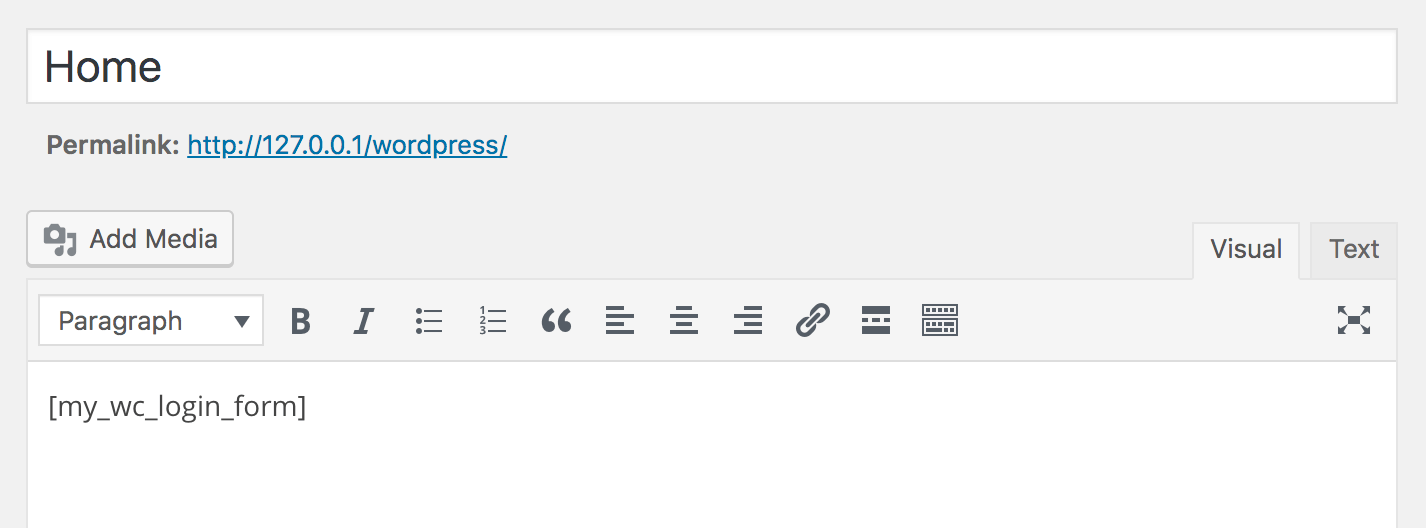
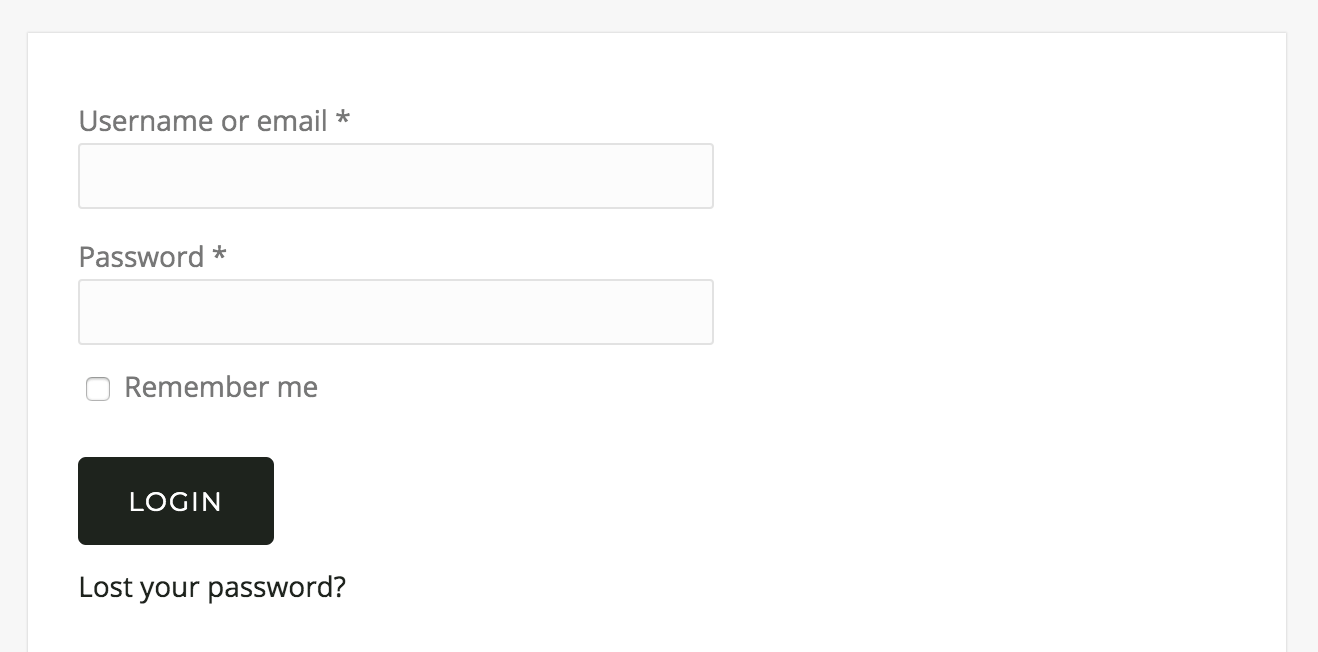
You can apply this shortcode in almost any place you want. But let’s add it to one of our pages. For example, if you have a login page, you can create it this way:
And this is the result:
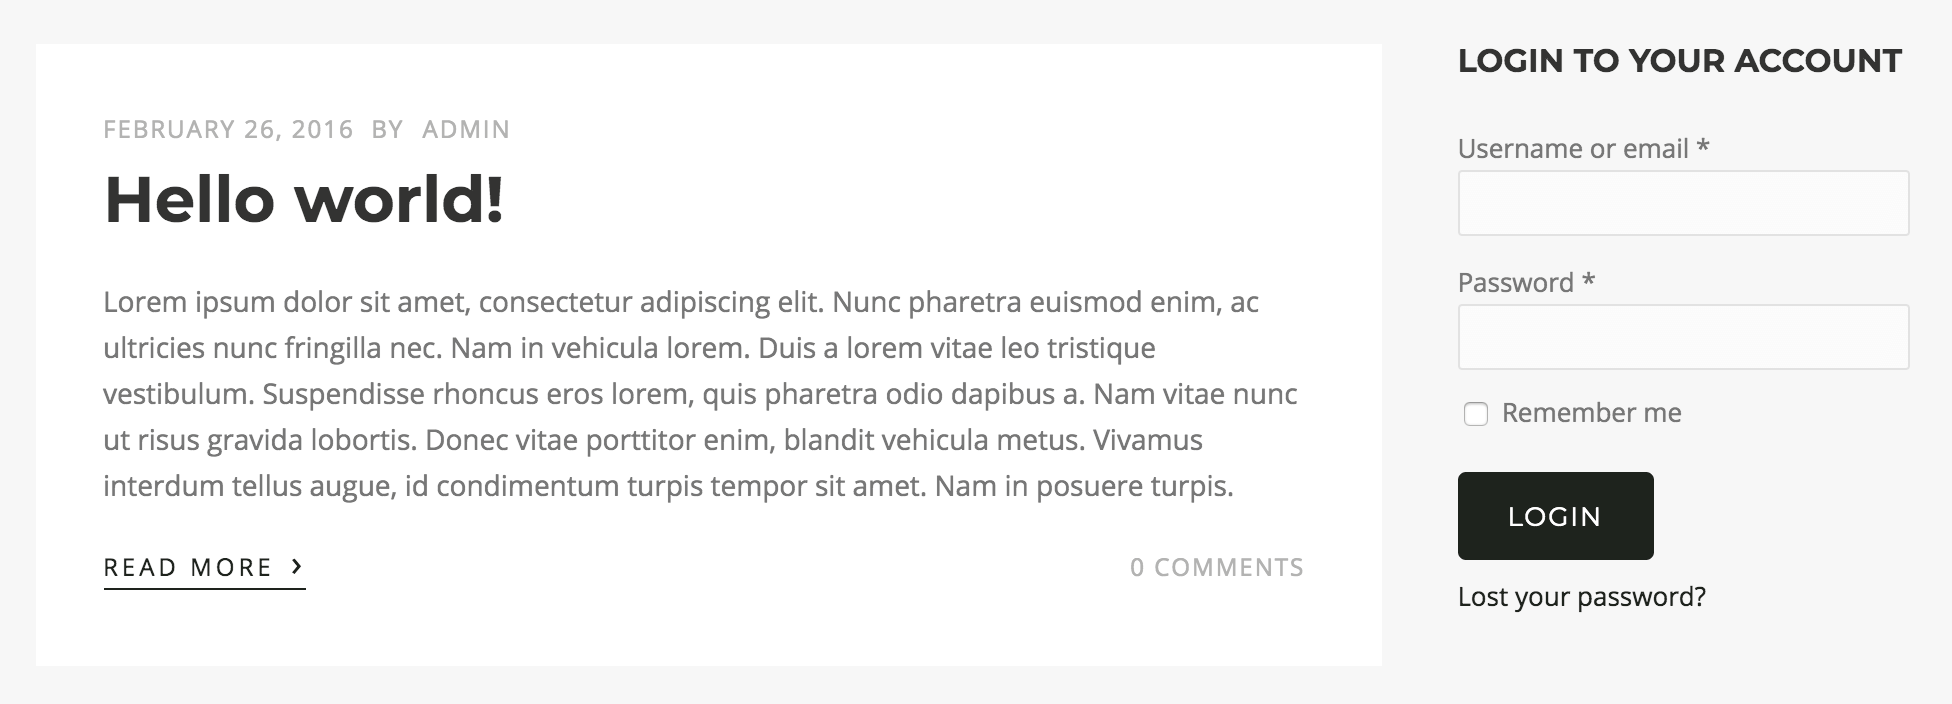
On the other hand, you can use this shortcode in your sidebars. This is my favorite, as it fits nicely in the sidebar area. This is how you create it in your widget areas:
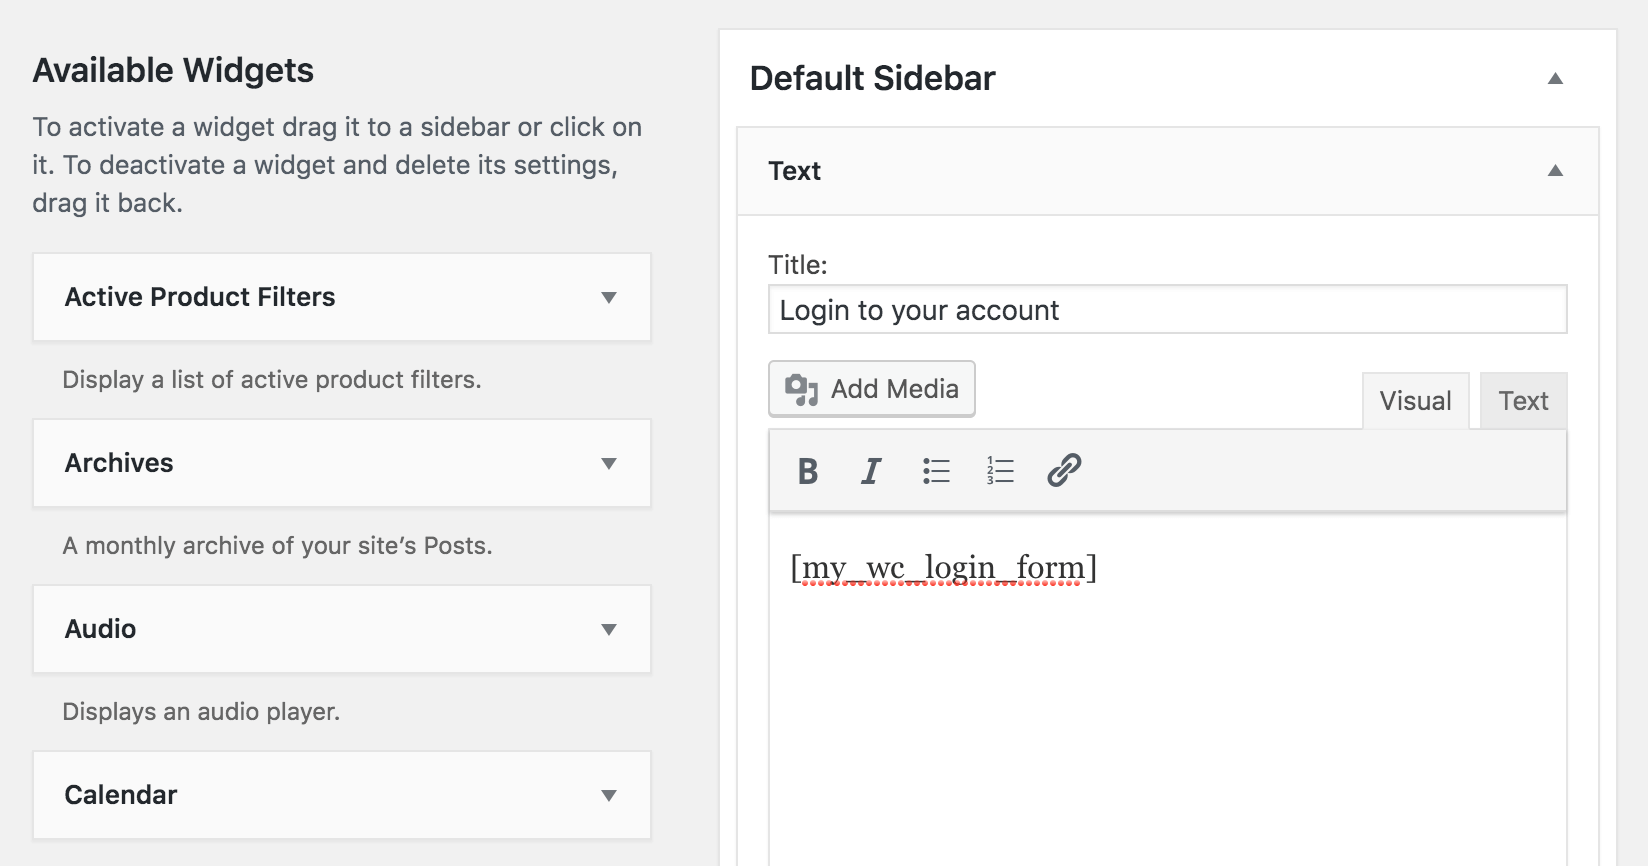
And this is the result we have:
Furthermore, you can use your WooCommerce login shortcode in your template files or inside of other shortcodes. For other shortcodes, this depends on your current plugins. Usually, sliders, columns, accordions, and other elements allow shortcodes in them. For a template edit, you can apply it with this code:
echo do_shortcode('[my_wc_login_form]');
Conclusion
Today, we looked into how to create your WooCommerce login shortcode to enhance the login experience. You can use this shortcode anywhere you want. This makes it powerful for a solution in a page, widget, slider, or even in other shortcodes.
We hope you enjoyed this article and see you again next time!