How to send custom emails to your WooCommerce customers
In this article we are going to learn the different ways to customize the default WooCommerce email template and how to to send custom emails to your customers. We are going to see how to to send emails depending on specific criteria, such as the customer data or the products ordered. We are also going to learn how you can bulk send custom email to your WooCommerce customers.
Customization is key for a good user experience, it’s unlikely that products’s generic, default templates will match your branding and marketing campaign personality. But actually implementing these customizations may be hard depending on the level of customization you would like to apply to your WooCommerce emails. That’s why today we’ll compile different methods and help you with some code snippets. First we’ll look into the build in email customization options that WooCommerce offers but that we’ll take things step forward and provide some custom PHP code to customize the WooCommerce email templates. We’ll walk you through them and we’ll see the advantages and limitations of each approach.

WooCommerce email customization from the dashboard
WooCommerce allows you to tweak and customize each of the email templates they have. In order to do that, you just need to copy the template file to your theme. You can access all emails that are sent under WooCommerce > Settings > Email section:
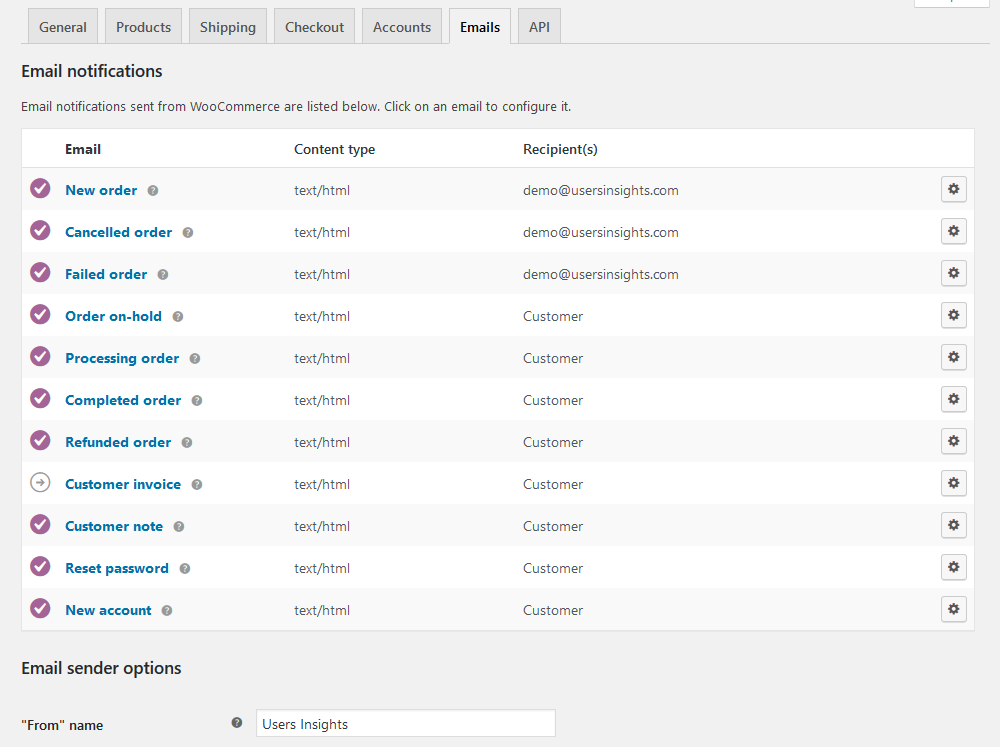
By default WooCommerce sends different email notifications to customers based on their interaction with your online shop. Some of the most commonly used default WooCommerce email templates are:
- New Order: Sent to the WooCommerce store admin when a new order is created by the customer.
- Cancelled Order: Sent to the store admin when order(s) has been marked as cancelled.
- Failed Order: Sent to the store admin when order is marked as Fail.
- Order On hold: Send after an order is placed on-hold.
- Processing Order: Sent to customers after payment.
- Completed Order: Sent to customers when their orders are marked completed (usually indicate that the orders have been shipped).
- Order Refunded: Sent to customers when when their orders are marked refunded.
- Customer Invoice: Sent to customers containing order information and payment links.
- Customer Note: Sent to the WooCommerce store admin when a customer note is added in the dashboard.
- Reset Password: Sent to a customer when they request to reset their password.
- New Account: Sent to the customer when they create a customer account (via checkout or account sign up page).
You can click the Settings/Manage button to the right of the email template if you’d like to edit the email text. You can customize the email subject, heading, content, and type. In addition to these build in emails, you can add customized WooCommerce emails as well.
WooCommerce by defaults offers some basic customization options. You can change some basic look of the email templates, under the WooCommerce -> Settings -> Emails-> Email Options. From there you can change things like the header image, body text color, body background color, background color, footer text, etc. Note that these are global settings and changing these options will update all of your email templates at once.
Customizing the WooCommerce email templates with code
A more effective and powerful approach is to modify the actual WooCommerce email template. There are several different way to change the email template and you can do it without having to change anything in the WordPress plugin itself. In WooCommerce very email type has a template file (For example, woocommerce/templates/emails/customer-on-hold-order.php). Additionally there are shared templates that all email types can access and use. They are located at woocommerce/templates/emails/email-styles.php.
If you click on any of emails under WooCommerce > Settings > Email section, you should see which file you need to copy in order to customize it. For example, if we click the “Order on-hold”, which is the first email a customer gets, you’ll see this:
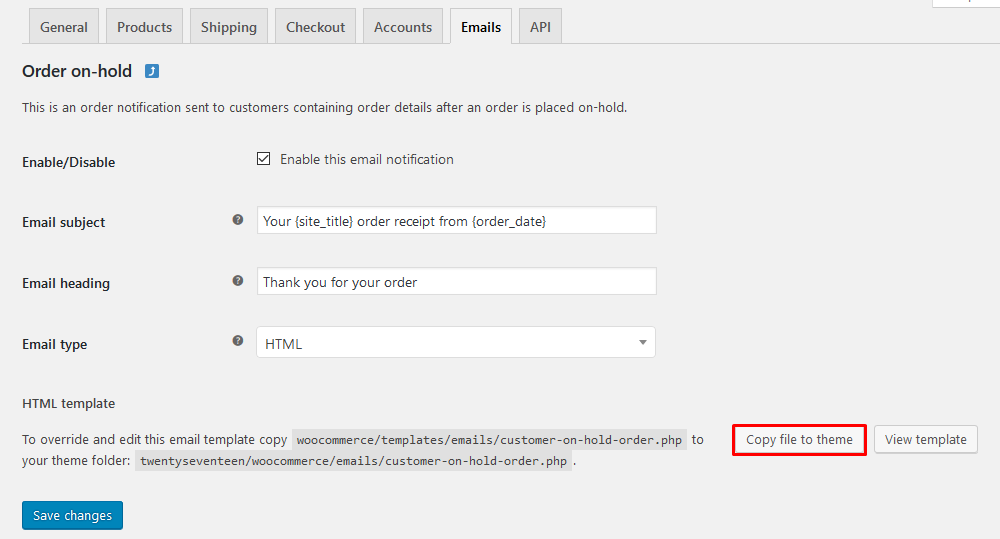
You can click on the “Copy file to theme” button to automatically copy the file in your theme’s folder. From there you can either use the same screen to edit your email template (just click “View template file”).
This allows you to quickly swap the content for that file. But you can also use a bit of PHP code in case you want to customize the messages.
How to customize the WooCommerce email template
When it comes to WooCommerce there are many hooks that you can use for customization. Hooks are the way WordPress uses to allow external code to be run without modifying the original file.
But customizing emails is a multi-step part. That’s because each part of the email is better modified by a different hook. So, in this example we are going to change the email subject and the content separately. You can also add your own email warnings based on certain hooks.
Most of the main email actions have a hook that you can use for customizations. Here are some examples:
- For each of the order status there’s a subject hook – so you can customize the email subject for cancelled, completed, on hold, processing orders. WooCommerce hooks are the go to way to add additional content to the layout of your emails, just keep in mind that hooks will allow you to add content but not modify existing text.
- In your email’s content there are different hooks that you can use – there are hooks for the order table, customer details, items quantity, email footer and others that you can use to add new content in your email
- For each user action there’s a hook – therefore you can customize the emails sent on password reset, when a new account is created and so on
Let’s see some examples of how you can use these hooks.
Customizing the email subject
The first and easiest aspect to customize in your email is the subject. The subjects can be changed with hooks such as:
- woocommerce_email_subject_customer_completed_order
- woocommerce_email_subject_customer_invoice
- woocommerce_email_subject_customer_invoice_paid
- woocommerce_email_subject_customer_refunded_order
These hooks have 2 arguments, the message subject and the order object. The subject is a simple string, that is what is going to be sent to your customer. The order object is the current order that is generating this email.
Let’s say that you want to add some nice words to your customer in the subject, along with their name. You can do that by getting the customer data from the order object. Just add this code to your functions.php (in a theme or child theme) and let’s see the magic happening:
/**************
CUSTOM EMAIL SUBJECT
****************/

//telling WooCommerce to run our custom function on the email subject
add_filter('woocommerce_email_subject_customer_completed_order',
	'uiwc_change_email_subject', 1, 2);

function uiwc_change_email_subject( $subject, $order ) {
	//getting the blogname scaping special chars for email
	$blogname = wp_specialchars_decode(get_option('blogname'), ENT_QUOTES);

	// getting the customer email with a fallback to the email address
	$name = $order->get_billing_first_name()." ".$order->get_billing_last_name();

	// creating our new subject line
	$subject = sprintf( '[%s] Order # %s - You are a star, %s',
		$blogname, $order->get_id(), $name );

	// sending our custom subject back to WooCommerce
	return $subject;
}
This code is composed of a few components:
- create a custom filter function that will be applied to the subject for completed orders
- load the name of the site, so we can use it in the subject
- create a custom emails subject in the format: “Ben’s Bookstore Order #123 – You are a star, Jane Smith”
You can spice up this code by adding other customer information or order information. You can even add multiple random compliments (here we just say “you are a star”).
Customizing the email content based on order value
In the next example we are going to show you can add custom text to your new order email. Since the entire order data is at your disposal you can send custom email after purchase to your WooCommerce customers based on their order data. Here we’ll use the order’s total value as a customization condition. In addition, any of the order’s data can be used.
The following code snippet adds a premium offer in the WooCommerce order email template when the customer has spent more than $100 on this order. This could be any value and could be any message you want to add to your WooCommerce custom email. You could use it if the value is in a certain range if it’s bigger than a certain amount or if it’s lower than a purchase value.
/**************
INVITATION TO PREMIUM SERVICES
****************/

//hook our function to the new order email
add_action('woocommerce_email_order_details', 'uiwc_email_order_details', 1, 4);

function uiwc_email_order_details($order, $admin, $plain, $email) {

	// checking if order value is what we want
	$total = $order->get_total();

	// checking if order order status is what we want
	$status = $order->get_status();

	// if total is greater than our threshold let's check the order status
	if ( $total >= 100) {

		// checking if it's the email status we want (order complete) we show the message
		if ( $status == "completed" ) {
			//using WordPress' function for localization
			echo __( '<strong>Premium offer:</strong> Your order puts you in our VIP list.
				You can <a href="#">sign up for it here</a>.', 'uiwc' );
		}
	}

}
This code has a few differences from what we did before. Now instead of modifying the content we’re adding some extra content. So in this case we’ll use the add_actions hook, instead of a filter. Also, in this case we don’t have hooks for the content for each email type we send to the customer, but we still can find out which one we’ve got.
Here are the main parts of that snippet:
- Hook a function that will be executed on the order details part of the email
- Get the total amount and status of the order
- Add a premium offer if the order is completed and its total amount is $100 or more
Customizing the email content based on the products purchased
In addition, we can check other order details, such as the products bought for and create custom emails per product. You can customize and send custom email after purchase based on the number of products bought, product categories, variations and more.
Of course we are not talking about the standard WooCommerce email notification type of emails send by WooCommerce like: transactional email, order confirmation, order status change, welcome email etc. We are talking about targeted marketing emails send to your existing WooCommerce customers based on their previous order details data. You can significantly improve your email marketing campaign and email marketing overall if you improve your targeted messaging and customize your WooCommerce email templates. Sending emails with specifically tailored messages to multiple email addresses based on their previous order details can improve your conversion rate and your customer lifetime value .
In our example we’ll check if the order has one of the VIP products, and if it does, we’ll modify the order email template to invite the user to join our premium group.
/**************
DIFFERENT MESSAGES FOR DIFFERENT PRODUCTS
****************/

//hook our function to the new order email
add_action('woocommerce_email_order_details', 'uiwc_email_order_details_products', 1, 4);

function uiwc_email_order_details_products($order, $admin, $plain, $email) {
	$status = $order->get_status();

	// checking if it's the order status we want
	if ( $status == "completed" ) {

		// the IDs of our VIP products
		$prod_arr = array( 21, 37, 85 );

		// getting the order products
		$items = $order->get_items();

		// starting the bought products variable
		$bought = false;

		// let's loop through each of them
		foreach ( $items as $item ) {
			// checking if the ordered product is a VIP product
			if ( in_array( $item['product_id'], $prod_arr ) ) {
				$bought = true;
			}
		}

		if ( $bought ) {
			//using WP's function for localization
			echo __( '<strong>Premium offer:</strong> Your ordered products puts you in our VIP list.
				You can <a href="#">sign up for it here</a>.', 'uiwc' );
		}
	}
}
Here is what this snippet does:
- $prod_arr = array( 21, 37, 85 ); creates an array containing the IDs of our VIP products. Here you can set the IDs of our own products that you want to check against
- loop through each product in the order to see if it is one of the VIP products. If it is, add our special offer to the email just by printing the custom message.
It’s also possible to customize your WooCommerce customer emails on different criteria. You can follow the tips from other articles, such as the guide we have for adding custom user fields to the registration form. Then you can add these conditions in your functions or email template. In this case you could also use data, such as your customers’ city, job title, zip code and others.
Bulk send email to all customers who bought a product
Indeed, using the WooCommerce hooks is a great way of customizing your customer emails. But the limitation of this approach is that you can only customize events that will happen. You can’t send emails at will to your customers.
For that we’ll need a different approach – we’ll use Users Insights in combination with MailChimp or similar tool for sending bulk emails.
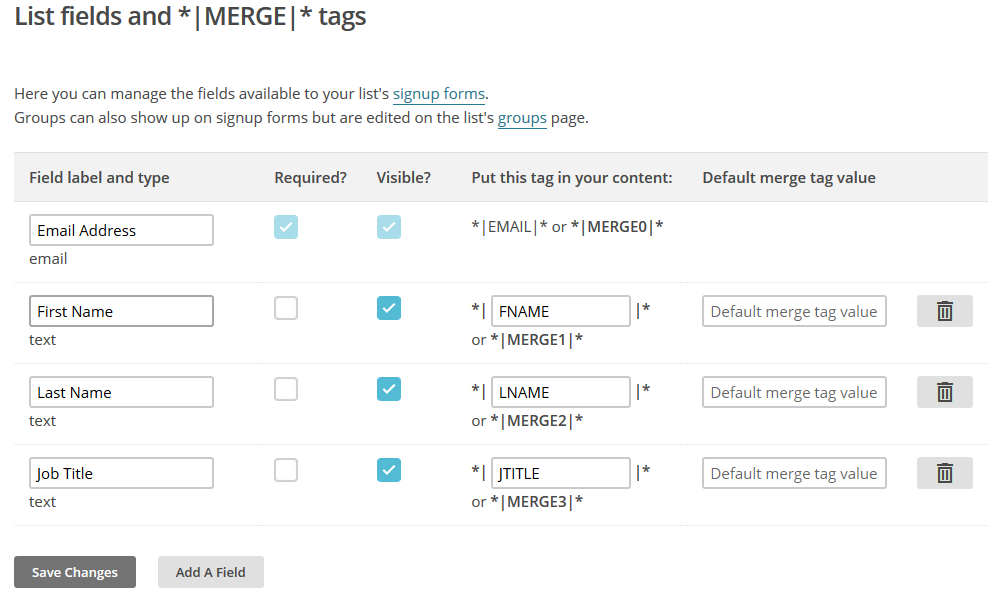
First, we need to select and export our users. In this step, make sure that the fields you want to use in your WooCommerce custom emails are visible. For example, we’ll use the customer name, email, and their job title. We’ll also only filter customers who have bought a certain product and send them a special offer.
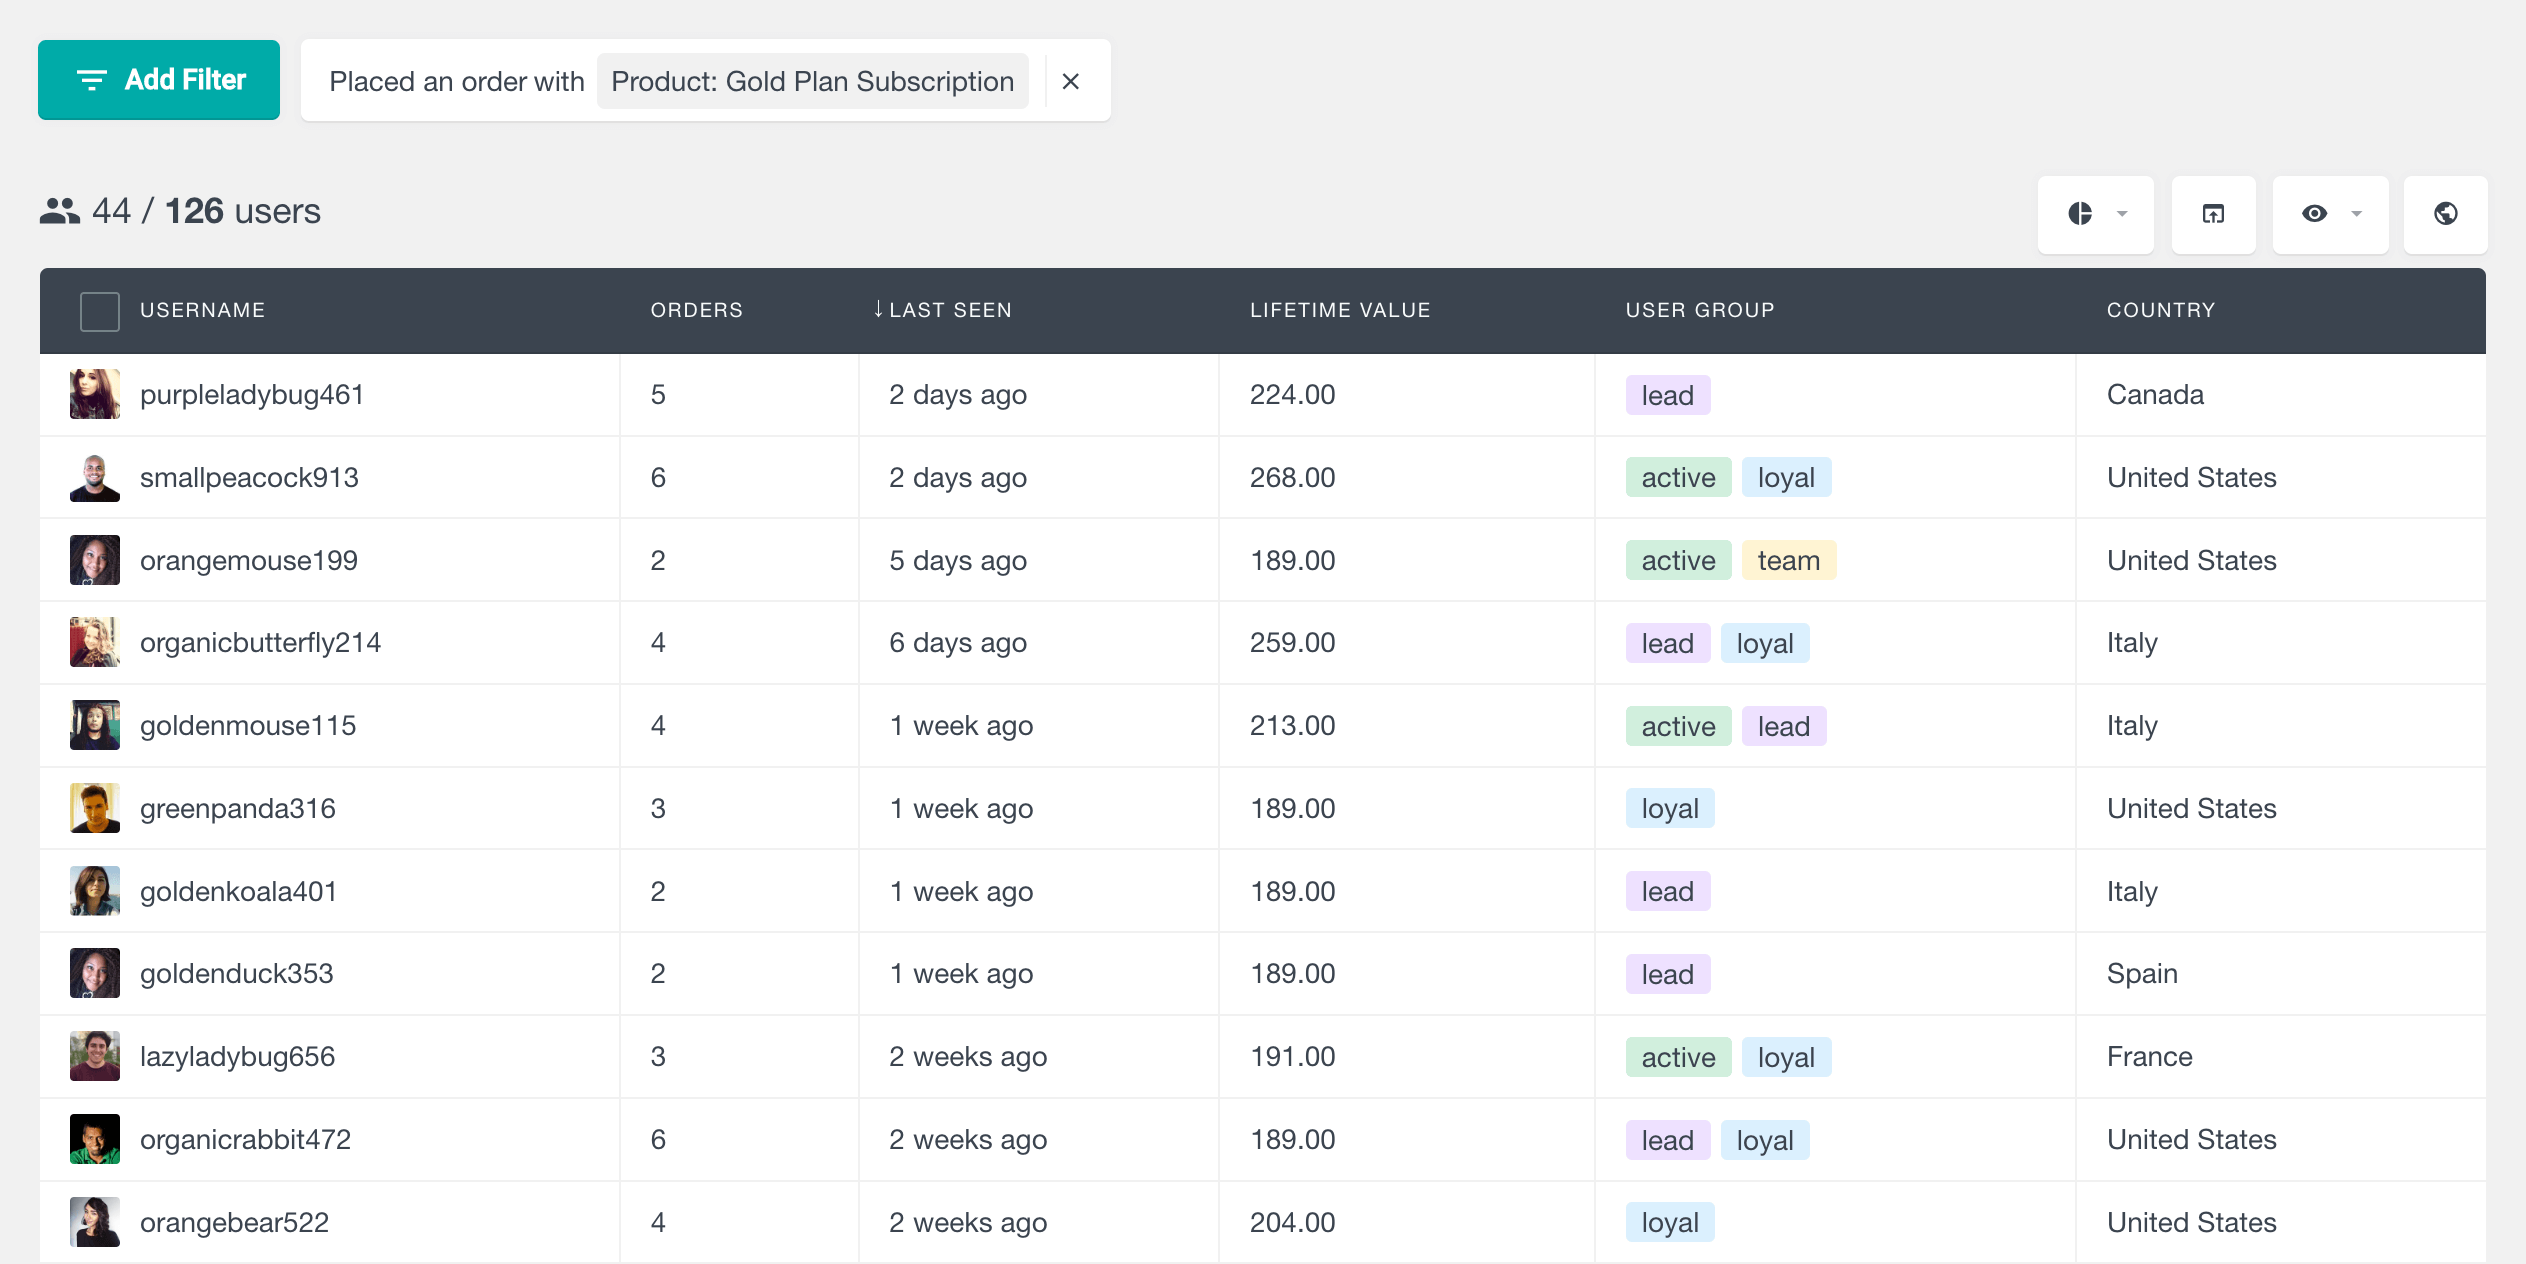
Then we’ll export this selection by clicking the export button:

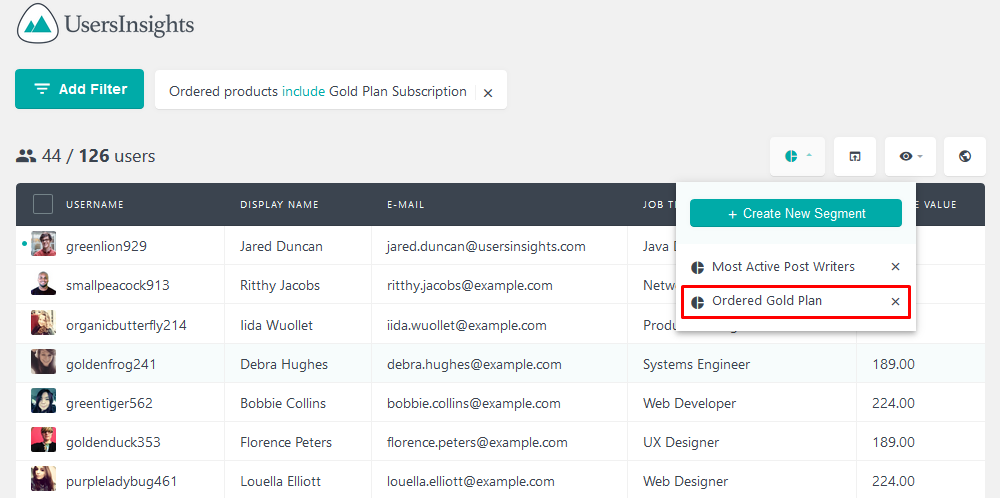
You can save this filter for later use using the Segments feature. Just click the segments button and you can use this selection any time you want.
Now you just need to import the CSV file into MailChimp. Make sure you have the custom fields you want created there so you can map them when importing. This can be done under Lists > Select a list > Settings > List Fields.
Then you can run your import under Add Contacts > Import Subscribers > CSV file.
For more details on how to import your exported user data, you can also refer to our MailChimp and Campaign Monitor user import articles.
Conclusion
Today we looked into the different ways to create and send custom emails to your WooCommerce customers. We saw different approaches, including modifying the default WooCommerce templates and using the custom email actions. Also we also learned how to bulk send custom emails to your WooCommerce customers based on the products that they have purchased.
We hope you found it useful, and see you again next time!