How to add custom fields to your WooCommerce customers
Do you want to be able to add some extra information about your WooCommerce customers? Maybe a phone number of the customer, or a short specific information that your online store needs.
In the following article we are going to show you how to add custom fields to your WooCommerce customer profiles using code as well as the Advanced Custom Fields plugin, WooCommerce registration and checkout page. We will also see how to use the WooCommerce customer custom fields data to search and filter your customers.
Benefits of using WooCommerce customer custom fields
Custom fields allow you to store additional information about your WooCommerce customers. There are a number of different ways that you can use these custom fields to gain a greater understanding of your customers, their behaviour and their needs, some of which are:
- Store additional information about your customers.
- Ability to personalize your customer profile.
- Create custom segments based on your custom fields.
- Improve your customer management and organization.
- Share important customer information internally with your team.
- Create custom fields using plugins like Advanced Product Fields (ACF) to enhance product listings.

What Are WooCommerce Custom Fields?
WooCommerce custom fields are a great way to store and display additional information about your products on your site. They work just like regular WordPress custom fields, but they’re specifically designed to collect information about WooCommerce customers and WooCommerce products. WooCommerce provides some default fields for most products and variations, such as prices and product descriptions. However, if you want to create fields that are unique to your store, you can use custom fields. It is important to mention that in tutorial we are going to focus mainly on customer related custom fields. There are two types of WooCommerce custom fields:
- WooCommerce customer custom fields – We are going to explore in details in this article and
- WooCommerce product custom fields – This type of product fields are usually displayed on the WooCommerce product page and used to add extra product data or to create custom product and add extra product options, product variations and product addons
 The bouth types of fields use the WordPress custom fields functionality and store the data as WordPress user meta or as other type of metadata.
How to add custom fields to the WooCommerce customer registration form
There are a few different ways that you can add custom fields toyour WooCommerce customer data and customer profile. You can assign custom input fields to specific products using conditional rules, ensuring that these fields appear only on selected items for targeted functionality. Some custom fields might be added by a dedicated WooCommerce custom field plugin, and some might be added by the WooCommerce theme. You can also add custom fields to WooCommerce customer data without plugin by adding some custom code to your WordPress website.

Adding custom fields to the WooCommerce checkout page enhances data collection, enabling better customer segmentation and personalized marketing, which can reduce cart abandonment and improve conversion rates. These fields offer insights into customer preferences and potential objections, allowing for more effective abandoned cart follow-ups and tailored checkout experiences.
How do I add a custom field in WooCommerce checkout without plugin
When it comes to WordPress and WooCommerce, almost anything can be done with custom code. And that’s the case for our registration fields as well. It’s possible to actually edit the WooCommerce registration form programmatically when users are in the checkout process.
We’ll need to use some of the WooCommerce hooks to edit the WooCommerce register form and checkout forms fields. The main elements of our customization code are as follows:
- Setup the fields – so it’s very easy for anyone to add or remove fields as they are needed
- Displaying the fields on the WooCommerce checkout page, including how to display custom fields. This ensures that specific custom field values, such as product variations like clothing sizes, are visually accessible to users during checkout.
- Validation – Showing an error message when the fields are not completed correctly
- Saving the fields data – sanitize and save the WooCommerce custom fields
We recommend adding this code to a child theme’s functions.php file or creating a custom helper plugin. Let’s take a look at each part of it.

Unlock the Full Potential of Your WooCommerce Customer Data
Creating the WooCommerce custom fields for the checkout form
The following function registers the WooCommerce custom checkout fields:
/***
    SETUP
****/
function woo_custom_setup_fields() {
    $fields = array(
        array(
            'key' => 'job_title',
            'label' => 'Your job title',
            'placeholder' => 'Your job title',
            'error' => 'Do not forget job title.'
        ),
        array(
            'key' => 'company_size',
            'label' => 'Your company size',
            'placeholder' => 'Your company size',
            'error' => 'Do not forget company size.'
        )
    );


    return $fields;
}
Overall, this function returns our desired custom WooCommerce fields, along with their attributes. Once we do our code in this way, it’s even possible to get these fields from another plugin such as ACF or even from a custom options page, if you want that to be customizable for your users.
Displaying the custom fields on the WooCommerce checkout page
After we have registered the custom fields, we’ll need to setup the data and create the HTML code. :
/**
 * Add custom fields to user / checkout
 */
add_action( 'woocommerce_after_order_notes', 'woo_custom_checkout_field' );

function woo_custom_checkout_field( $checkout ) {
    $fields = woo_custom_setup_fields();


    if ( ! empty( $fields ) ) {

        echo '<div id="bv_custom_checkout_field"><h2>Custom Fields</h2>';

        foreach ($fields as $field) {
            woocommerce_form_field(
                $field['key'],
                array(
                    'type'          => 'text',
                    'class'         => array('my-class form-row-wide'),
                    'label'         => __($field['label']),
                    'placeholder'   => __($field['placeholder']),
                ),
                get_user_meta( get_current_user_id(), $field['key'] , true  )
            );
        }

        echo '</div>';
    }
}
This is needed so that our customers can interact with our newly created WooCommerce registration form fields. This code could be expanded to accommodate multiple sub-sections. The real work here is done by the woocommerce_form_field() function, which creates the HTML needed for the input field based on certain attributes.
You should now see the new WooCommerce customer fields displayed on the checkout page:
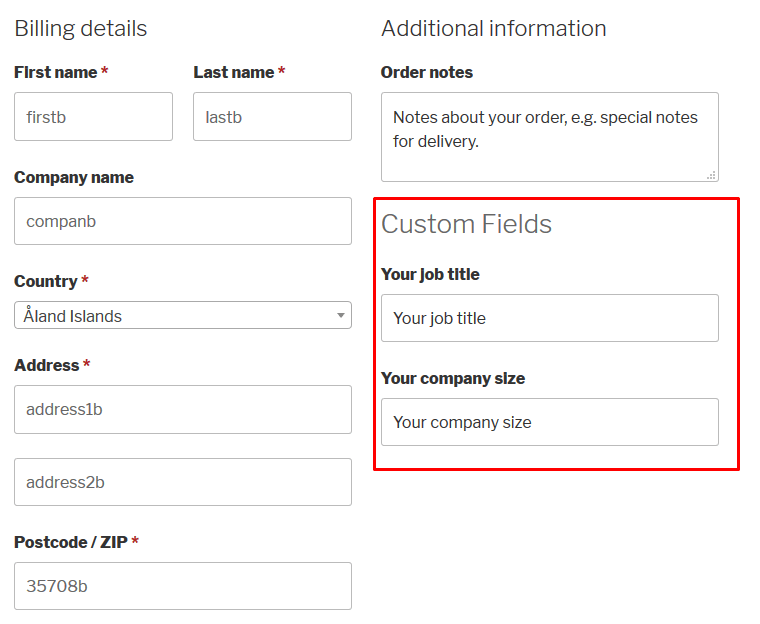
Showing an error message when the form fields are not completed correctly
Now we need to validate the field’s data when the checkout form is posted. For this example the field is required and not optional, so let’s make sure that we show an error message when the customer fields are empty:
/**
 * Verification
 */
add_action('woocommerce_checkout_process', 'woo_custom_checkout_field_process');

function woo_custom_checkout_field_process() {
    $fields = woo_custom_setup_fields();

    if ( ! empty( $fields ) ) {
        foreach($fields as $field) {
            $key = $field['key'];

            if ( ! $_POST[$key] ) {
                wc_add_notice( __( $field['error'] ), 'error' );
            }
        }
    }
}
For this we’ll hook into the woocommerce_checkout_process . Use this code only if your custom fields are required. If some of the fields are required and others are optional, you can add a “required”=>true attribute for the required fields in the woo_custom_fields_setup() function and call the wc_add_notice() function only when this attribute is present and set to true.
Saving the custom fields data
The last part is saving the data:
/*
 * Update field
 */
add_action( 'woocommerce_checkout_update_order_meta', 'woo_custom_checkout_field_update_order_meta' );

function woo_custom_checkout_field_update_order_meta( $order_id ) {
    $fields = woo_custom_setup_fields();

    if ( ! empty( $fields ) ) {
        foreach($fields as $field) {
            $key = $field['key'];

            if ( ! empty( $_POST[$key] ) ) {
                update_user_meta( get_current_user_id(), $key, sanitize_text_field( $_POST[$key], '' ));
            }
        }
    }
}
This code will get the values for each field, and then will sanitize and save them as user meta. Once the code reaches this part, our custom user data is safe in our database.
You just need to replace our demo data (job title and company size) with your own. Lastly, don’t forget to keep the exact same array key names (key, label, placeholder, error). You can copy and paste the second bit if you need to more fields.
Updating the custom fields from the profile page
Once you have added the custom fields to your checkout form, you might also want to provide your users an option to update their WooCommerce custom fields data at a later point. This can be accomplished by creating a custom WooCommerce profile page, where your users can update their custom fields, as well as their general details (like name, billing address, etc.)
You can easily accomplish this by using the Advanced Custom Fields (ACF) plugin as checkout field editor. We already have a guide on this entire process – if you are interested, check out the article on Creating custom user profile pages with ACF. The article includes detailed instructions, so here we’ll only share the WooCommerce specifics that you need to know.
Once you have ACF plugin installed and active, you can create a new field group to contain the form for the profile edit page. Just create a field group and make sure to set its rules to be visible to all users. Then add the default fields and your custom fields. In our example, we’ve recorded the company size and job title, but you can add as many fields as you want.

Once these fields are created, just follow the instructions from our ACF profile page article to create the [my_acf_user_form] shortcode to load them in a page. So, whenever you need to load a profile edit page you can just paste that text in the page’s content.
And that’s it. You are ready to create a new menu item for the profile edit page with the custom fields as well as WooCommerce’s default fields.
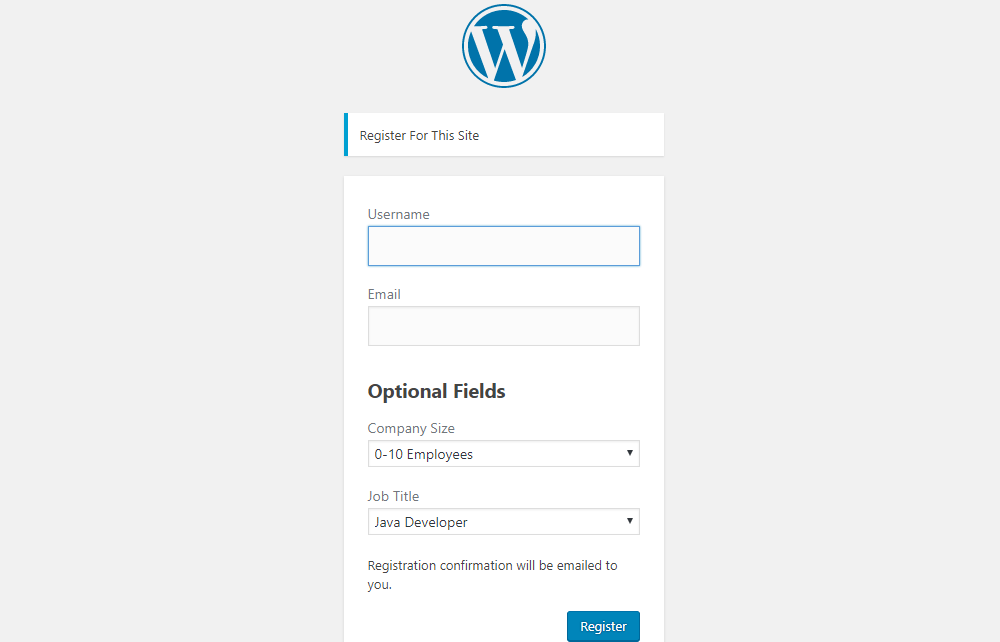
Adding the custom fields to the WordPress registration form
If you have a WooCommerce store where some of the users register before making a purchase, you might also want to add your custom fields to the default WordPress registration form. In this way, you will also have these additional fields pre-filled once these users go to the checkout page. We have another detailed guide on how to use ACF for user registration and segmentation, that you can check out for detailed instructions.
Overall the process of adding the fields is the same as above, just create a new fields group, and add them to all users. Once you do that the WordPress registration page is going to include these fields:
Load and display WooCommerce custom fields
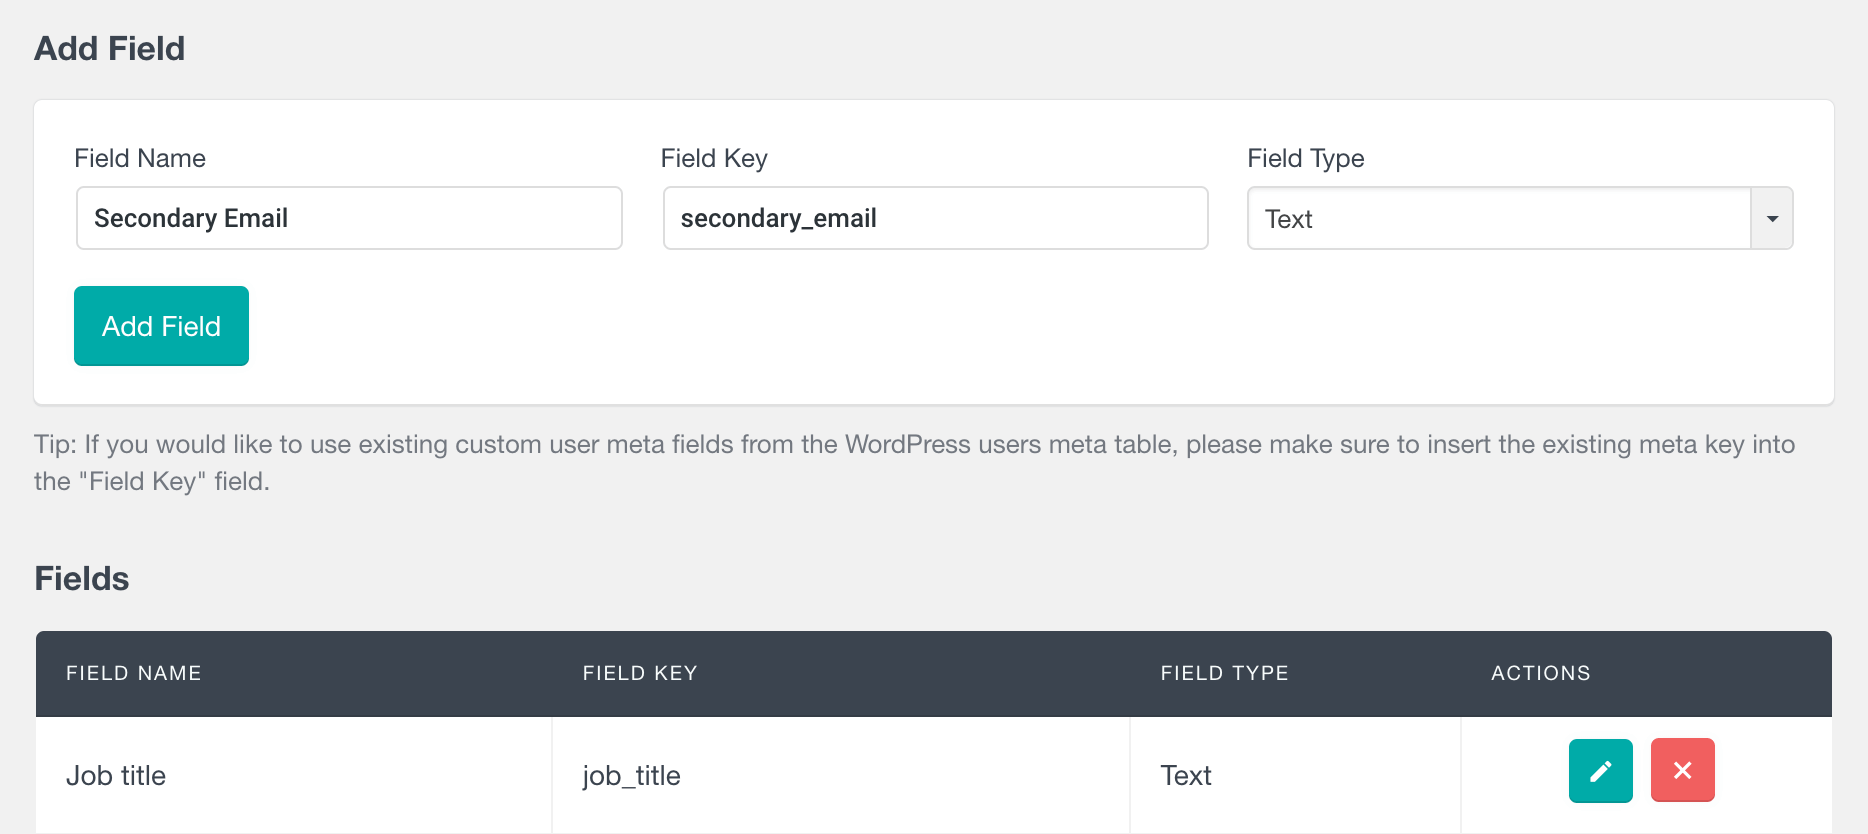
The custom fields feature of Users Insights can be accessed from the Users Insights -> Custom Fields menu in your WordPress dashboard. When you open the Custom Fields page, you will see a form that allows you to create your own custom user fields. All the existing custom user fields, if any, will be listed in a table below this form.
The form for creating custom fields consists of three fields. The first one is the name of the custom field. The name will used to identify the field in the Users Insights user table, custom user profile section, as well as in the Users Insights filters. The second field is the user meta key. This is the name under which the new custom field will be saved in the database. The key should be in the following format: “example_user_key”. You can also use existing meta keys if you already have some customer data stored as user meta. For example the data form the custom checkout fields stored as user meta by the WooCommerce checkout from form the example above. The existing user meta will be automatically detected in the Users Insights table and custom profile page. The third field is a drop down select option that gives you the option to choose the type of the field. Currently, the custom fields feature supports text and numeric field types.
Custom fields allow you to store additional information about your WooCommerce customers.
Let’s say, for example, that you want to create a custom field that you want to use to store an alternative email address of your customers. The data of this extra field will be a standard text field with a field name of “Secondary Email” and it will be added to the customer account page and the users table. This might be a different email from the one set as a main account email address. In order to add a new custom field, all you need to do is to create a new field called “Secondary Email”, select a key name and choose the field type. For this example, the type of the field will be “text”.
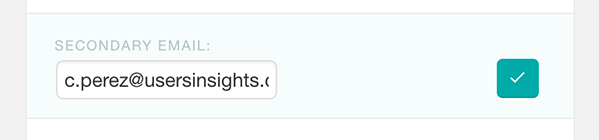
Adding and editing the custom field data of a customer
If we now open a Users Insights customer profile, we will see the newly created field listed in the customer details section. You can access the profile section by clicking on any customer’s username in the Users Insights table. You can update the data of this custom field by clicking on the edit button next to the field name. To save the changes just click on the “done” button.
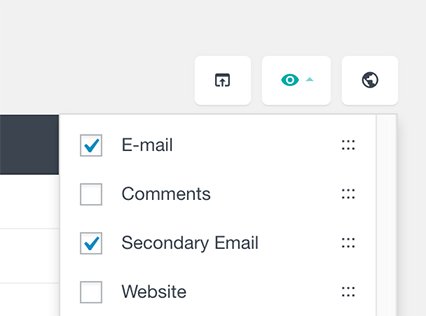
Display custom fields data in the user table
All the custom fields that you have created for your WooCommerce customers are also automatically available in the Users Insights table. If the newly added custom fields are not visible in your customer table, you will need to make them visible first. You can show and hide the table fields by clicking on the “eye” icon in the top right menu of the Users Insights page.
Filtering your WooCommerce customers by the custom field value
The custom fields are also available in the Users Insights smart filters. This means that you can search and filter your customers by their custom fields data. For example, if you want to see all the customers who have a second email address set, you can use the filter “Secondary email is set”:
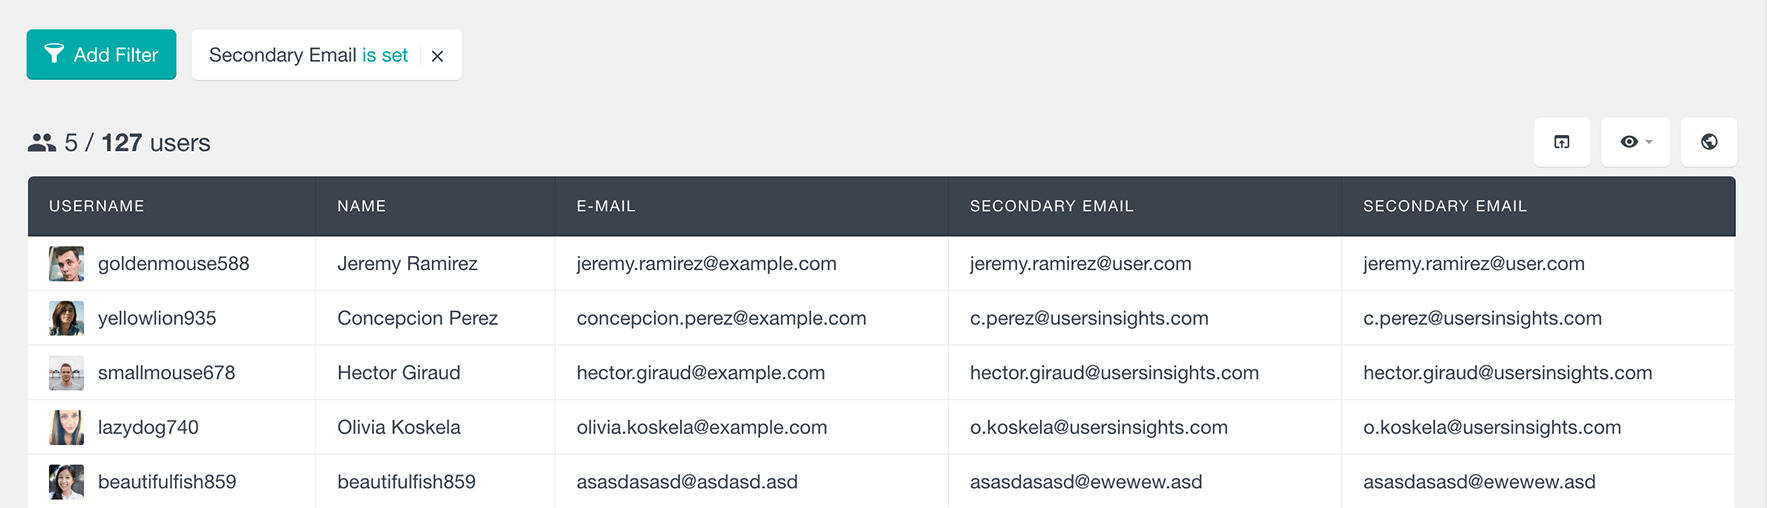
This will show you a list of all the customers who have custom field value into their secondary custom field.
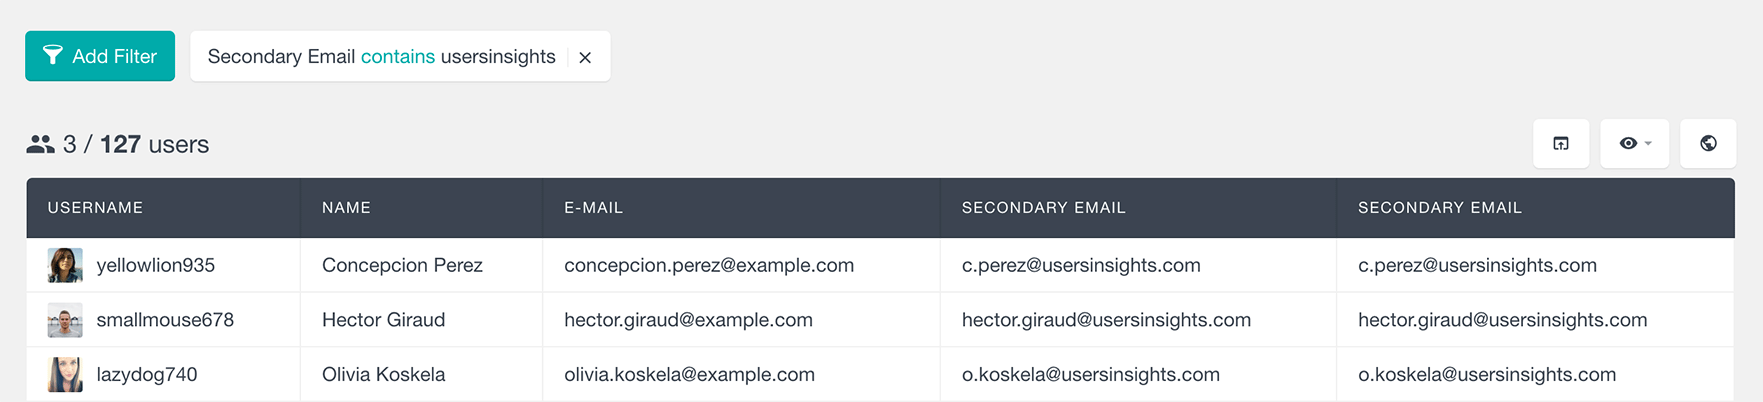
If you want to search for a specific email address, you can use the filter “Secondary email contains” and type the email address you are looking for:

You can also use the same filter to search for a range of emails. For example, to find all the customers who have a secondary email address set as a “usersinsights” email account, you can add the filter “Secondary email contains usersinsights”:
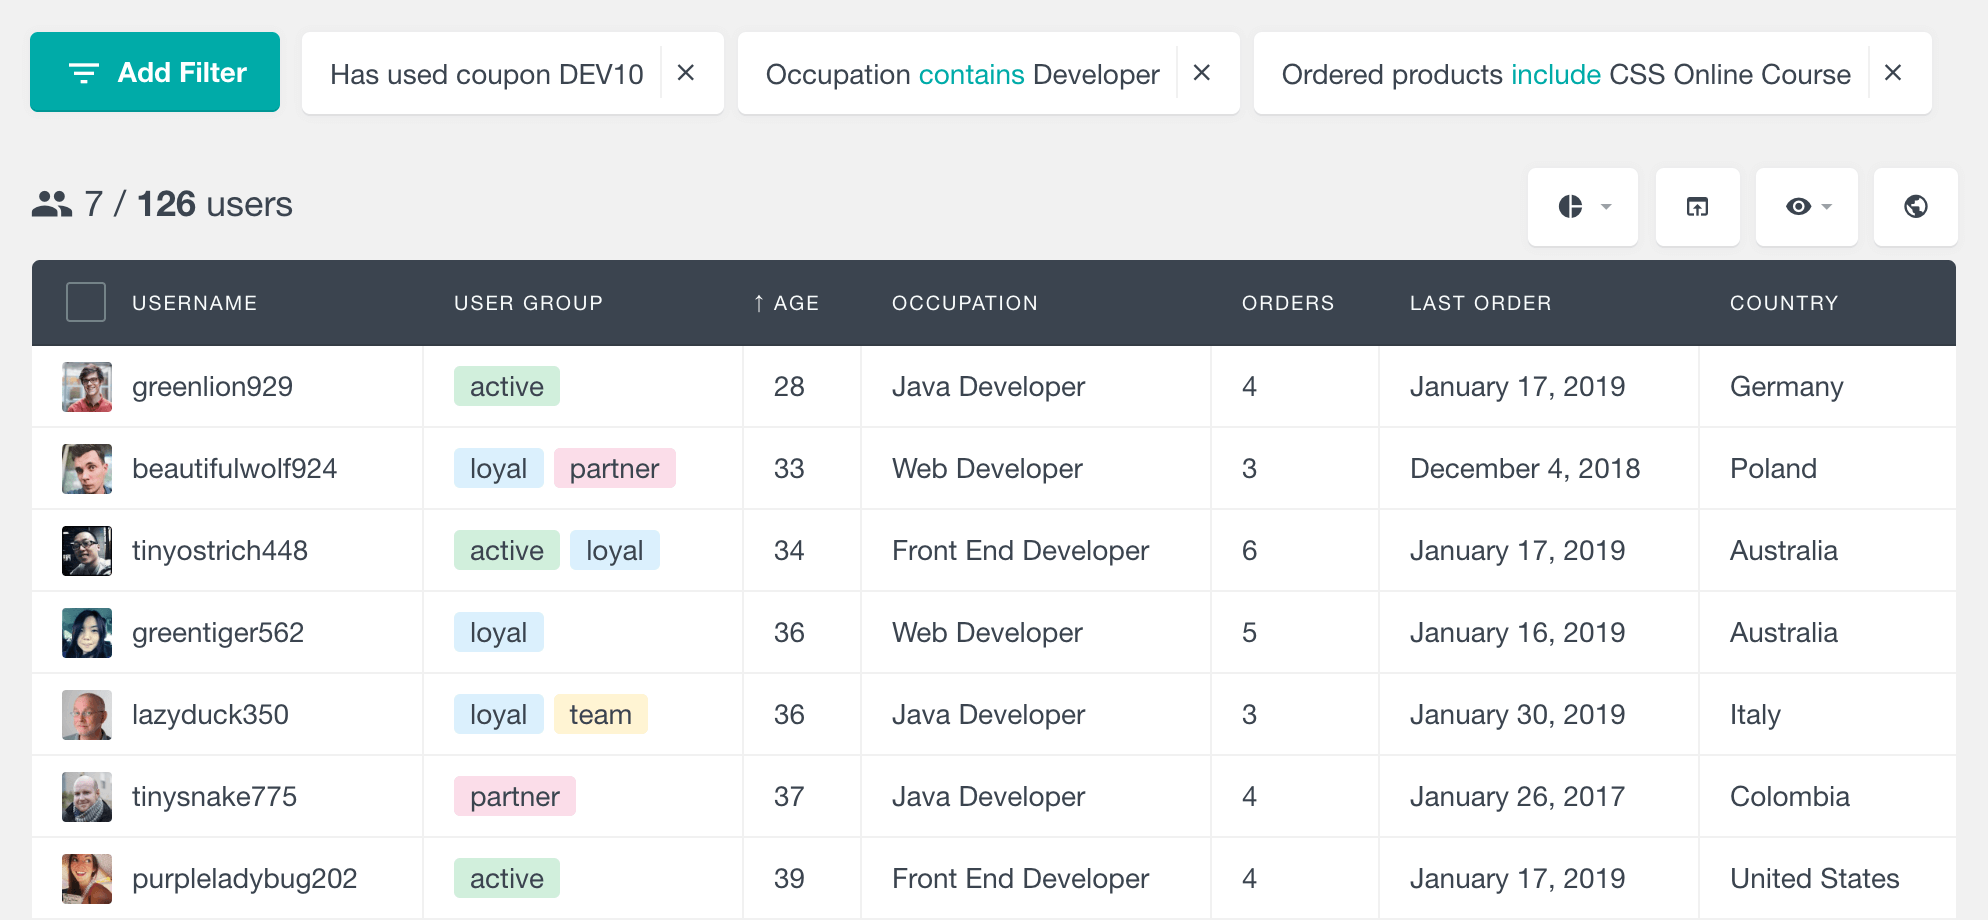
Combining the custom fields with other filters
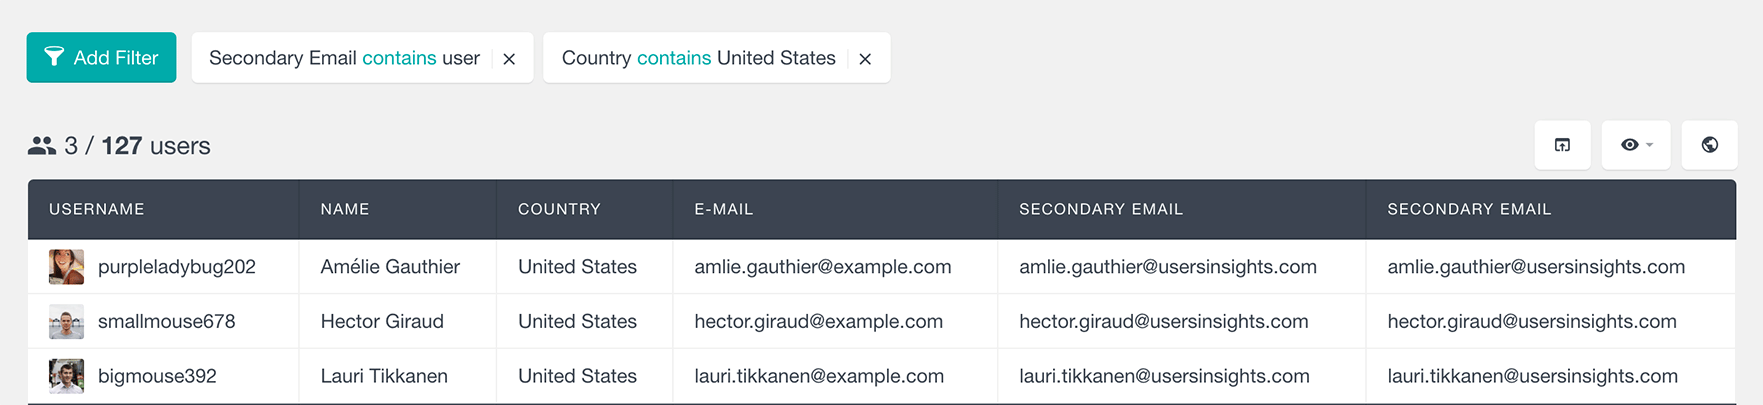
Since the Users Insights filters are stackable, you can use multiple filters at once. This means you can combine the custom fields filters with the rest of the filters that Users Insights provide. An example of this would be to find all the customers who have a secondary email set from a specific domain and are from the United States:
Some of the most important data in your business is the data that comes from your customers. It’s very important to manage your customer relationships well. As you can see, using custom fields to store extra additional information about your customers can be quite useful in many different situations. This can be done by adding extra data to your customer records and managing them better. We hope that this article helped you learn how to create WooCommerce customer custom fields, as well as how to use the data from these fields to better organize and manage your WooCommerce customers.