Creating custom user profile pages with ACF
In this article we are going to show you how you can use the Advanced Custom Fields plugin to easily create a custom front-end user profile page.There is no doubt that customization is one of WordPress’s strongest features. It allows you to store data in the way you want it and display it as you need it. But in order to do that you need to know how to create custom fields for your registered users. Also, you’d need to create a custom reporting tool to read all this data from the custom fields. If you aren’t a developer yourself, or just don’t want to spend long hours coding a plugin for this, using a premade plugin may be your best solution.

That’s why today we’ll show you how you can use the Advanced Custom Fields (ACF) plugin. Paired with a bit of code you’ll be able to not only create your own user fields but also create a page to allow your users to update their own fields.
In short, our goals for today are:
- Installing Advanced Custom Fields (ACF)
- What can I do with ACF – free?
- How to create custom fields
- Create a user profile page with ACF
- Read your custom data with Users Insights
Installing ACF
You can install the Advanced Custom Fields plugin the same way you’d install other plugins from WordPress’ repository. The easiest way is installing directly from your WordPress Dashboard > Plugins > Add new and search “Advanced Custom Fields”.
Just click install and you are ready to go! Now let’s see what you can do with this plugin.
What can I do with ACF – free?
Advanced Custom Fields is a plugin that makes it easy to create blocks of custom fields. These blocks can be used on your custom posts, pages, custom post types, users, attachments, and taxonomies.
The plugin is easy to use, but it also allows you to apply complex logic rules to your fields. For example, you can apply fields just to posts of a certain category or even to a specific post.
You can also use this plugin to hide default fields from your post or user edit screen if you want to. And this plugin has many hooks that can be used to extend your functions even more.
There are many great uses for it, but today we’ll focus on the custom fields for users.
How to create custom fields
Applying custom fields to your data is really simple. First, you need to create a new custom fields group under WordPress Dashboard > Custom Fields > Add new.
Now you can create all the fields you want. In our example, we’ll store the company name, but you can add as many fields as you want (for example company size, user role, satisfaction ratings).
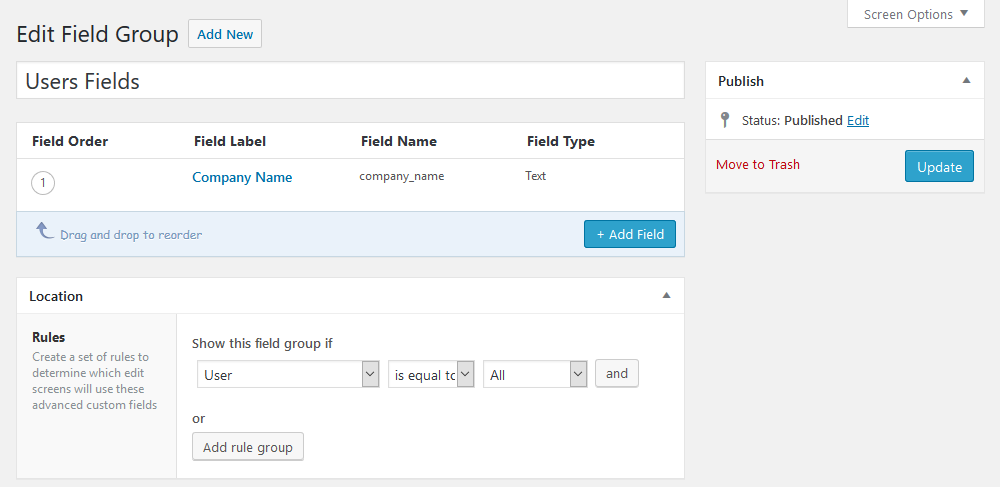
After you hit publish, you’ll see that your URL now contains your field group ID. In our example the URL turns into /wp-admin/post.php?post=220&action=edit. This means that the field group ID is 220. This number is important further on when we’ll be creating the front-end page for the user profile.
Additionally, as soon as you save the field, it should appear in your user edit screen, under WordPress Dashboard > Users > Edit

Often we don’t want to give users access to the admin section, so it’s time to create their profile page.

Create your own custom WordPress user profiles packed with details
Create a user profile page with ACF
The user edit page will require 3 main components:
- PHP function to create a form shortcode
- PHP function to process your form data
- A page using these shortcodes to input / output user data
We will now be adding some custom PHP code. It would be better to add this new code in a child WordPress theme or even in a custom code snippets plugin, so you won’t lose your code during future updates.
We’ll now create a shortcode [my_acf_user_form] to display a form in your page and allow users to enter their data. In order to make this customizable, we’ll accept the attribute field_group=ID for the ACF fields group ID. This shortcode can be added to any page, as long as you use a valid ID for a group of fields that will edit user data.
The PHP code itself is this one:
function my_acf_user_form_func( $atts ) {

	$a = shortcode_atts( array(
		'field_group' => ''
	), $atts );

	$uid = get_current_user_id();

	if ( ! empty ( $a['field_group'] ) && ! empty ( $uid ) ) {
		$options = array(
			'post_id' => 'user_'.$uid,
			'field_groups' => array( intval( $a['field_group'] ) ),
			'return' => add_query_arg( 'updated', 'true', get_permalink() )
		);

		ob_start();

		acf_form( $options );
		$form = ob_get_contents();

		ob_end_clean();
	}

    return $form;
}

add_shortcode( 'my_acf_user_form', 'my_acf_user_form_func' );
Let’s explain a little bit the ACF related functions:
- $options – this variable stores your form settings, the variable name itself won’t affect your code as long as you replace it in both instances
- post_id – this is probably the most important part of the code – This tells the ACF form function that this form won’t update a post, but it will update a user and the ID of the user is the $current_user->ID (the logged in user’s ID)
- field_groups – sets the ID of the field group that is set in the shortcode. Since this option expects an array of IDs, we need to convert our string ID to an array containing the ID as an integer.
- return – this will tell the acf_form function what URL it should send the data to, since the acf_form_head is in this same page, the data is sent to this page with an “updated” attribute
- acf_form($options) – this will actually run the function with the options we’ve just added
Since we have the HTML form created we need a function to actually save the data sent to it. This is done with this other snippet:
//adding AFC form head
function add_acf_form_head(){
    global $post;

	if ( !empty($post) && has_shortcode( $post->post_content, 'my_acf_user_form' ) ) {
        acf_form_head();
    }
}
add_action( 'wp_head', 'add_acf_form_head', 7 );
What this code does is call the acf_form_head function in the head of your page. This function loads all the required assets and code for our user profile fields form. This code is only added on the posts / pages that have the shortcode that we are using – this will avoid loading the ACF head code on the rest of your pages.
Now regarding the fields group, you probably have already created your own. But if you want your users to be able to edit their own default fields, you can just recreate them in your field group. For example, if you create a field named “first_name”, then any data you add there will replace WordPress’ original First Name field.
Just make sure that all your desired fields are in your field group (and in your desired order) and you are all set for this part as well.
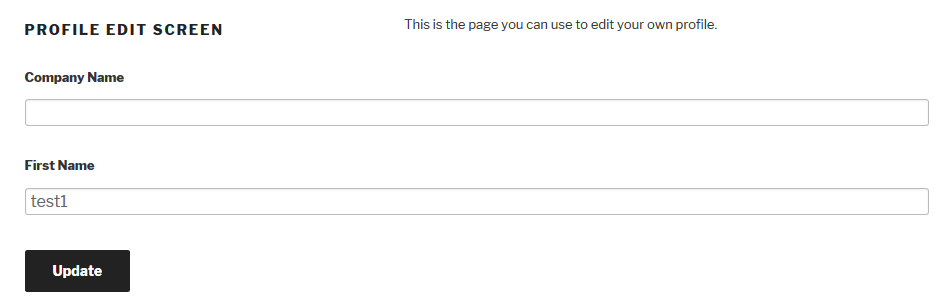
It’s time to create a page with this shortcode and it’s as simple as adding the following shortcode to your page:
[my_acf_user_form field_group="220"]
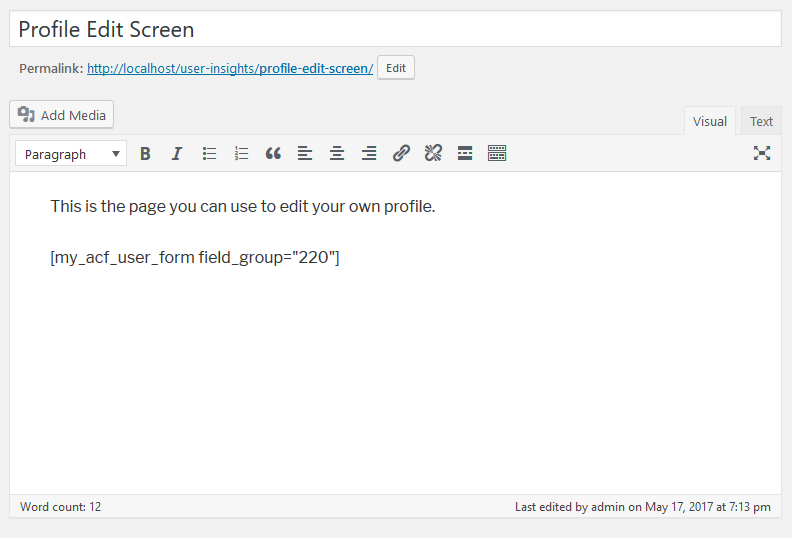
Just make sure to add the correct ID for your fields group (in our case 220). And just like that your users can now edit their own data.
Although collecting your user data is nice, it would be even better to actually use them in your decisions. That’s what we’ll see in the next section.
Read your custom data with Users Insights
All these custom user fields can be loaded and used in the Users Insights filters. But before doing that we just need to tell Users Insights that these fields exist. For this we are going to use the Custom Fields feature. This process is called mapping, in short, we assign our custom labels to fields that are already in your database.
You can do this under WordPress Dashboard > Users Insights > Custom Fields. You can add anything you want to the “name” field, but the key has to match the one you added using ACF. So, in our example, the Company Name is “Company,” but the key has to be “company_name” so we can read the data in that field.
You just need to do the same for all the fields you want to map and you are all set. Now you can use this field in your own filters:

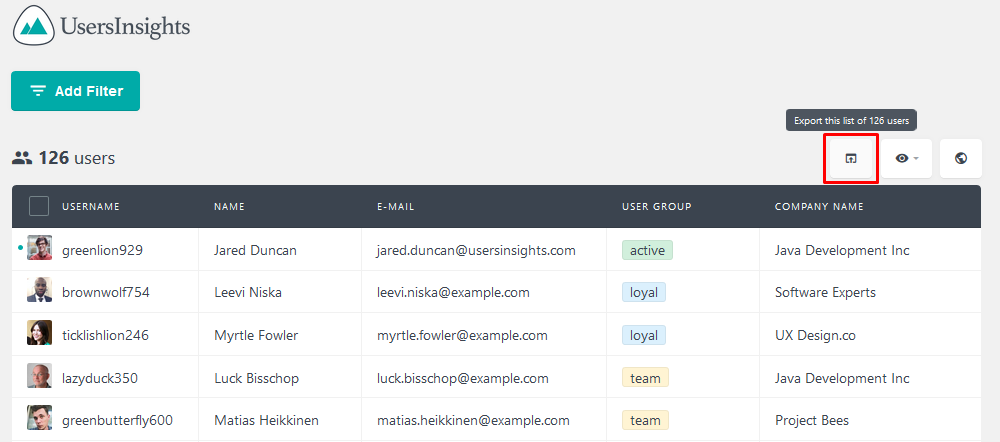
Also, as usual, these fields can be exported assuming that the columns are visible when you click the export button.
Conclusion
Today we learned how to install and use the ACF plugin for user custom fields registration. We also saw how you can use some custom code to create a custom user profile page.
After all, we also found out how you can use this newly added data in your filters with Users Insights. This will allow you more precise filters and you’ll be able to make much more sense of your user data.
We hope you enjoyed it, and see you next time!