How to import WordPress users to Campaign Monitor with custom fields
In this article we are going to show you how you can export your WordPress users with their custom fields, so you can import them into custom segmented lists on Campaign Monitor.
It’s a great idea to create a newsletter for your current WordPress users. But it’s even better to create segmented lists so you can give them the most accurate information based on their profile and needs. Also newsletters perform much better when you are able to do some kind of customization. From simple greetings by name, to more complex connections, such as using the user’s company name in your content.
Therefore, we’ll make use of the User Insights segmentation feature to create different user lists and then export these lists as CSV files. After that we’ll see how you can import this CSV file into Campaign Monitor so you’ll be ready to send segmented and customized emails.
The topics for today are:
- Planning your export
- Filtering your users
- Selecting your custom data
- Exporting your custom data
- Adjusting your data
- Importing your WordPress users into Campaign monitor
So let’s get started!

Planning your export
You first need to outline your desired segments and your desired metadata. Make sure you write down all your desired fields such as the user’s name, user group, company, previous orders and others.
By creating different segments you’ll know which user groups you’ll target, and by outlining your custom fields you’ll know what kind of customization you can have in your messages and in your lists.
For example, you can send different campaigns for users with different primary languages. But you could not only include a nice standard name customization (“Hey [name]”) but also more creative customizations (“how are things going at [company]?” or “thanks for your [product] purchase last month!”).
So your main goal at this point is figuring out all the custom information you need for your lists, and their segments. Once you have that planned we can proceed to filtering and exporting your data.
Here are some ideas for segmentation and custom fields:
- Based on location
- Any custom user meta fields (e.g. birth date, gender, company name, etc.)
- Last activity
- WooCommerce customer lifetime value
- Ultimate Member custom fields
- BuddyPress xProfile fields
- User interests gathered via surveys
- Submitted Gravity Forms
- User courses, via Learndash
- Stores visited
Filtering your users
Let’s take a look at some examples of how you can apply different filters with Users Insights.
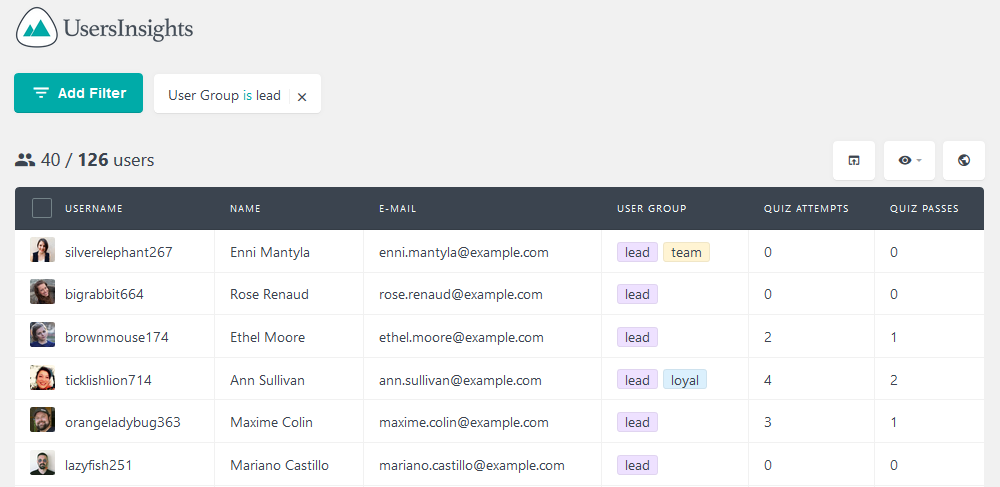
If you want a list by the user group, for example, you could use this filter:
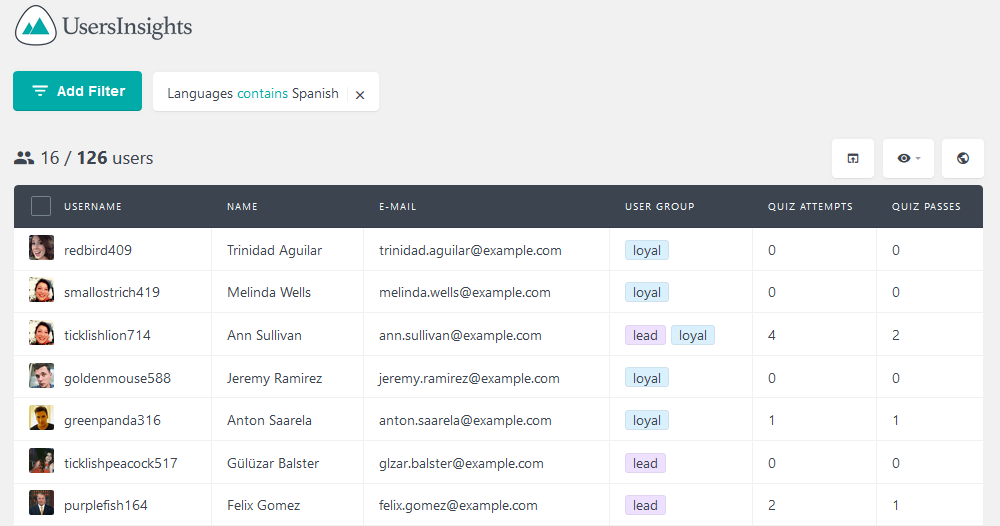
If your goal is to target users by language you could use this instead:
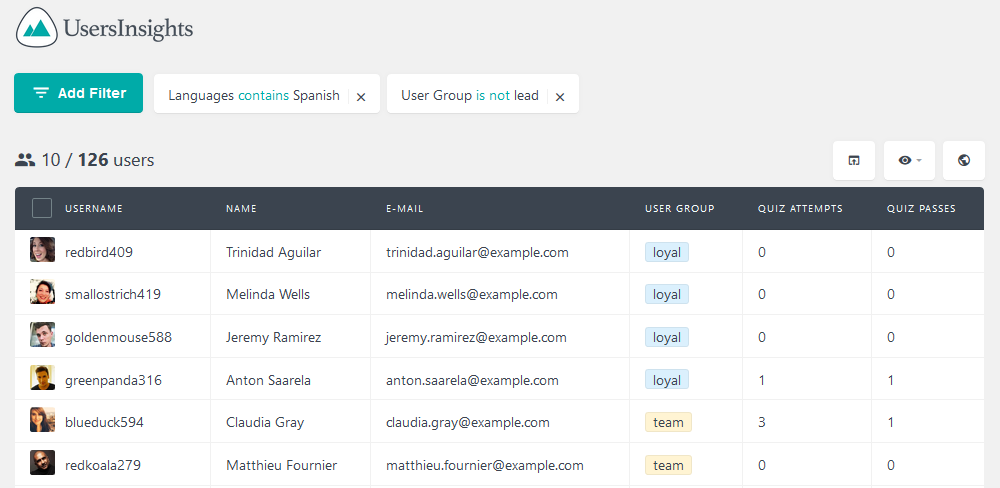
It’s time for you to get creative and implement your segmentations planned. Just make sure to avoid overlapping (unless it’s intended), and for that you can use the NOT criteria. For our example, first we create a list with the users of a group. Then you want another list, but only with users who speak Spanish and aren’t in the previous list. For this you can use the “user group is NOT …” filter:
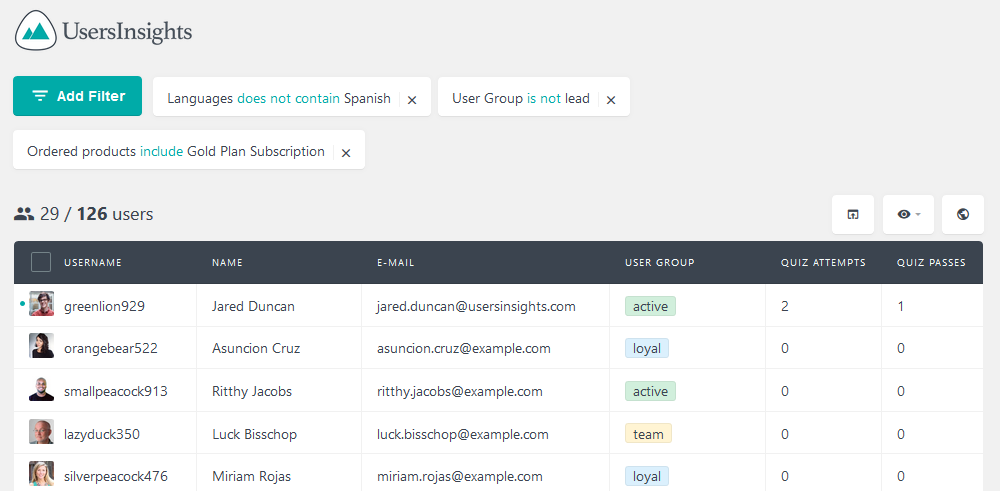
If you intend on having multiple lists with no duplicates, just make sure to stack up the inverted criteria of the previous searches. So if you want to create yet another list following our example for users who bought the Gold Subscription WooCommerce Subscription you’d have something like this as your filter:
Selecting your custom data
Now that all your filters are ready, select the user fields that you would like to export. This step is rather simple, just make sure you have all your desired columns visible by clicking the eye icon:
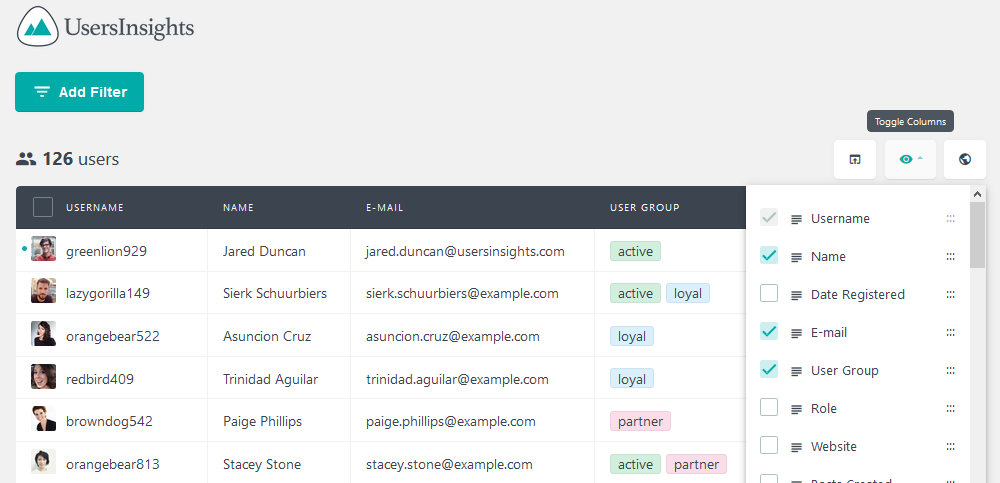
You could, as well, have different fields for each segments. Just hide / show them as you need to.
Exporting your custom data
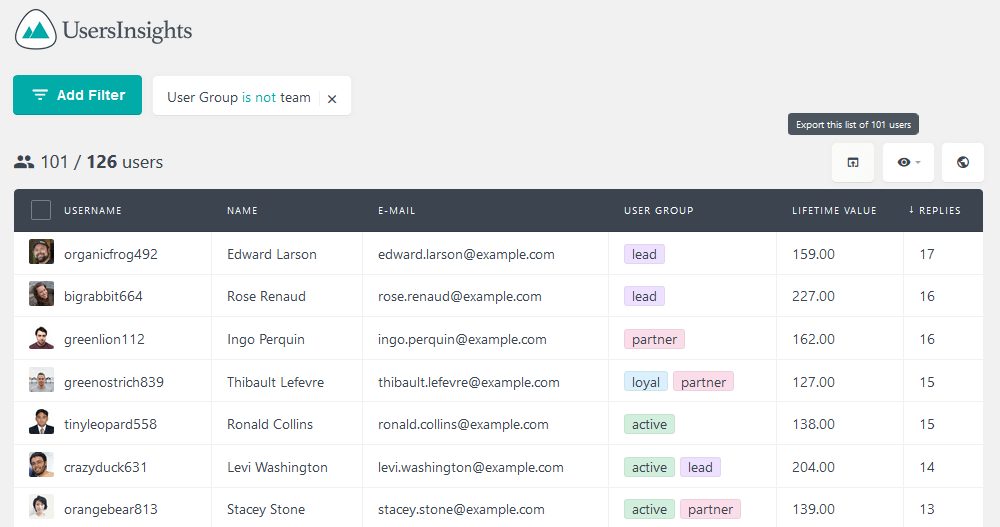
Once you have all your data set up and all your custom fields visible, it’s time to export your data. For that you can use the export button.
In this section you can also the number of users that are going to be exported:
Just make sure you do this for all of your segments so you’ll have different import files. Also, at this point make sure you have visible all the columns (custom fields) you want for each segment. You can have different columns in different segments though, as each of them will be imported separately.
Importing your WordPress users into Campaign Monitor
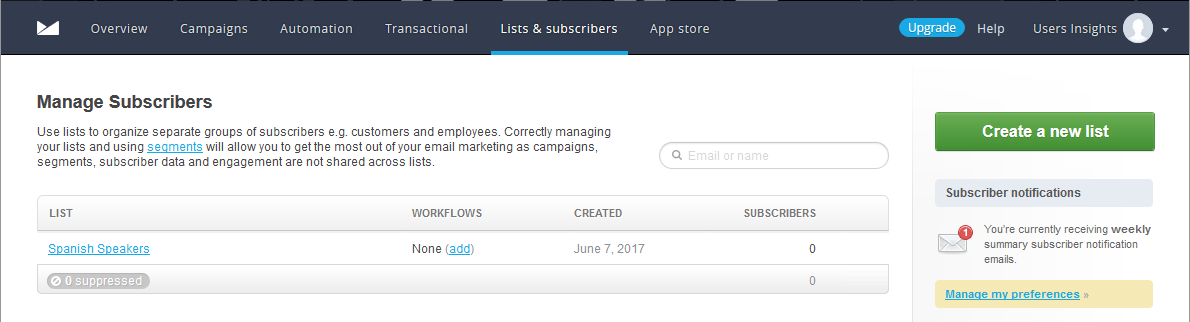
You can import all these users into Campaign Monitor via CSV import. First create a new list, or select an existing one:
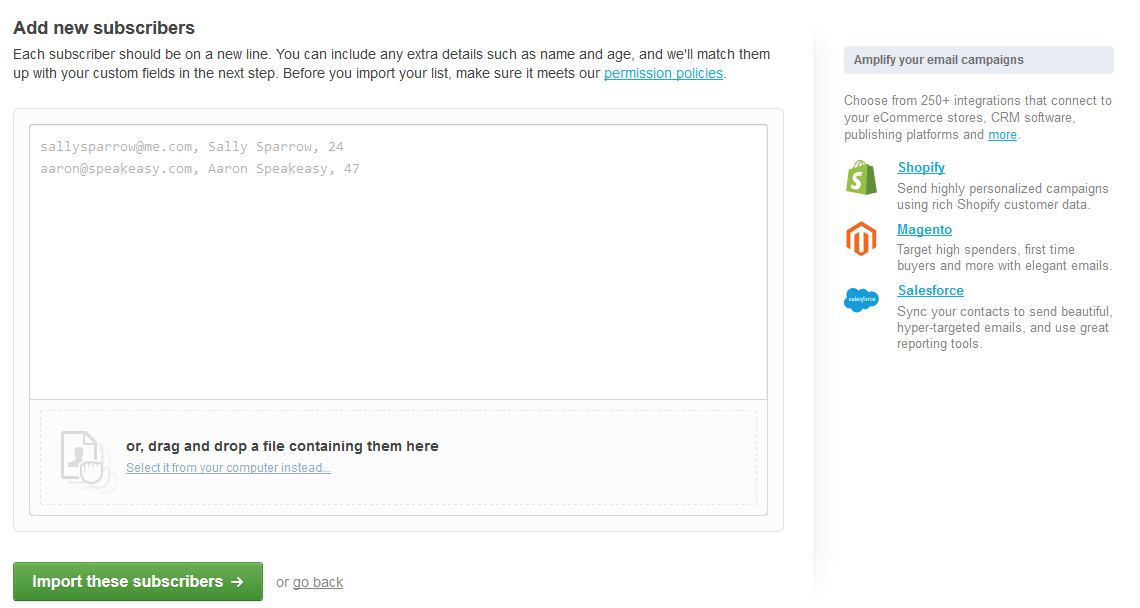
Then on the next screen you can click the “Add subscribers to list” button and either copy / paste your data or upload your CSV file:
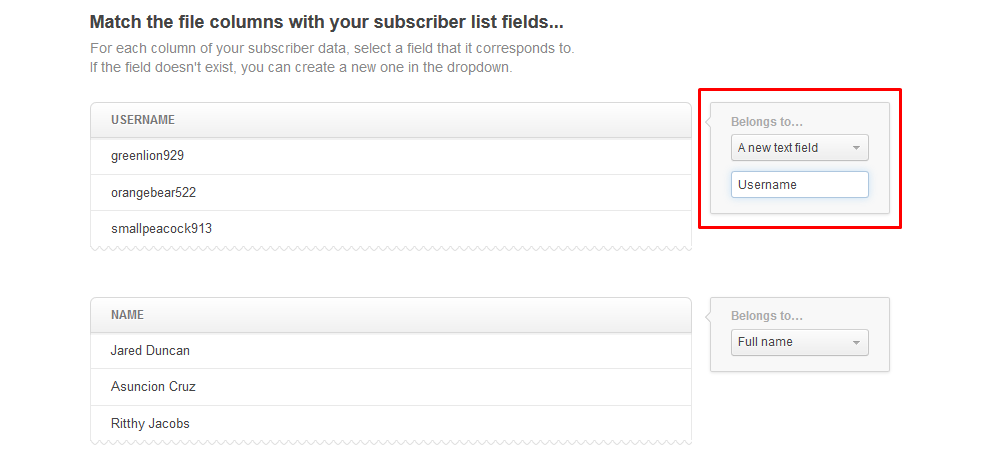
And on the next screen you’ll see each of your columns where you can add them to an existing field or create a new one:
Once you upload your desired file you are all set. Your users and custom data are going to be available for your future campaigns. Then you can send emails to this list in particular, and use the custom WordPress user fields.
Adjusting your data
Sometimes you may need to tweak the data you’ve got from your CSV export. You could need to change the way some fields are formatted, or even create new fields based on the current ones.
For example, you could add a label to your users depending on their lifetime value. You can create new columns as you want to, here is an example:
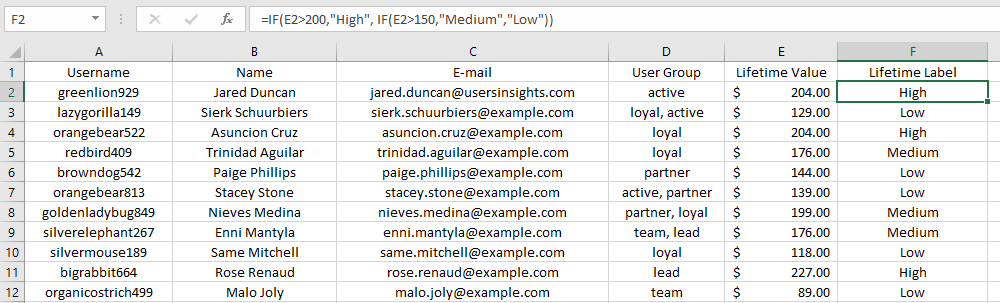
For that we’ll assign to users different labels depending on their lifetime value, this is our formula:
=IF(E2>200,”High”, IF(E2>150,”Medium”,”Low”))
You can tweak this or create your own. What we are doing is simply nesting different “IF” conditionals (once one fails we test the other) so we can assign different labels depending on arbitrary values.
After doing your own adjustments just make sure to save this file as CSV again, or to save it as xls if you want to still edit this in the future.
Now you can just follow the instructions above and import your custom user data into Campaign Monitor.
Conclusion
Today we looked into how you can use the Users Insights plugin to segment your users in order to send different newsletters to them. We discussed different techniques from planning to implementation about how you can add custom fields and how you can segment your users in a way that you’ll avoid duplicated entries.
We hope you have a better understanding of how you can import your WordPress users into Campaign Monitor and how Users Insights can help you do so. Thanks for reading, and we see you again next time!