How to create WooCommerce coupons programmatically
Today we’ll look into how to programmatically create WooCommerce coupons and different ways to implement these coupons. Here we’ll investigate how to use this strategy to boost your customer retention.
Customer acquisition is one of the highest costs a company has. That’s why customer retention is the key to successful business. When you figure out how to keep happy customers coming back, you are actually saving a ton of marketing resources. Thus, repeat purchases should be one of your main goals.
Yet, many companies fall into the trap of rewarding new customers, instead of recurring ones. Quite often we see discounts for new purchases that won’t apply to renewals. Well, we are here to show you one of the strategies you can use to break this cycle.
In this article we’ll show you how to:
- Create WooCommerce coupons programmatically
- How to add coupons to orders and customers
- Display coupons in the order thank you page and thank you email
- Measure effectiveness of our strategy with Users Insights
Let’s see some strategies to create coupons tailor-made for each customer. Then we check how to implement this into your store, and how to display them. Lastly, we explore some options to measure our marketing efforts results.

Planning your WooCommerce coupons strategy
Every time a registered customer creates a new WooCommerce order, a lot of data is saved. Thus, you can use this data to figure out what kind of actions will resonate with your customers. For example, if you have an audience passionate about science books, coupons on coloring books won’t work.
Therefore, first, you need to get a feel of your audience. After that, you’ll know what kind of coupons you want to create. That’s because programmatically created coupons require some planning. Thus, make sure they are created around your specifically designed business rules.
Usually, the right criteria to define when and how to create a coupon depends on your business. For instance, you can create a 20% discount coupon for all customers of a particular product. Or maybe you can create coupons for orders above a specific threshold. As we can access all the order and customer data, there are many factors you can use.
Here are some ideas:
- Presence of a specific product in the cart
- Presence of a specific product combination in cart
- Order value
- Number of items in cart
- Customer lifetime value
- User role (wholesale vs retail, VIP vs regular, etc.)
- Customer location
- Job title, age, gender, languages spoken
These are all ideas, but you can come up with your own metrics. That’s the beauty of it, there’s a big chance that the data points you need are already there. Even if they aren’t, it’s probably quite easy to implement them.
How to programmatically create WooCommerce coupons
It’s time to see some code examples of how to programmatically create WooCommerce coupons. The coupon codes are actually quite simple to create.
Creating the coupon
Creating the coupon object is as simple as creating a post with post type shop_coupon. Here we need to set the coupon code as the post title. We also need to make sure to set the post status to “publish”.
$coupon_args = array(
  'post_title' => 'welcome',
  'post_content' => '',
  'post_status' => 'publish',
  'post_author' => 1,
  'post_type' => 'shop_coupon'
);

// create post type and save the ID
$coupon_id = wp_insert_post( $coupon_args );
Coupon options
The second step is configuring the coupon settings, such as the type of the discount and the usage limits. We can do this by adding custom fields (post meta) to the coupon post. Here are some of the available arguments:
discount_type– Values: fixed_cart, percent, fixed_product, percent_productcoupon_amount– Integer with money or percent discountindividual_use– ‘yes’ or ‘no’ if it can be used with other couponsproduct_ids– Applies just to specific products. Specify the products as comma separated product IDsexclude_product_ids– Won’t apply to specific productsexclude_sale_items– ‘yes’ or ‘no’ if it can be used with products on salemaximum_amount– maximum purchase price that it can be applied tominimum_amount– minimum purchase price that it can be applied tousage_limit– the total times this coupon can be usedusage_limit_per_user– number of times a single user can use this couponlimit_usage_to_x_items– integer applying a limit on the number of cart items. When set to 0, it can be applied to unlimited number of items.free_shipping– ‘yes’ or ‘no’ if grants free shippingdate_expires– UNIX time of expiration date
For example, if we wanted to create a coupon with a 20% discount, we can do:
update_post_meta( $coupon_id, 'discount_type', 'percent');
update_post_meta( $coupon_id, 'coupon_amount', 20);
Therefore, to put it together, we can simply add a function that creates coupons based on our desired arguments.
function my_create_coupon( $coupon_name, $args = array() ) {

  $coupon_args = array(
    'post_title' => $coupon_name,
    'post_content' => '',
    'post_status' => 'publish',
    'post_author' => 1,
    'post_type' => 'shop_coupon'
  );

  $coupon_id = wp_insert_post( $coupon_args );

  if ( !empty( $coupon_id ) && !is_wp_error( $coupon_id )) {
    foreach ( $args as $key => $val ) {
      update_post_meta( $coupon_id, $key, $val );
    }
  }

  return $coupon_id;
}
For example, by using this newly created function, we can use the following code to create a single usage coupon, giving 10% discount and free shipping:
my_create_coupon(
  "welcome",
  array(
    'discount_type' => 'percent',
    'coupon_amount' => 10,
    'free_shipping' => 'yes',
    'usage_limit' => 1
  )
);
But where can we actually add this code? Well, this depends on when you want to create the coupons. Let’s see next how to use our function to create new coupons easily.
How to add programmatically created coupons to an order
In this section we’ll show you how you can automatically generate new coupons in your orders. In this way, you can provide your customers a coupon for their next purchase. The thank-you page is a pretty good opportunity to display our coupon. That’s because it improves our users’ satisfaction with an instant gift. As soon as their order is complete, they get an even better deal.
This task can be devised in many different ways, but in our case we will:
- generate a custom coupon code on the WooCommerce thank you page – this will run when the order process has finished. For this we’ll use the
woocommerce_thankyouhook. - the coupons will be generated for registered users. If you want to create coupons for guests as well you can do that as well, but our goal here is to reward loyal customers.
- we’ll also attach a custom field “user-coupon” to the user and order, so we can filter our users and orders in the future.
- for the coupon code we’ll generate a numeric based code, by generating a random number. In this way we can keep the example simple, but you can always use a different method to generate a random code.
- in the end we’ll show the coupon code on the Thank you page. There are many ways to edit the thank you page. We have a guide on How to customize the WooCommerce thank you page where you can learn more.
And here is our final function:
function wc_create_custom_coupons( $order_id ) {
  // get all the order data
  $order = new WC_Order($order_id);

  //get the user for the order
  $user = $order->get_user();

  // if user isn't false, it's a registered checkout
  if( ! empty ( $user ) ) {
    $coupon_code = strval(rand(1000000000, 1999999999));
    $coupon = my_create_coupon(
      $coupon_code,
      array(
        'coupon_amount' => 10,
        'discount_type' => 'percent',
        'free_shipping' => 'yes',
        'usage_limit' => 1
      )
    );

    //Save the coupon code as user meta
    update_user_meta( $user->ID, 'user-coupon', $coupon_code );

    //Save the coupon code as order meta
    update_post_meta( $order_id, 'user-coupon', $coupon_code );

    //let the user know you have a gift for them!
    echo "<h1>We have a gift for you!</h1>";
    echo "<h2>Use the coupon ".$coupon_code
      ." in your next purchase for a 10% discount and free shipping</h2>";
  }
}
//add this newly created function to the thank you page
add_action( 'woocommerce_thankyou', 'wc_create_custom_coupons', 10, 1 );
You can surely customize this snippet for alternative displays. You could use some JS code to move it up in this page. The sky is the limit now!
How to add custom coupons to order thank you email
In addition to the on-page coupon, you might want to send them in your order confirmation email as well. For this, we just need to find the right hook for the email you want to edit. This is a good path, but there’s an easier way.
You can simply edit the email template files.
You can do that under woocommerce/templates/emails, or add a custom template file in your theme. For example, you can edit the email-order-details.php file and around line 25 add this nice message:
<?php
$coupon = get_post_meta( $order->get_id(), 'user-coupon', true );

if ( $coupon ) {

  echo "<h1>We have a gift for you!</h1>";
  echo "<h2>Use the coupon ".$coupon
    ." in your next purchase for a 10% discount and free shipping</h2>";

}
?>
Now our users have both the thank you page and the order confirmation page with coupons. You can even send further emails if you feel like they haven’t seen them still.
How to filter users based on coupon usage
Now we have our coupons and custom user fields. We can filter users using Users Insights and measure the success of our strategies.
First, you need to map our custom user field. Even though the default WooCommerce fields are mapped automatically, our custom ones aren’t. Thus, you need to go to Users Insights > Custom Fields and add the user-coupon field.
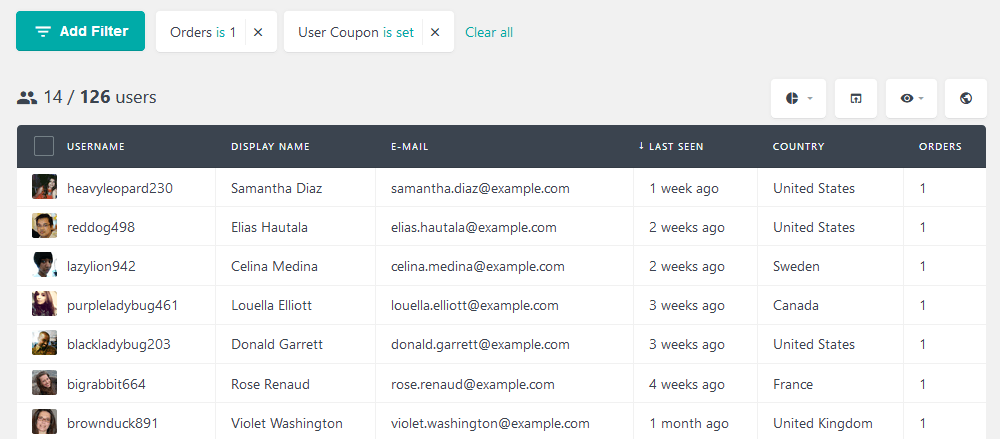
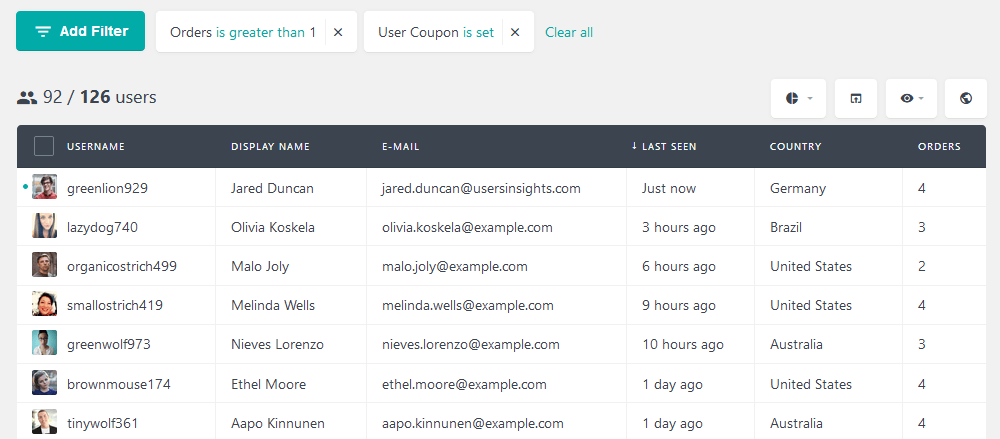
One of the strategies for effective coupon usage is to make sure our users haven’t forgotten about them. Thus, you can filter all users who have a coupon and have just one order. As we award our coupons in the first order, only users with repeat purchases have already used them.

Then you can export this users list and get in touch with them using MailChimp or similar.
The other way around is true as well. As we know that users with repeat purchases have a coupon, we can filter them as well.

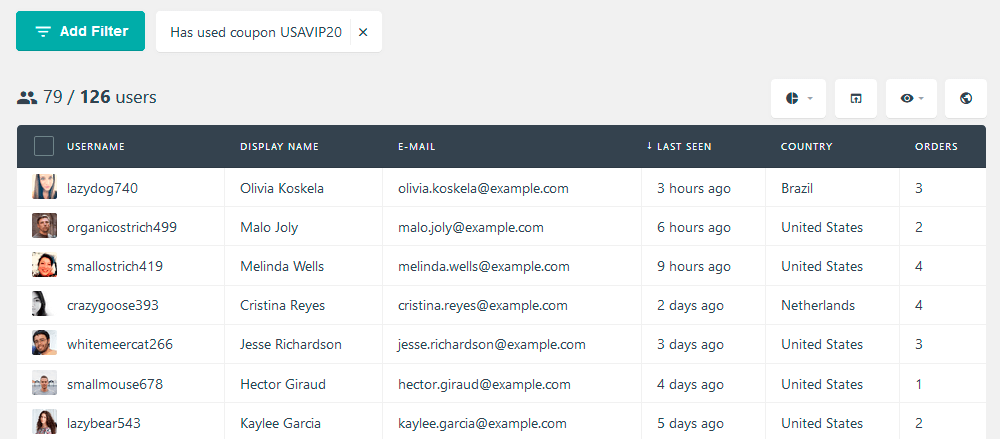
Depending on how you create your coupons you can filter customers by coupon code. Surely, if you create one coupon per user you won’t have much intel. But if you give customers the same code for specific amounts, user roles or even locations this could be helpful. For instance, we can filter all users with the USAVIP20 code:

Conclusion
Today we dived into how to use coupons as a customer retention strategy in your WooCommerce store. We saw how to create your coupon strategy. After this, we investigated how to programmatically create coupons in WooCommerce. Then we looked into different options to display these codes. And lastly, we filtered our WooCommerce customers based on coupons used.
We hope you enjoyed and see you again next time!
