How to create WordPress users programmatically
Today, we’ll dive deep into how to create WordPress users programmatically. Throughout this article, we look into how to use the wp_create_user() and wp_insert_user() functions. In addition, we’ll compare them and find out where to use each WordPress user function to create WooCommerce customers. Furthermore, we’ll explore how to create users with user meta.
And in the end, we’ll explore how to better visualize and filter users based on these custom fields.
You can always create users by using the WordPress dashboard. However, this approach is insufficient if you need to programmatically create WordPress users. In these cases, we need to use some PHP code.
However, this decision is not always so simple. That’s because WordPress has more than one function to create users. Thus, we need to check the characteristics of each function and then evaluate which is better to create users programmatically.
In addition, creating users alone may not be enough for our project. Usually, we need to add custom user fields and data to organize our users better.
Our goal for today is to walk from the very basic syntax of these functions to their core differences. Then, we’ll dive into their usage comparison and understand how to create users with their custom fields.

How to add a new user in WordPress (the manual way)
Adding a new user to WordPress is a two-step process. To add a new user to WordPress, you must first create an account for them with a username and password. Then, you need to assign that user a role determining what they can do on your website.
To add a new user in WordPress manually:
- Log in to your WordPress admin as an Administrator.
- In the left-hand main menu, hover over Users and click Add New.
- Enter a username and email address for the new user. You can also add the First and last name optionally.
- Choose a password for the user or click the Generate Password button to have WordPress generate one.
- Select the user role for the user from the dropdown menu. The default user role is Subscriber.
- Click the Add New User button to save your changes.
The new user will receive an email notification with their username and password, and they will be able to log in to your website and start using it immediately.
How to create WordPress user programmatically with code
You might want to create a WordPress user programmatically for many reasons. For example, if you are developing a plugin or a custom theme that requires users to register, you may want to automatically create a new user when they register. Or, if you are importing user data from another system and want to create new users for your WordPress website, you may need to programmatically create WordPress users. In this tutorial, you will learn how to add new users to your site in an automated way.
The wp_create_user() function
<a href="https://codex.wordpress.org/Function_Reference/wp_create_user">wp_create_user()</a> is a simple function to create a new WordPress user. This function accepts just 3 arguments – the username (required), password (required), and email (optional). When successful, it returns the newly created user ID. If there’s an error, you get a WordPress error object.
This is its basic syntax:
wp_create_user( (string) $username, (string) $password, (string) $email = '' );
And here is an example of using this function:
wp_create_user( 'johndoe', 'passwordgoeshere', 'john.doe@example.com' );
Since the email is optional, this is one of the few ways you can use to create WordPress users with no emails. The following example illustrates a quick way to create users with no email:
wp_create_user( 'johndoe', 'passwordgoeshere' );
You may be wondering about error handling. After all, we don’t want to create WordPress users programmatically where there are conflicts. The beauty of the wp_create_user() WordPress function is that it handles the error cases for you. Thus, you just need to check for the result of the function and see if that’s an ID or a WP error. You can check whether a value is an error by using the is_wp_error() function.
$result = wp_create_user('johndoe', 'passwordgoeshere', 'john.doe@example.com');
if(is_wp_error($result)){
  $error = $result->get_error_message();
  //handle error here
}else{
  $user = get_user_by('id', $result);
  //handle successful creation here
}
And this is how the data looks like in the database when the code is executed successfully:

The wp_insert_user() function
The wp_insert_user() function is the big brother of the wp_create_user() function. This function has a lot more options when it comes to programmatically creating WordPress users. And with great powers come great responsibility. Here we need to prepare our data to account for all these options.
The base syntax for wp_insert_user() is this one:
wp_insert_user( (array|object|WP_User) $user_data )
But the true secret is inside of the $user_data argument. This can be either an array, an instance of stdClass or an instance of WP_User. These are the possible values for an array of formatted data:
$user_data = array(
  'ID' ( null | integer ),
  'user_pass' ( null | string ),
  'user_login' ( null | string ),
  'user_nicename' ( null | string ),
  'user_url' ( null | string ),
  'user_email' ( null | string ),
  'display_name'( null | string ),
  'nickname' ( null | string ),
  'first_name' ( null | string ),
  'last_name' ( null | string ),
  'description' ( null | string ),
  'user_registered'  ( null | string ),
  'role' ( null | string ),
  'jabber' ( null | string ),
  'aim' ( null | string ),
  'yim' ( null | string ),
  'locale' ( null | string ) ,
  //...
);
Additionally, even though this function is called “insert user”, it can be used to update users. That’s why all arguments can be null. If you add the user ID, you just need to add the arguments you want to update. If you don’t add a user ID, then a new user will be created with your parameters. However, if you need to update a user, it’s better to use the wp_update_user() function instead. In this way, your code will be much easier to read and understand.
Similarly, this function returns the user’s ID on success and a WordPress error object on failure.
The following example illustrates creating a new user by setting some additional data:
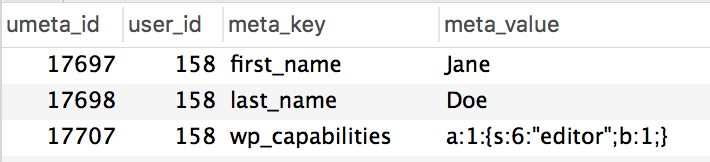
$user_id = wp_insert_user( array(
  'user_login' => 'janedoe',
  'user_pass' => 'passwordgoeshere',
  'user_email' => 'jane.doe@example.com',
  'first_name' => 'Jane',
  'last_name' => 'Doe',
  'display_name' => 'Jane Doe',
  'role' => 'editor'
));
It is a bit fuzzy, as this syntax requires you to create an array. But this case is much more powerful. Thus, we trade more options for a harder setup. This is how the result looks in the wp_users table:

And the additional fields, such as first/last name and role can be found in the wp_usermeta table:
wp_create_user() vs wp_insert_user()
As you may have noticed, both functions are quite similar. And that’s for a good reason. The truth is that the wp_create_user() function actually calls the wp_insert_user() function. This is how WordPress creates this function in the core:
function wp_create_user( $username, $password, $email = '' ) {
    $user_login = wp_slash( $username );
    $user_email = wp_slash( $email );
    $user_pass  = $password;

    $userdata = compact( 'user_login', 'user_email', 'user_pass' );
    return wp_insert_user( $userdata );
}
Therefore, no matter what you pick, both functions are going to lead to very similar results. Thus, it’s a matter of how much data you need to specify for the user. If you just need to specify your username, password, and email, go for wp_create_user(). On the other hand, if you need a more robust setup, where you need to specify more user fields, wp_insert_user() is better.
Now let’s add custom fields to our users.
Creating users with custom meta fields
The wp_insert_user() function allows metadata addition and customization. But to add custom user fields, you need to use the update_user_meta() function. The syntax is quite simple, we use it like this:
update_user_meta($user_id, $meta_key, $meta_value, $prev_value );
Since this function can only add one custom field at a time, we need to take this into account. Thus, if you want to create users along with their metadata, you need a loop. This example creates a user, then we add a job title and country custom fields. But if you have more custom fields you can just add them to the array we set up.
function new_user_with_metadata( $username, $password, $email = "", $meta = array() ) {
  //this is just an example, in your function you can pass as many fields as you want
  $meta = array(
    'job_title' => 'developer',
    'country' => 'United States',
    'viaphp' => true
  );

  //let's create our user
  $user = wp_create_user( $username, $password, $email );

  //check if there are no errors
  if ( ! is_wp_error( $user ) ) {
    foreach( $meta as $key => $val ) {
      update_user_meta( $user, $key, $val );
    }
  }

  return $user;
}
Therefore, this function creates users with custom fields. You can freely tweak this function, in particular regarding the custom fields you accept. If the data comes from a user-submitted form, make sure to correctly escape and verify meta values, to avoid security issues.
Here we add the viaphp flag to our users as well. This is a quick way to filter users who have been created by using our functions. That’s quite handy in case you need to troubleshoot issues with these users.

Get the most out of your WordPress user meta data with custom fields
How to create WooCommerce customers programmatically
At its core, WooCommerce customers are just WordPress users. Then, the very first step in our process is to create a WordPress user.
You can use the WP function for that, wp_create_user, or you can use the special WC function, wc_create_new_customer:
function my_new_wc_customer( $username = '', $password = '', $email = '', $args = array(), $type = 'wc' ) {

  if ( 'wc' != $type ) {
    //use the default method
    $id = wp_create_user( $username, $password, $email);

  } else {
    //or the WC method
    $id = wc_create_new_customer( $email, $username, $password, $args );
  }

  return $id;
}
The only difference between these 2 is that the first one creates a WordPress user with the default WP role defined in your site. The second one creates a new user with the “customer” role automatically, regardless of what you have as your default user registration role.
But there’s an important step to take here. We need to add a “flag” to differentiate the WooCommerce customers programmatically created from the self-registered customers. This allows us to quickly debug issues and fix errors. In our code, we add the custom user field “programmatically” to do that.
This is the second version of our customer creation code:
function my_new_wc_customer( $username = '', $password = '', $email = '', $args = array(), $type = 'wc' ) {

  if ( 'wc' != $type ) {
    //use the default method
    $id = wp_create_user( $username, $password, $email);

  } else {
    //or the WC method
    $id = wc_create_new_customer( $email, $username, $password, $args );
  }

  if ( ! is_wp_error($id) ) {
    update_user_meta( $id, 'programmatically', 1 );
  }

  return $id;
}
This function returns either the user ID or a WP error.
How to filter the programmatically created WordPress users
As we created 3 custom user fields, we can use them to filter these users with Users Insights. For that, the first step is to map these custom fields under Users Insights > Custom Fields. You just need to add your field keys there so that they can be used in our user table. In case you need more information, you can read our guide on how to map custom user fields.
There are many ways to search, filter, and display users based on metadata. However, here we are focused on the power of filtering WordPress users created via code. Once you have the Via PHP custom field mapped, we can filter all dynamically created WordPress users:

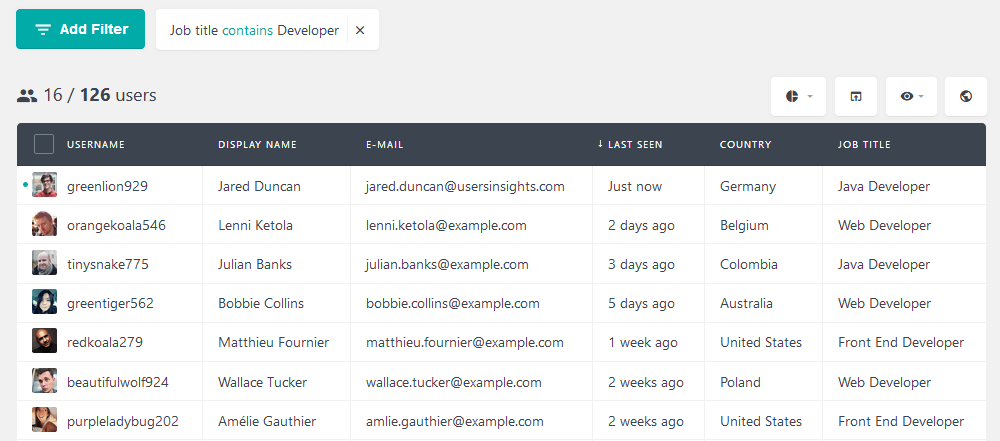
Then we have the regular filters. For instance, if you want to know how many developers you have in your database you can filter users based on their job title:
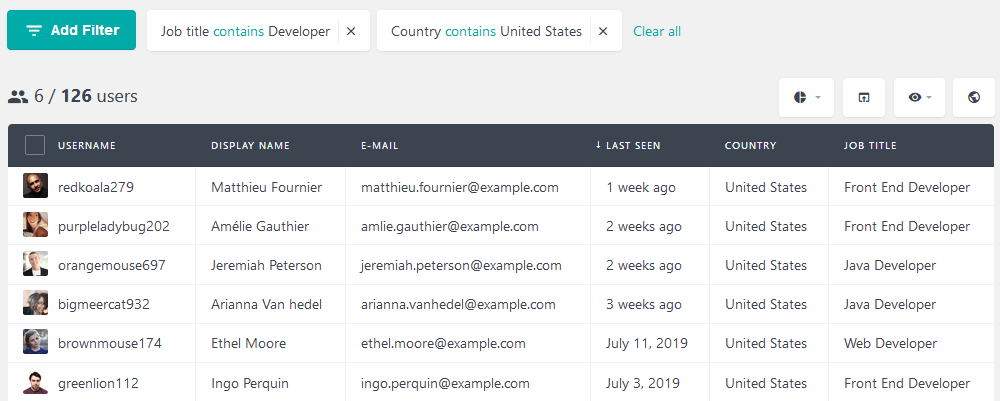
The true power of Users Insights comes from combining filters. For example, if you have a product that is targeted to local developers only it is easy to find them. You just need to filter users based on their Country AND Job title. Something like this:
This should be enough to get started.
How to search programmatically created WooCommerce Customers
At this point, we have customers, customer data, WooCommerce orders, and other customer-specific data in your WooCommerce store. Then it makes sense to filter them and better understand our customer base.
Again you can use Users Insights to do that. For example, we can filter all customers who were created using our code and who bought the Gold Membership product:
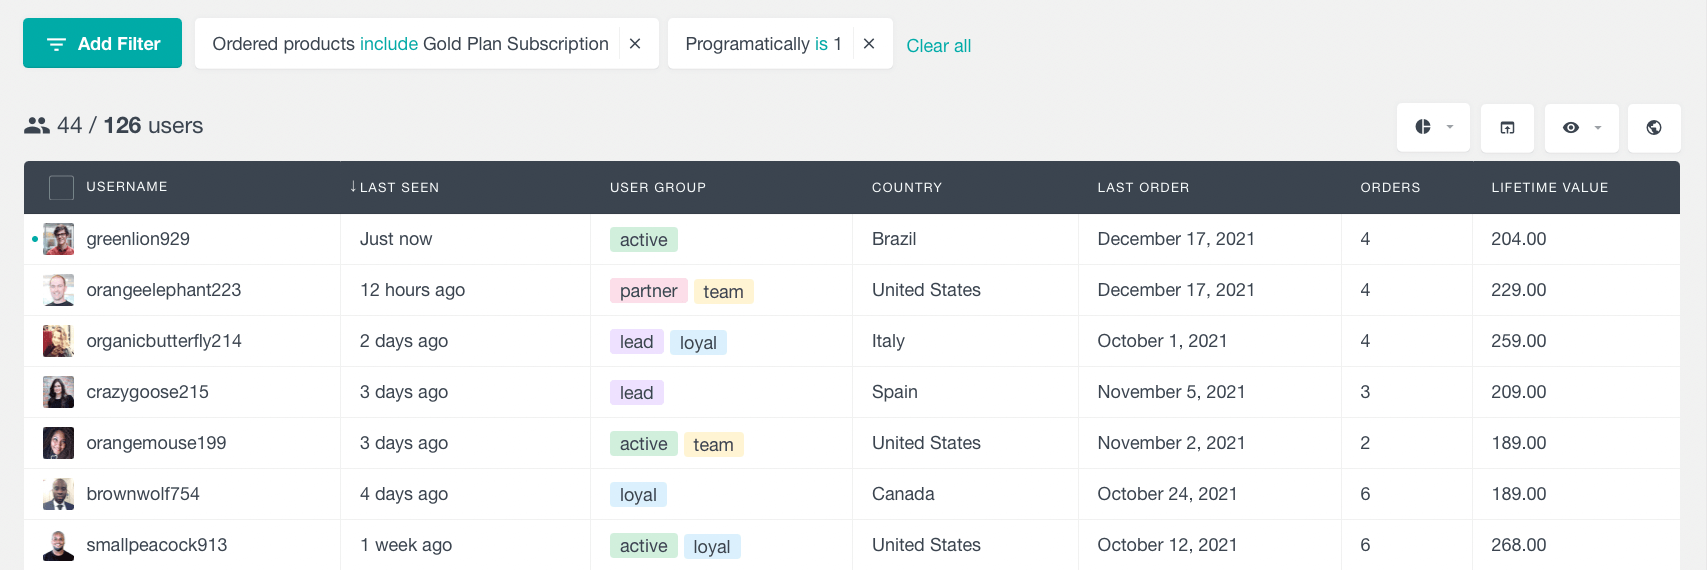
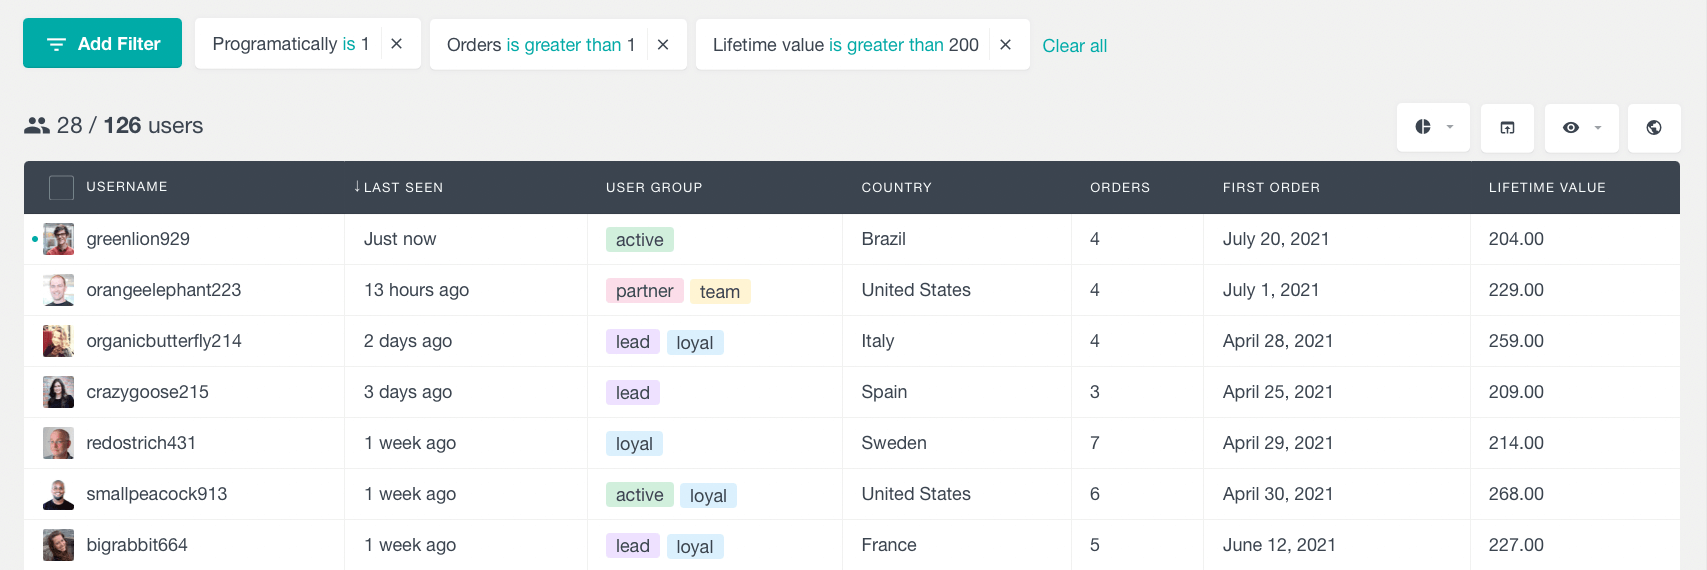
In addition, you can filter users by additional WooCommerce order criteria. For example, we can find all repeat buyers with a lifetime value greater than 200.
Conclusion
Today we looked into how to create WordPress users programmatically and how to programmatically create WooCommerce Customers. We learned how to use the wp_insert_user() and wp_create_user() functions. In addition, we dived into their particularities and differences. Then we created users with custom fields and filtered through them using Users Insights.
We hope you enjoyed this article and see you again next time!