How to create WooCommerce orders programmatically
Today we investigate how you can use the WC_Order class to programmatically create WooCommerce orders. This allows you to add orders, update orders and even perform more advanced tasks.
WooCommerce is incredibly complete and flexible. And due to its flexibility, it’s easy to miss a lot of interesting features.
In this article we dive deeper into how you can use the WC_Order class for many different use cases. There are few different scenarios in which it may be desirable to create WooCommerce orders programmatically. Creating an WooCommerce order programatically can save you time by providing the ability to automatically create orders for items you know have been purchased, such as an item that is being sent to a client or internal inventory. Or maybe you are trying to assign WooCommerce order that is made by an existing guest user. Another example scenario is if your store has offline payment method and your admin receives a call from a customer and based on their requirements, you create a custom new order for them.
Once you are comfortable using the WC_Order class, you can do it all.
Now let’s get started!

The WC_Order object
WordPress allows you to store custom information with custom post types. You can add post types for books, for forum posts, for lessons. Thus, it makes sense that WooCommerce itself uses this tool.
Orders are a custom post type. But if you need to manipulate them, you are too limited when using the default WordPress functions.
That’s due to the fact that many operations need to affect a lot of different places. If you add a product to an order, you need to calculate its price, taxes, shipping, totals.
Using WooCommerce, you can easily create orders programmatically with a few simple lines of code.
But you don’t need to worry about all that. You can use the WC_Order object to achieve all that without the need of a WooCommerce plugin.
Thus, you can use the methods that WooCommerce has to fire all these actions from a line or two of PHP code.
How to programmatically create a new WooCommerce order
The WooCommerce orders are created using the wc_create_order function. It is a shortcut for initiating the WC_Order class for a new order passing a few arguments. Here’s an example:
function my_new_wc_order( ) {
  $args = array(
    'status'        => 'wc-completed',
    'customer_id'   => null,
    'customer_note' => null,
    'parent'        => null,
    'created_via'   => null,
    'cart_hash'     => null,
    'order_id'      => 0,
  );

  $order = wc_create_order( $args );

  return $order;

}
Once the WC_Order object is set, you can manipulate it. This doesn’t apply just to new orders though, you can do the same by passing your order ID to the WC_Order class:
$order = new WC_Order( $order_ID );
Now that we have our WC_Order class initiated, we can manipulate our order, whether it’s old or new.

Improve Your WooCommerce Sales Performance with Data-Driven Insights
How to add a customer to the order
As you saw in our first code snippet, you can simply pass the user id as an argument for the wc_create_order function. But that isn’t the only method to add a customer to an order.
You can use the $order->set_customer_id() method, which is the right way to do it in WooCommerce. Here is an example:
function my_save_order_customer() {

  $order = new WC_Order( $order_id );
  $order->set_customer_id( $customer_id );
  $order->save();

}
Notice that we need to run $order->save(); This might seem like a downside, but it’s a huge improvement, from just updating one option at a time.
This might seem a bit odd when you have just one option, but it makes a big difference when you have many custom fields, products, customer details. And then you update them all to your database at once, with that method.
You might be wondering what happens if you add no customer to your order. It stays as a guest order. Even if you add customer details, shipping, billing and even the customer email. If you don’t tell WooCommerce “Hey, this order is assigned to this customer”, it stays as a guest by default.
How to programmatically add items to your WooCommerce order
You can add a product line to your order using $order->add_product. This allows you to add not just a specific product but pass some arguments as well. Here is an example:
function my_add_products_to_order() {

  $order = new WC_Order( $order_id );

  $args = array(
    'name'         => "Custom name",
    'tax_class'    => "",
    'product_id'   => "",
    'variation_id' => "",
    'variation'    => "",
    'subtotal'     => 0,
    'total'        => 0,
    'quantity'     => 1,
  );

  $order->add_product(  wc_get_product( $product_id ) , 1, $args );
  $order->calculate_totals();

}
Notice that we have a few important things here:
- The $args variable is optional, and it allows you to add special use cases for your product (instead of the product name, use a custom name, for example)
- The product is passed as a product object ( wc_get_product( $product_id ) )
- We need to run $order->calculate_totals() – otherwise the total price won’t be adjusted
As you can see, this adds a product line to your order. You can have multiple order lines for the same product, or a single line with greater quantities.
In turn, you can remove items from your orders using $order-> remove_item().
How to add shipping and billing details to your WooCommerce order
You might need to add some shipping and billing details to your WooCommerce order. They can be added using set_address method.
In addition, you need to add shipping prices, which can include taxes.
You can do it with this code snippet:
function my_shipping_details( $order_id ) {
  $order = new WC_Order( $order_id );

  $billing = array(
    'address_1' => 'Address 1',
    'address_2' => 'Address 2',
    'city' => 'My city',
    'company' => 'My Company',
    'country' => 'My Country',
    'email' => 'billing@myemail.com',
    'first_name' => 'John',
    'last_name' => 'Smith',
    'phone' => '+1134123456',
    'postcode' => '132',
    'state' => 'My State',
  );

  $shipping = array(
    'address_1' => 'Shipping Address 1',
    'address_2' => 'Shipping Address 2',
    'city' => 'Shipping city',
    'company' => 'Shipping  Company',
    'country' => 'Shipping  Country',
    'email' => 'shipping@myemail.com',
    'first_name' => 'Jane',
    'last_name' => 'Doe',
    'postcode' => '132',
    'state' => 'Shipping State',
  );

  $order->set_address($billing, 'billing');
  $order->set_address($shipping, 'shipping');

  //add your shipping rate
  $shipping_rate = 100;

  //calculate taxes (if needed)
  $shipping_taxes = WC_Tax::calc_shipping_tax( $shipping_rate, WC_Tax::get_shipping_tax_rates() );

  //add shipping values line to our order
  $order->add_shipping( new WC_Shipping_Rate('flat_rate_shipping', 'Flat rate shipping', $shipping_rate, $shipping_taxes, 'flat_rate') );

  //update totals
  $order->calculate_totals();
}
Notice that we just need to add our shipping prices, then everything else is calculated automatically. After that, there is just one element missing from our order: taxes.
How to add taxes to your order
In our shipping calculation, we used the taxes class. But we need to pay taxes in our entire order, not just shipping. Thus, we need to use a method that affects the entire order.
And we can do it with the $order->calculate_totals() method.
Our main remark here is that you can use the WC_Tax class for advanced tax calculation and manipulation. For edge cases, you can use that class and edit your order’s taxes in any way you want.
How to set your order status
Now that our order is ready, we just need to change its status. We can do that with the update_status method.
This method has 3 arguments:
- New status (required) – a string with the new status name
- Note – Text string to be prepended to the default order status change note
- Manual – a boolean variable on whether this is a manual change or a system change (system notes are marked with a darker background in the order notes)
Here is an example:
$order = new WC_Order( $order_id );

$order->update_status('completed', 'testing note', true);
How to search customers
After you create your orders, you might want to search your customers based on them. In this case, you can use Users Insights to filter users by products bough, lifetime value and other options.

Here’s an example of how to find all customers who placed an order for the Gold Membership in the last month:
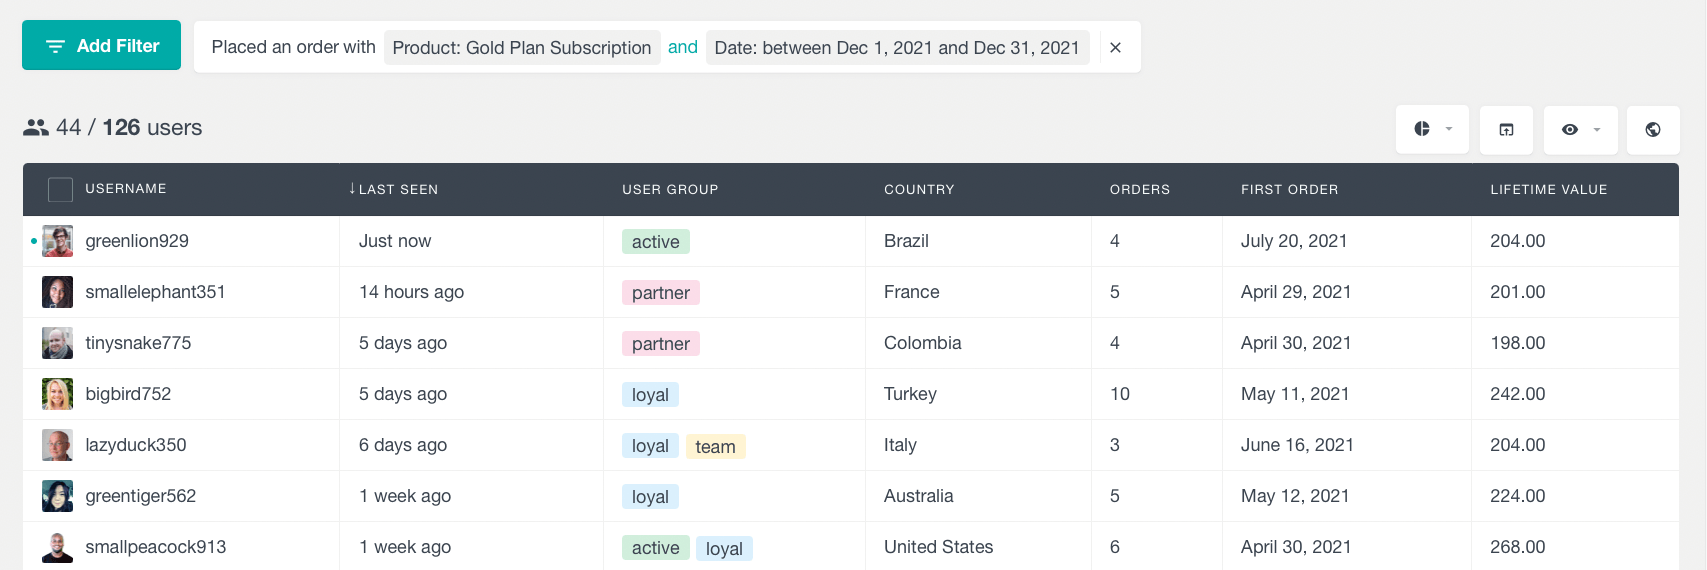
From here on, you can create all sorts of filters and segments of your customer data. You can filter by ordered product, customer data, coupon code used, custom field, shipping method, past order history etc.
Conclusion
Today we dived into how you can use the WC_Order class to create and edit your orders. This allows you to programmatically create orders and edit them. In addition, we explored how you can use Users Insights to find users based on products bought.
We hope you enjoyed, and see you again next time!