How to create a custom add to cart URL in WooCommerce
If you’re running an online store with WooCommerce, you may want to make it easier for customers to add products to their carts by creating custom add to cart URLs. In this tutorial, we’ll show you how to create an add to cart URL in WooCommerce and implement it on your website.
How to find the product ID in WooCommerce
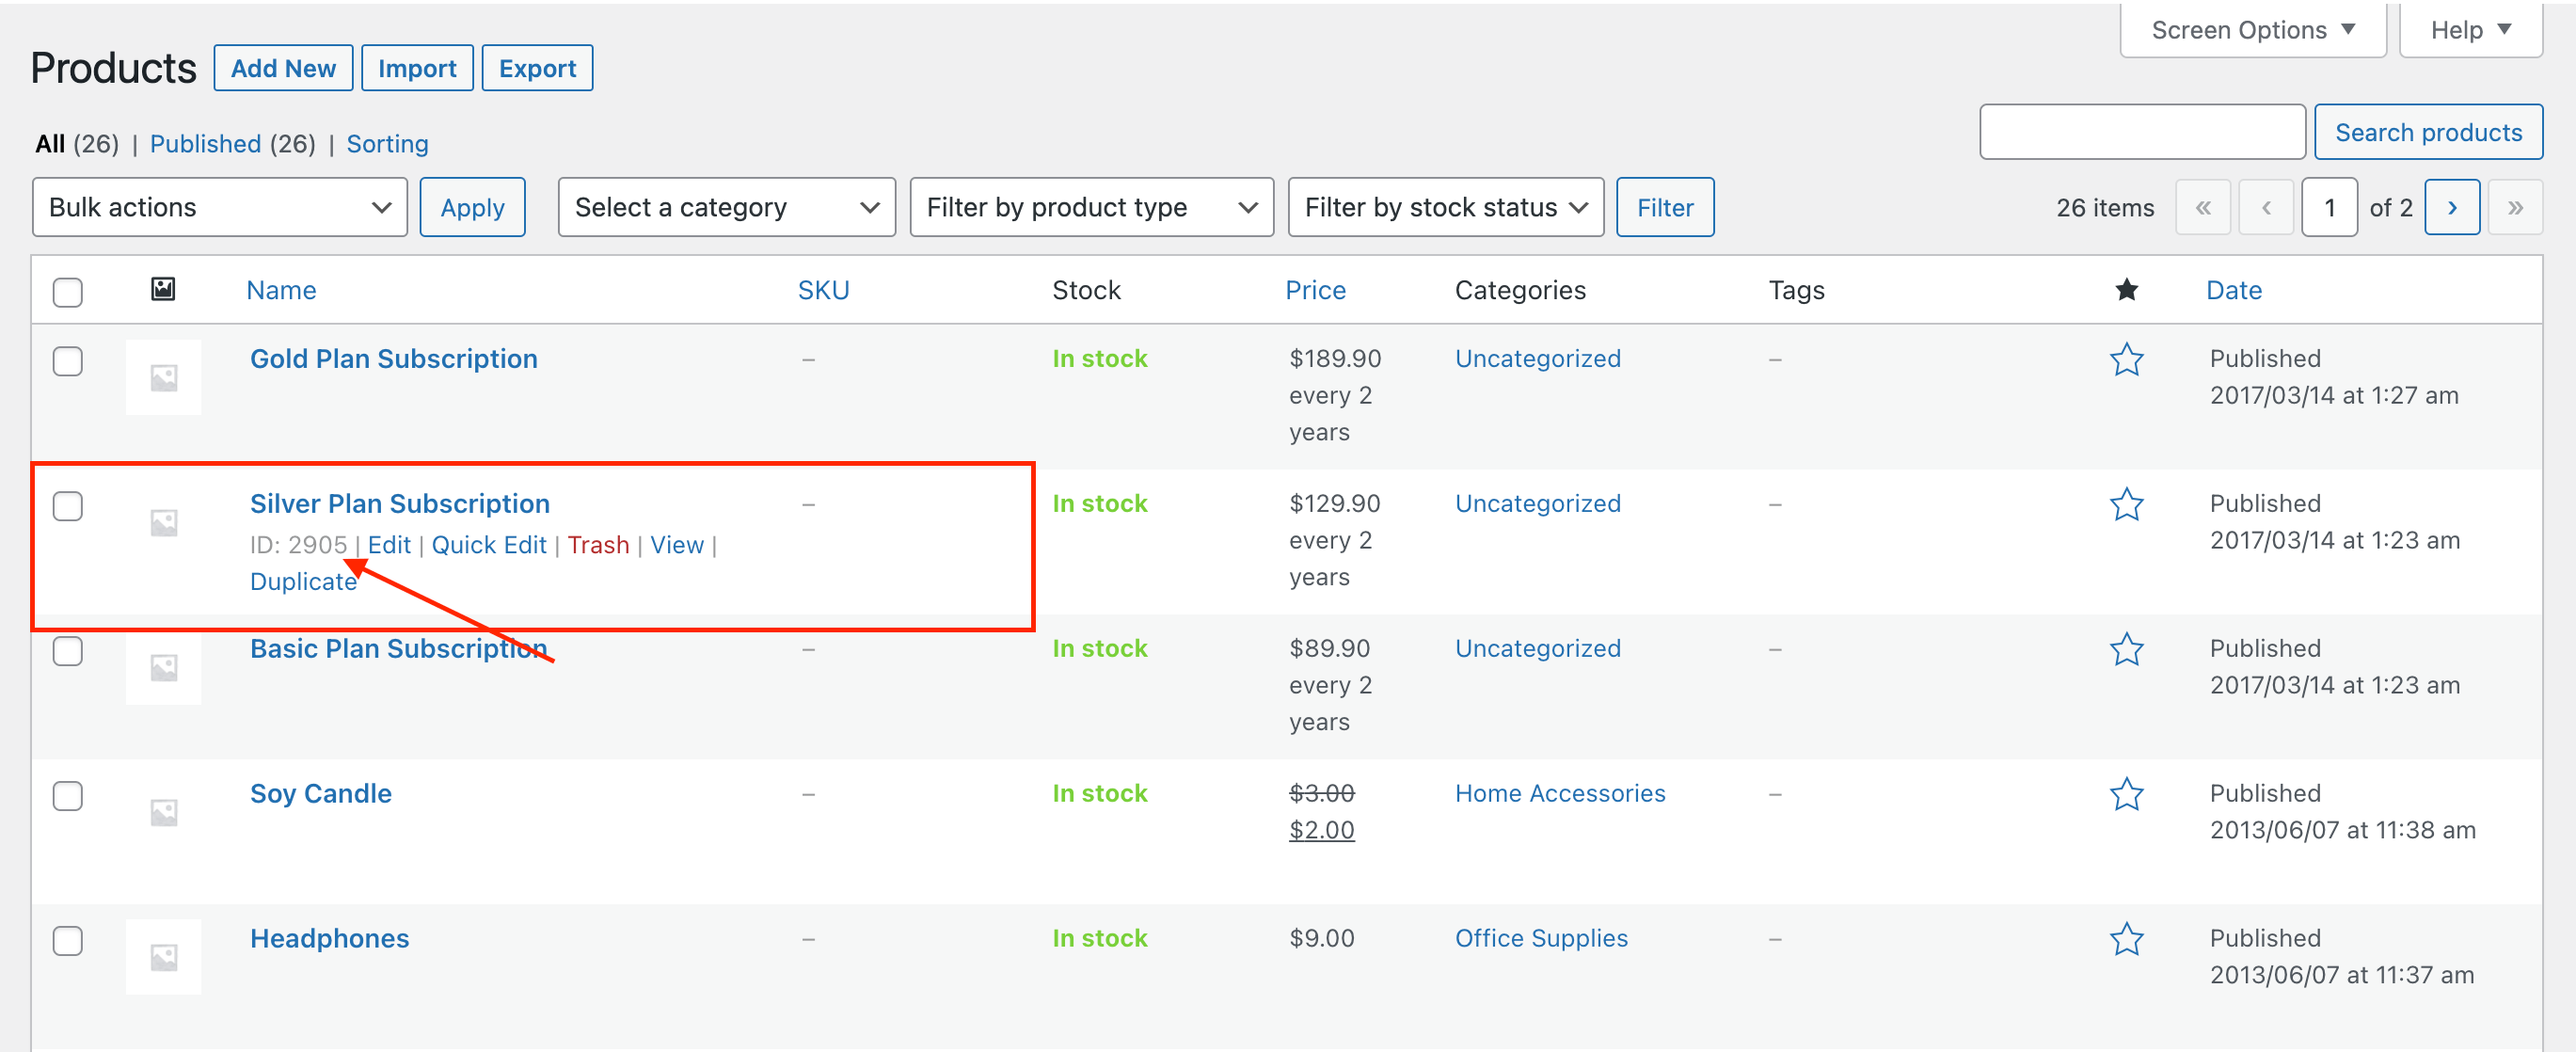
In WooCommerce, a product ID is a unique identifier assigned to each product in your online store. It is a numerical value that helps WooCommerce to distinguish between different products and manage them accordingly. The product ID is used in various areas of WooCommerce, such as in the product URL, order details, and reports.

To create an add to cart URL, you need to locate the product ID of the product you want to add. Here’s how to find it:
- Log in to your WordPress dashboard.
- Go to Products > All Products.
- Hover over the product page you want to add to the cart.
- The product ID will appear at the end of the URL in the browser’s address bar.
Understanding URL parameters
URL parameters are a way to pass data to a webpage through the URL. In WooCommerce, URL parameters are used to pass information about the product to the add to cart URL. The two most important URL parameters for creating an add to cart URL are:
- add-to-cart: This parameter tells WooCommerce to add the product to the cart.
- quantity: This parameter specifies the quantity of the product to add to the cart.
Creating an add to cart URL for a simple WooCommerce product
Now that you know the product ID and understand URL parameters, you can create an add to cart URL. Here’s how:
- Open a new browser window or tab.
- Type your website’s URL and add /?add-to-cart= followed by the product ID.
- For example, if your website’s URL is https://example.com and the product ID is 123, the URL would be https://example.com/?add-to-cart=123 .
- To add a specific quantity of the product, add &quantity= followed by the quantity.
- For example, to add two units of the product, the URL would be https://example.com/?add-to-cart=123&quantity=2 .
You can create an add to cart URL for multiple products by adding more add-to-cart and quantity parameters separated by an ampersand &.
URL to add a simple product to the cart and redirect to the cart
https://example.com/cart/?add-to-cart=25&quantity=1
Keep in mind, if you have modified the link for the cart, make sure to substitute “cart” with “basket”, for instance. To get this to work, you must also select the “Allow AJAX add to cart buttons on archives” setting under WooCommerce -> Settings -> Products -> General.
URL to add a simple product to the cart and redirect to the checkout page
https://example.com/checkout/?add-to-cart=25&quantity=1
Make sure you check the “Enable AJAX add to cart buttons on archives” box in the WooCommerce section under Settings > Products > General and uncheck the option for “Redirect to the cart page after successful addition” for this feature to work.
URL to add a simple product to the cart and redirect to any page
https://example.com/your_custom_page/?add-to-cart=25&quantity=1
Remember, for this to work, you must tick the “Enable AJAX add to cart buttons on archives” option under WooCommerce –> Settings –> Products -> General and also disable “Redirect to the cart page after successful addition”.
Add to cart URL for variable products
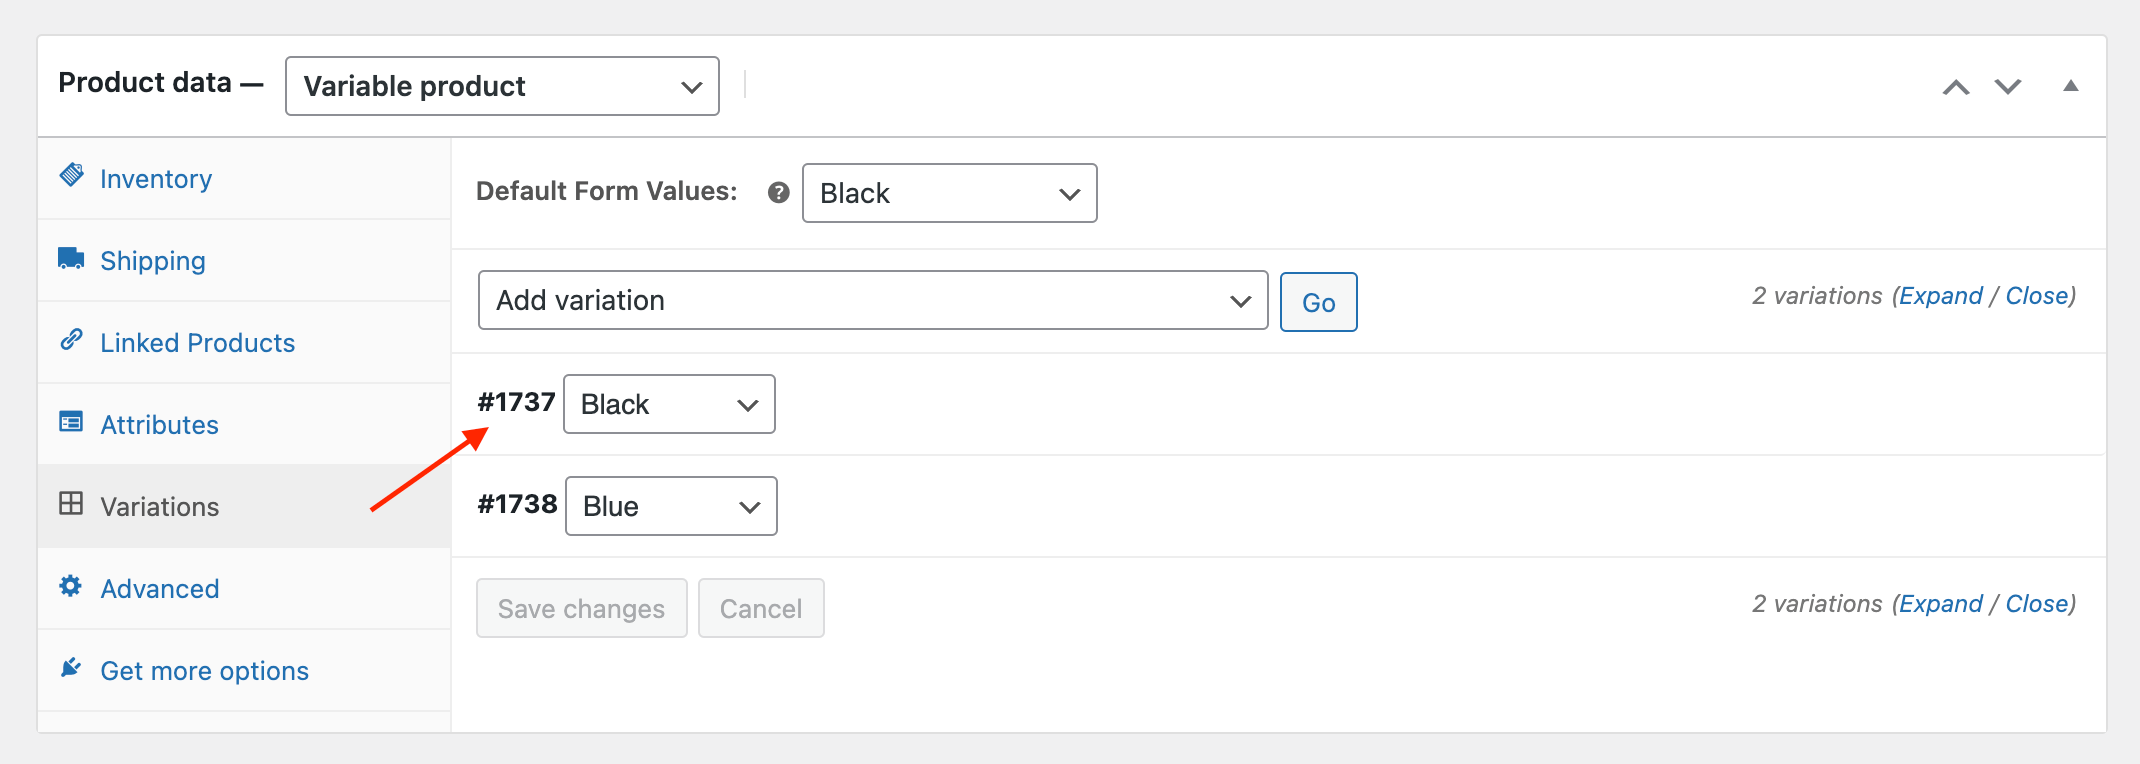
Here, things were originally complicated, but now it’s much easier! All you need is the variation ID. Here’s where you can find it:
WooCommerce URL to add one variable product to the cart
https://example.com/?add-to-cart=88&quantity=1
As per the example above, only the Variation ID (88) should be included here.
You can also change the quantity, redirect to cart, checkout, and another page in the same way we’ve seen for the simple products; you just need to use the specific product variation ID.
Testing the Add-to-Cart URL
It’s essential to test the add-to-cart URL to ensure that it’s working correctly. Here’s how to test it:
- Copy the add-to-cart URL you created.
- Open a new browser window or tab.
- Paste the URL into the address bar and press Enter.
- The product should be added to the cart, and you should be redirected to the cart page.
Implementation
Now that you’ve created and tested the add-to-cart URL, you can implement it on your website. Here are some ways to do it:
- Embed the URL in buttons, images, or text.
- Create a custom add-to-cart button with the URL.
- Use the URL in email campaigns or social media posts to promote products.

Unlock the Full Potential of Your WooCommerce Customer Data
Optimizing Add-to-Cart URLs with Users Insights
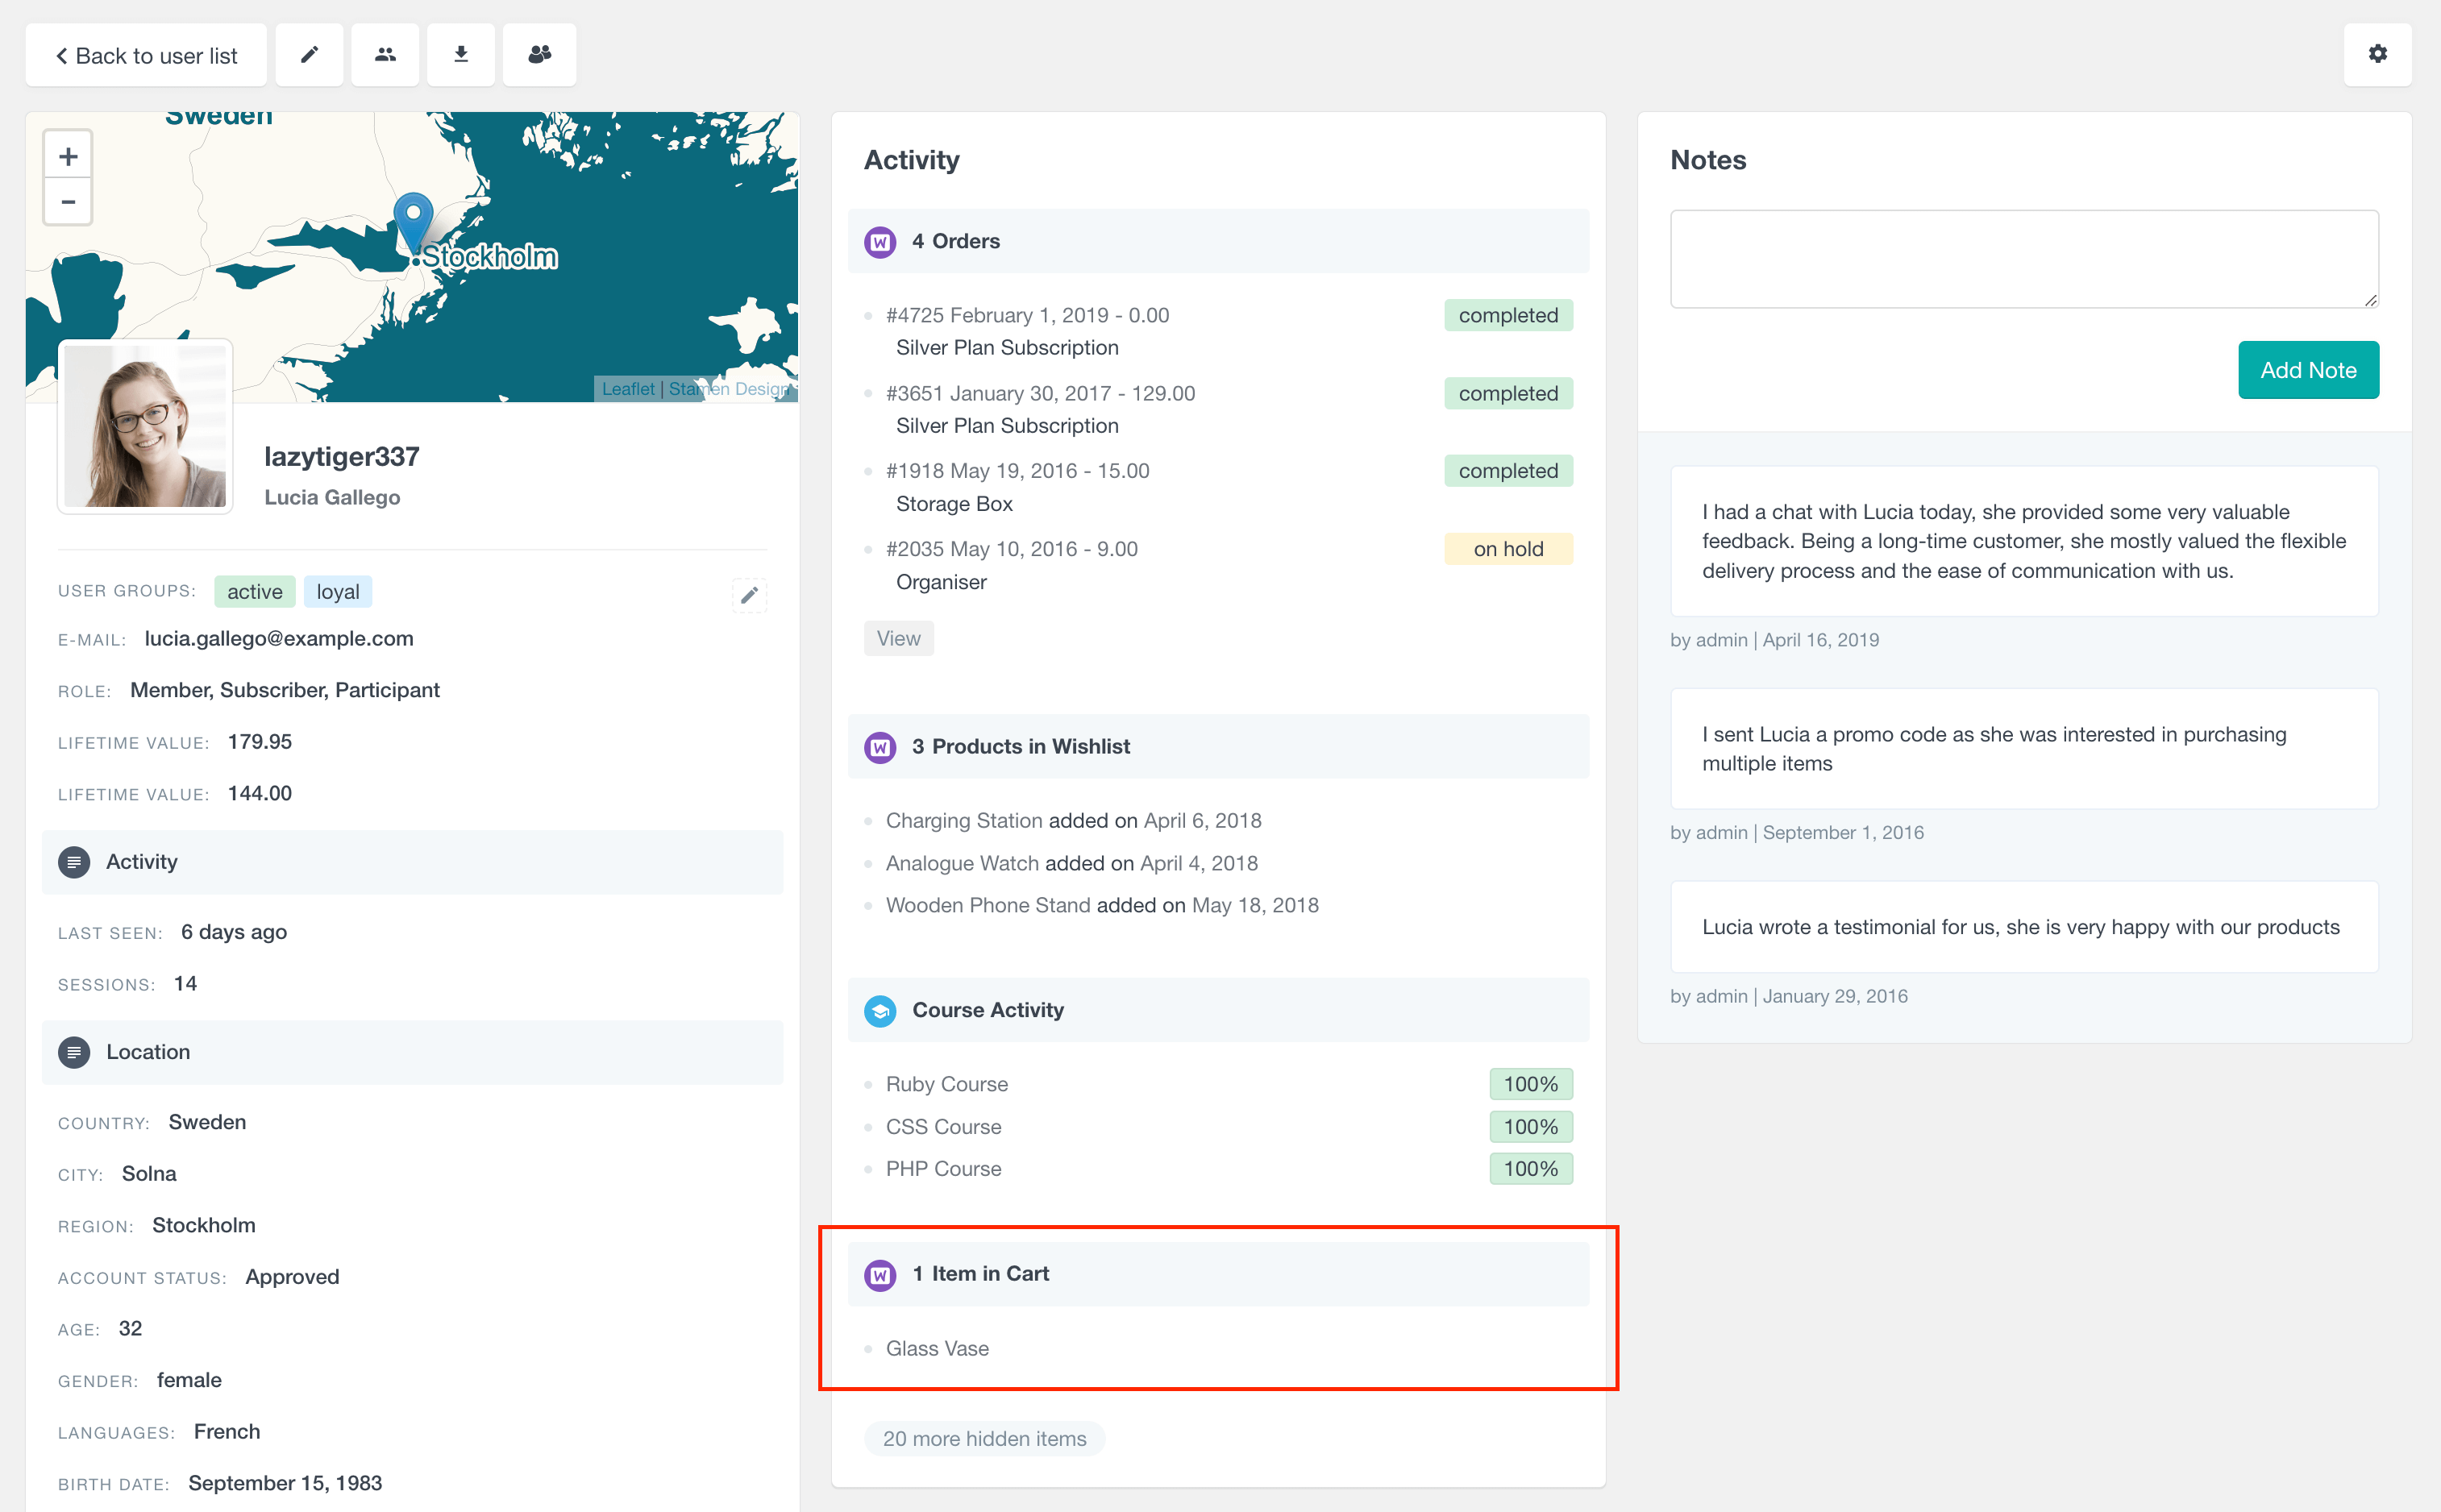
If you’re leveraging custom add-to-cart URLs across different channels (e.g., emails, social media, or product pages), it’s essential to track how users interact with these URLs and are they adding products in their carts. The Users Insights plugin allows you to monitor user behavior and segment customers based on their actions.
For instance, using the smart filters feature, you can identify which users added products to their carts via custom URLs and whether they completed their purchases. This data can be exported and analyzed further to optimize the add-to-cart URLs or to refine your marketing campaigns.
View customer carts in WooCommerce
View all customers who have a specific product in the cart
To view all customers who have a specific product in their cart, use the “Product in Cart” filter. When you select this filter, a drop-down menu will display all your WooCommerce products, allowing you to search for and choose the product you’re interested in.
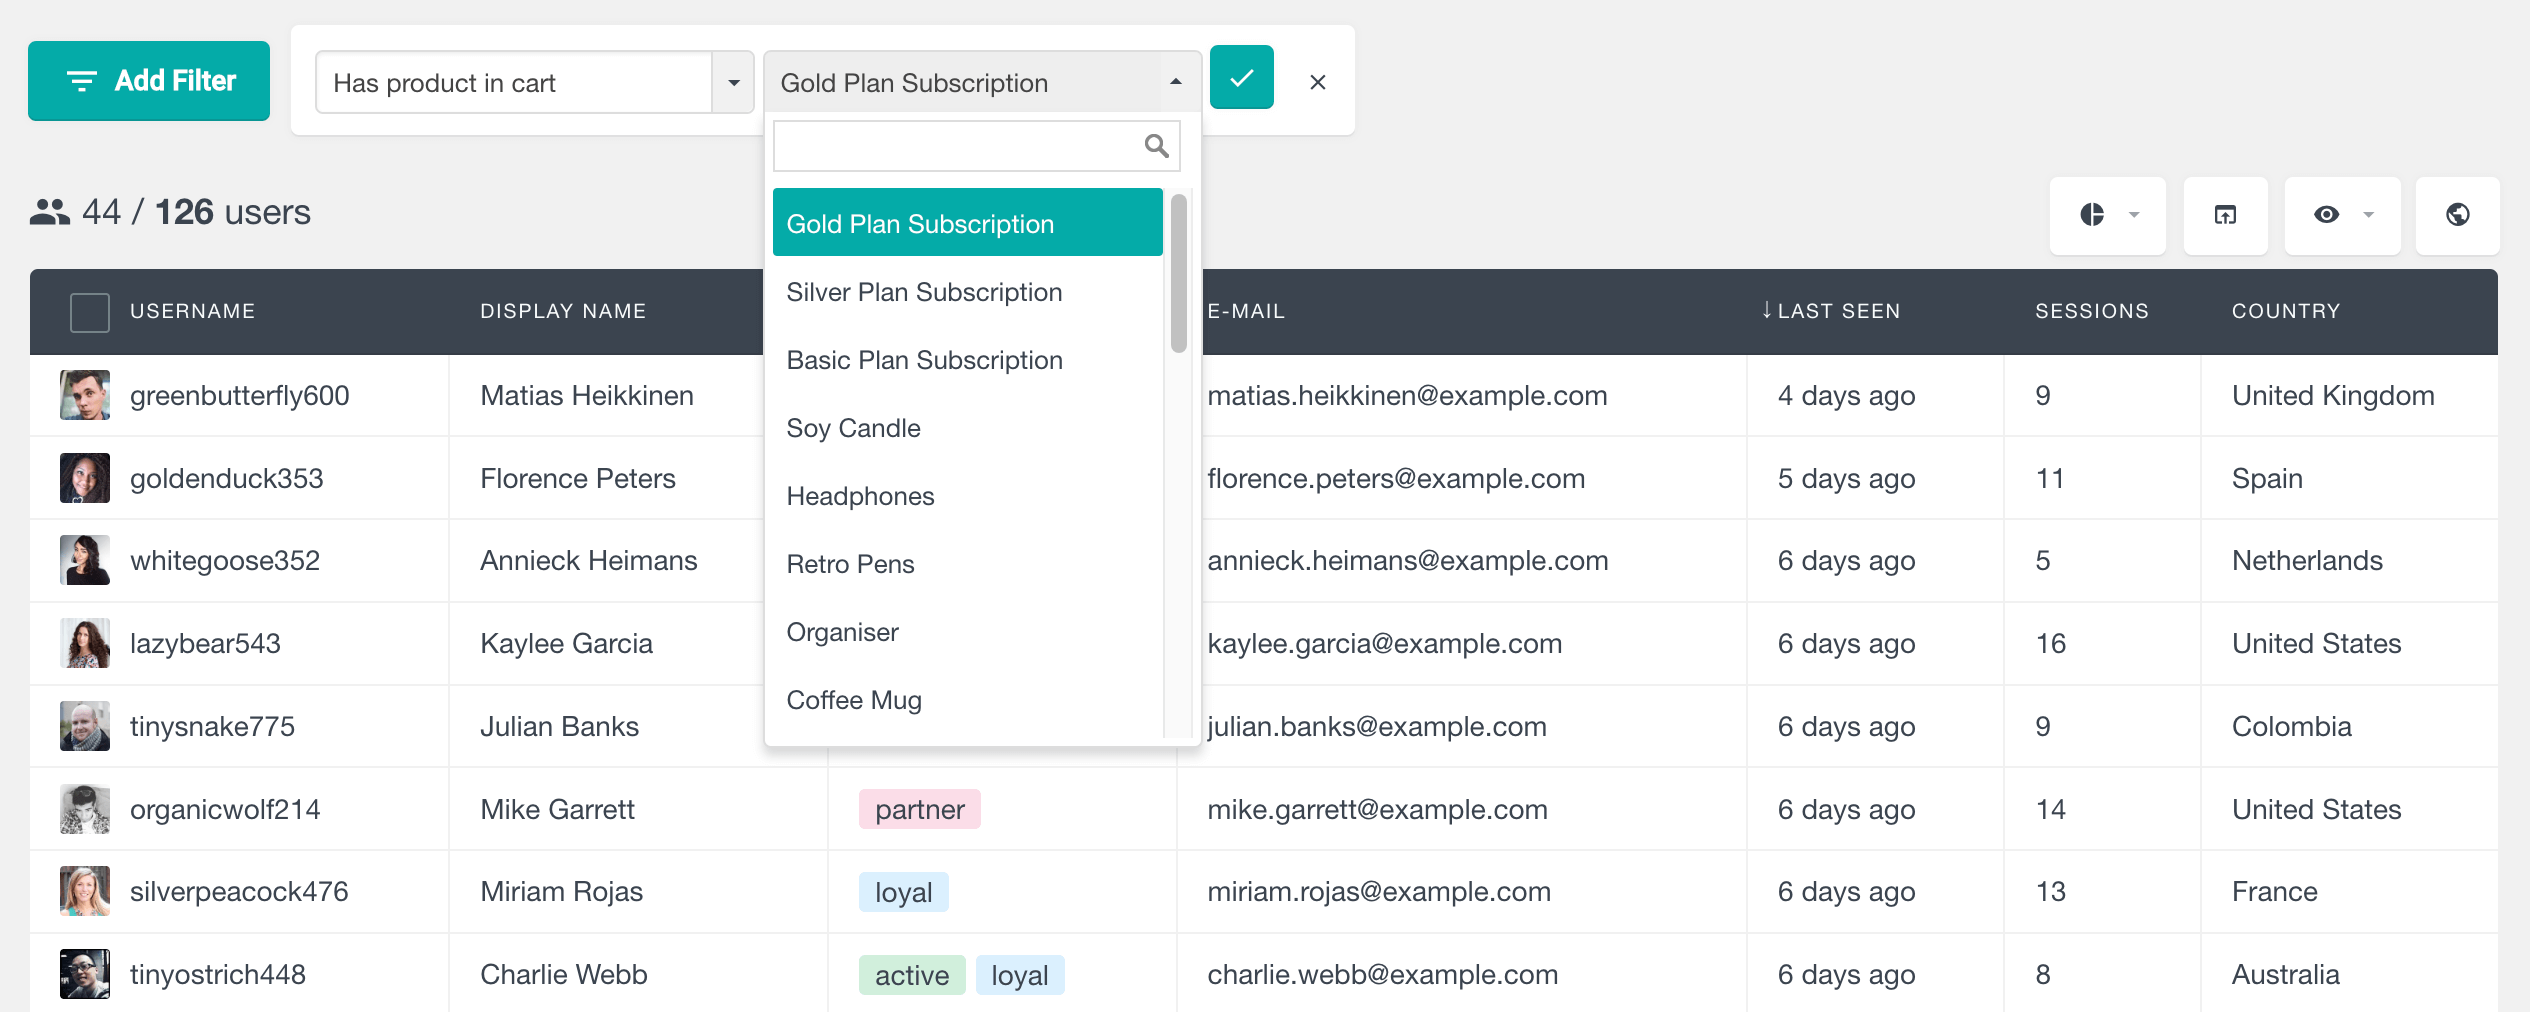
After applying the filter, you’ll see a list of customers who currently have that specific product in their shopping cart. This feature makes it easy to track customer interest in particular products within your WooCommerce store.
View WooCommerce Abandoned Carts Report
The WooCommerce Abandoned Carts Report in Users Insights provides detailed tracking of abandoned carts from logged-in users over various time periods. Available on the WooCommerce reports page, this report relies on the WooCommerce persistent cart feature, which is enabled by default.
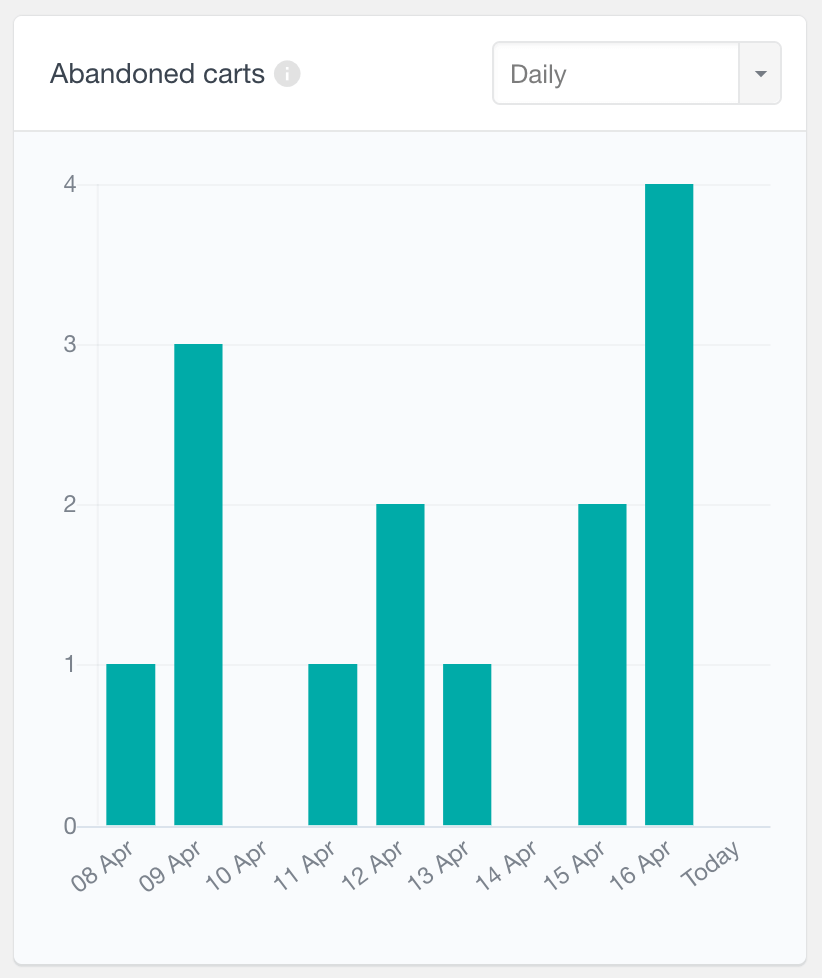
With this report, you can view abandoned cart data at daily, weekly, monthly, or yearly intervals. By analyzing these patterns, the report helps you identify trends in cart abandonment, allowing you to take action to reduce abandoned carts, recover lost sales, and optimize the WooCommerce checkout process for improved conversion rates.
Conclusion
Creating a custom “Add to Cart” URL in WooCommerce enables the construction of a custom URL to add specific products to a customer’s shopping cart. It involves crafting the URL structure, adding product and quantity parameters, and ensuring a seamless redirection to the WooCommerce cart. Following the steps in this tutorial and implementing best practices, you can create effective add-to-cart URLs for your online store.

