How to customize the WooCommerce product category page
In this guide, we’ll explore WooCommerce product category pages. We’ll cover how to customize your category page, providing step-by-step instructions to tailor pages according to specific preferences. Additionally, we’ll explore methods and tools available to customize category pages, enabling efficient modification of layouts and designs for enhanced user experience and unique product displays.
What is a WooCommerce product category page?
The WooCommerce category page is an archive template that displays a collection of products assigned to a specific category within an e-commerce store. It serves as a catalog or index, showcasing products falling under a designated category and facilitating organized navigation and product browsing for website visitors.

This page is automatically available in every WooCommerce store. To view the page of any category, navigate to Products > Categories in your WordPress dashboard and click on the “View” link next to the category you would like to see.
The category page in WooCommerce is also accessible via the /product-category/category-slug/ path:

How to add a WooCommerce category page to the menu
Like any other WordPress page, the product category pages are available by default to be added to the navigation menus.
To add a category page to the menu, you can follow these steps:
- Go to “Appearance” > “Menus” in the WordPress dashboard.
- Select the menu where you want to add the product category page or create a new menu.
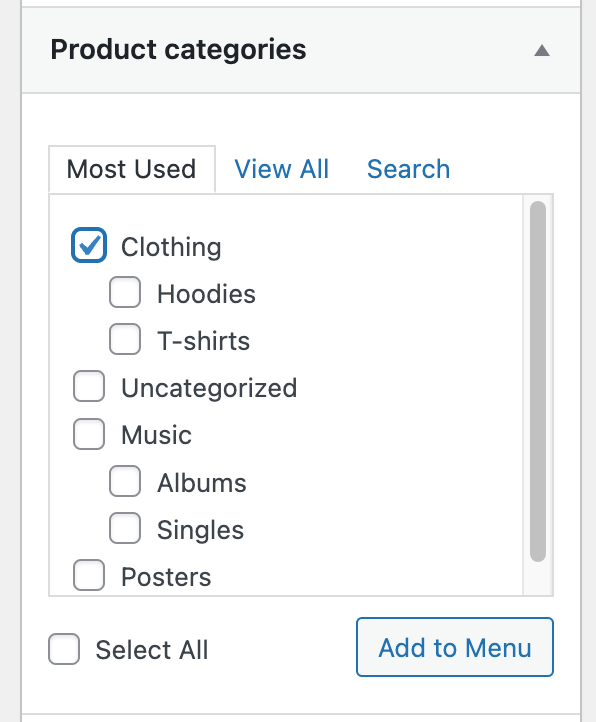
- In the “Add menu items” section, expand the “Product categories” tab
- Select the category that you would like to add to your menu and click on the “Add to Menu” button
- Click on the “Save menu” button
How to customize your WooCommerce category page
The following section will focus on how to customize your WooCommerce category page. We will provide techniques to modify the standard category page layout and elements to tailor the display of products, optimize user experience, and meet specific design or functional requirements. Customizing the default WooCommerce category page allows for seamless transitions from category listings to the corresponding product page, enhancing customer engagement.
How to add content to the category page
Adding text to product category pages benefits SEO (Search Engine Optimization) by providing valuable content that search engines can index and understand. By including descriptive and relevant text on category pages, you offer context to both users and search engines about the products within that category. This descriptive content can contain keywords, key phrases, and information related to the category’s products, aiding search engines in associating the page with specific search queries. Additionally, it enhances the overall content depth of the website, potentially improving organic search visibility and rankings for relevant search queries.

Unlock the Full Potential of Your WooCommerce Customer Data
Adding content using category description
WooCommerce categories allow users to enter a description displayed at the beginning of the category page.
To add a product category description in WooCommerce, go to “Products” > “Categories” in the WordPress admin dashboard. Choose a category or create a new one. Enter descriptive text in the “Description” field within the category editing screen and save changes.
It is important to note that this description can only contain simple text without markup and images. If you need to add more advanced content, you can use the WooCommerce hook method described in the next section.
Adding content using custom code
You can programmatically add rich and more dynamic content to your product category pages using WooCommerce the woocommerce_before_main_content hook:
add_action('woocommerce_before_main_content', function(){
  if(is_product_category('clothing')){
    echo '<p>This is a <strong>custom</strong> description added programmatically.</p>';
  }
});
The following screenshot shows the custom category description added from the admin dashboard (in red) and the custom category content we added programmatically (in blue).
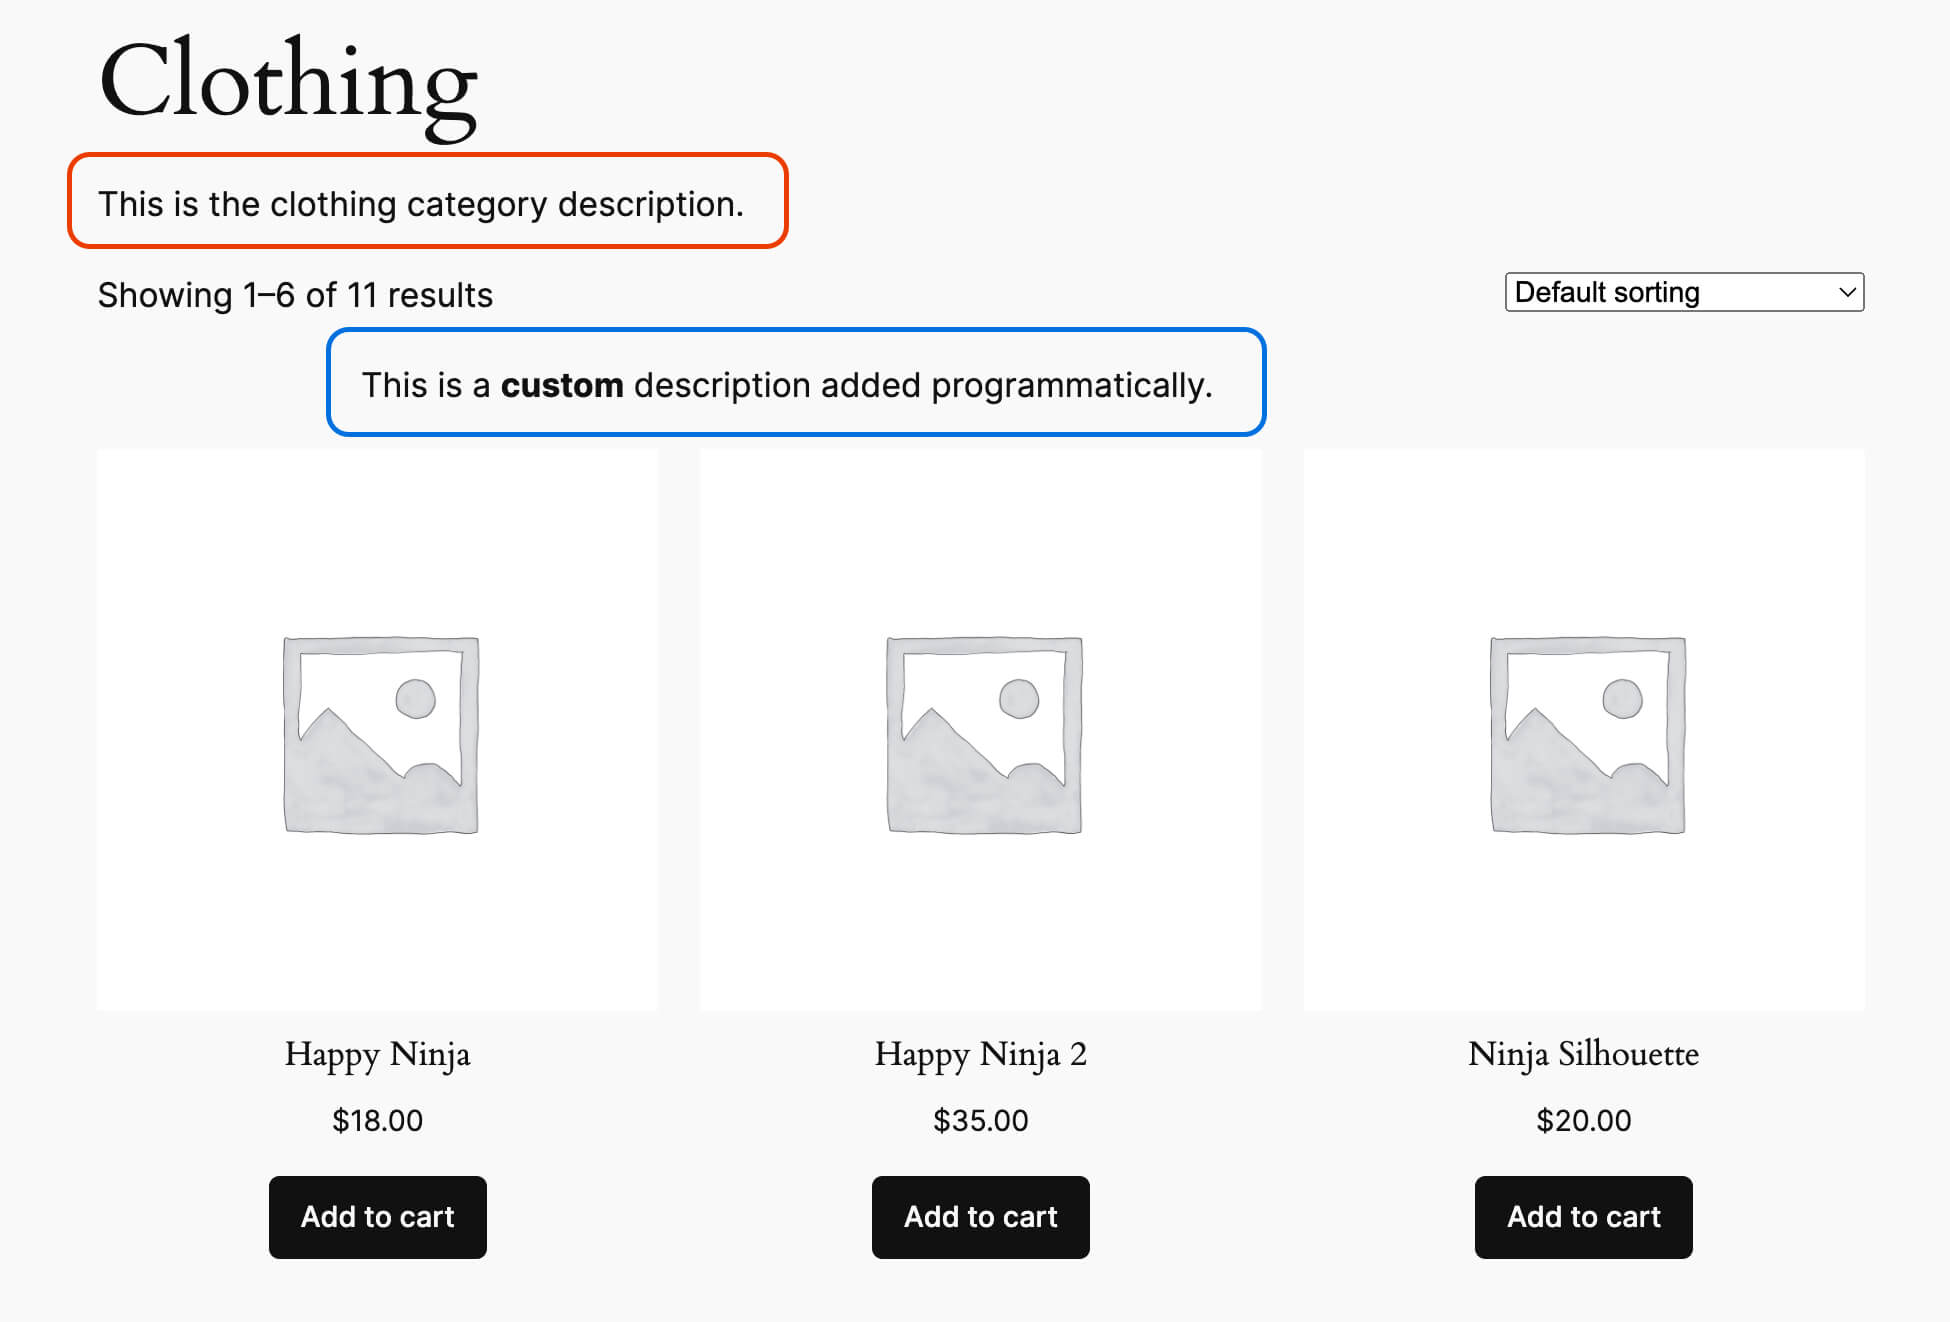
The provided code snippet hooks to the woocommerce_before_main_content action and checks if the current page corresponds to the ‘clothing’ product category using the is_product_category() function. It displays custom HTML content on the page if the condition is met.
How to change the number of products per page
We can use the filter to change the number of products per page on the category pages. This filter allows changing the number of products per page in all product listings. That’s why when using this filter, we must apply it only on category pages. This is done by using the is_product_category() function:
function my_change_category_products_per_page( $products_per_page ) {
  if(is_product_category()){
    $products_per_page = 6;
  }
  return $products_per_page;
}

add_filter( 'loop_shop_per_page', 'my_change_category_products_per_page', 9999 );
This code snippet sets 6 products per page on all category pages. If you need to change that only for a specific category, you can specify the category slug in the is_product_category() check:
function my_change_category_products_per_page( $products_per_page ) {
  if(is_product_category('clothing')){
    $products_per_page = 6;
  }
  return $products_per_page;
}

add_filter( 'loop_shop_per_page', 'my_change_category_products_per_page', 9999 );
How to change the number of product columns on category pages
Another way to customize the category page is by changing the number of product columns. This can be accomplished by using the loop_shop_columns filter. This filter enables the adjustment of column numbers across all product listings, including the main shop page. Therefore, when implementing this filter, it’s crucial to ensure that it is applied only on category pages.
function my_change_category_columns( $columns ) {
  if(is_product_category()){
    $columns = 2;
  }
  return $columns;
}

add_filter( 'loop_shop_columns', 'my_change_category_columns', 9999 );
This code changes the number of columns on all category pages. To change it on a specific category page only, you can specify the category slug in the is_product_category() check:
is_product_category('clothing')
Please note that for the products to appear in the intended column sizes, your theme needs to support a layout compatible with the specified number of columns.
How to customize your category page template
The WooCommerce product category template can be overridden by creating a corresponding file in the child theme directory with the same path structure. This allows you to create a completely custom WooCommerce category page. To create a custom WooCommerce category page template, you first need to locate the original template file in the WooCommerce plugin:
wp-content/plugins/woocommerce/templates/taxonomy-product_cat.php
After that, create a new folder named ‘woocommerce’ within your child theme and copy the template file into this folder.
wp-content/themes/your_child_theme/woocommerce/taxonomy-product_cat.php
Once copied, you can freely edit and apply changes to this file.
If you need to create a template for a specific product category only, you can create a copy of the taxonomy-product_cat.php with the following name format:
taxonomy-product_cat-{slug}.php
So, for example, for the category with the slug “clothing”, the file format should be:
taxonomy-product_cat-clothing.php
How to create a custom category page using a shortcode
In certain instances, creating custom WooCommerce category pages for particular categories or promotional campaigns might be necessary. These custom pages can supplement the standard/default category pages, providing a targeted and distinct presentation for selected categories or promotional events.
These pages can be easily created using the WooCommerce core shortcodes. The advantage of creating such pages is that you fully control how to structure the page content. Additionally, you can use your favorite page builder, such as Elementor, to create more dynamic content on your WooCommerce website. This includes additional product images, product recommendations, and customer testimonials.
To create a custom category page, first create a standard page from the Pages -> Add New section of your dashboard. After this, to add the products from your selected category, use the [products] shortcode with the category slug set as an attribute:
[products category="clothing" paginate="true" limit="6" columns="3" orderby="popularity"]
In this example, the [products] shortcode uses the following attributes:
- category – the product category slug
- paginate – set to true, so that product pagination is displayed
- limit – sets how many products to display per page
- columns – sets how many columns of products to display
- orderby – sets the sorting order of the category products. In this case we have selected “popularity” to display the best selling products first. Other options that you can use are date, id, menu_order, rating, and title.
How to filter customers by product category purchased
With the product category filer of Users Insights you can filter through your customers by the product categories they’ve bought from in the user table under the “Placed an order” filter. To use this, simply select the “Placed an order” filter, choose the “product category” option and select the category you’re interested in. Once you apply the filter, you’ll see all users who have bought from that category, including subcategories.
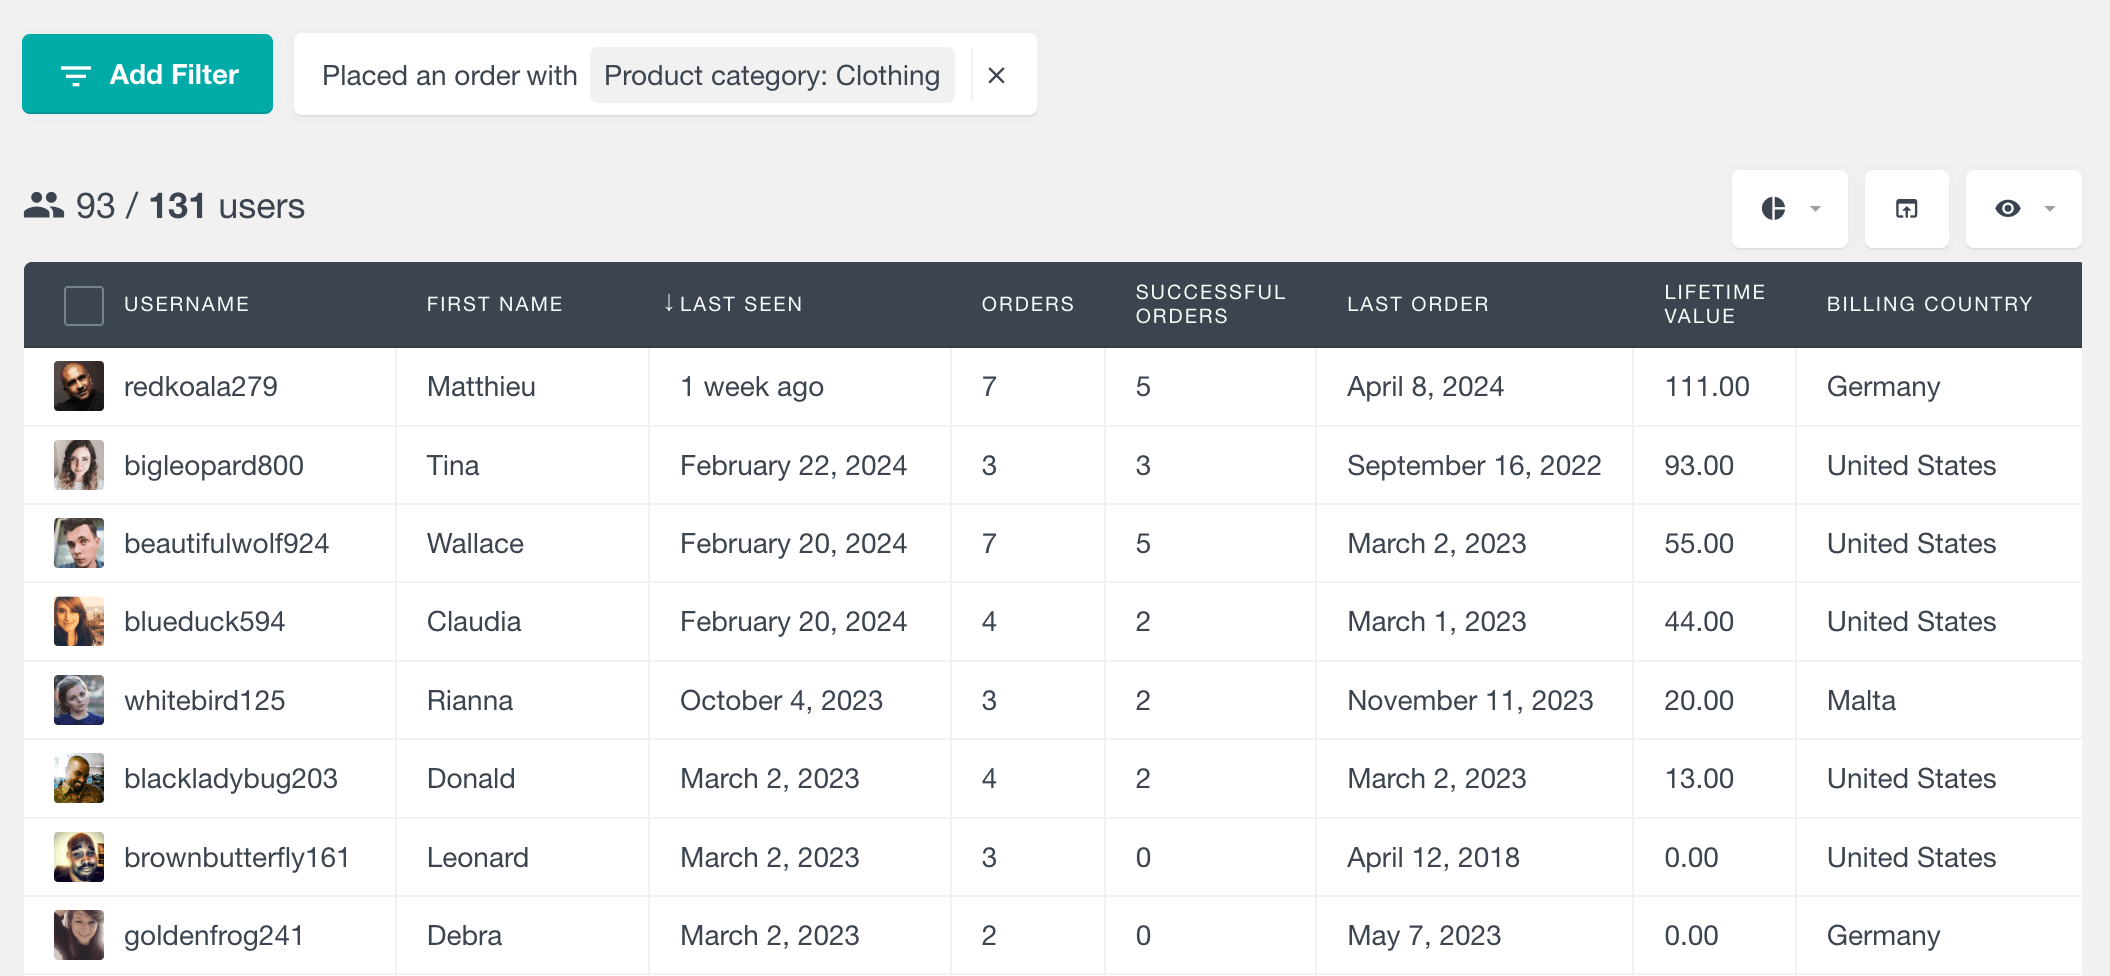
This WooCommerce filter doesn’t stop there – you can combine it with other filters. For example you can find customers who bought from a specific category within a certain timeframe and even narrow it down to those who have completed their orders.

This gives you a powerful way to drill down into your customer data.
Product category reports
The WooCommerce Product Category Reports offer a clear overview of how each product category is performing.
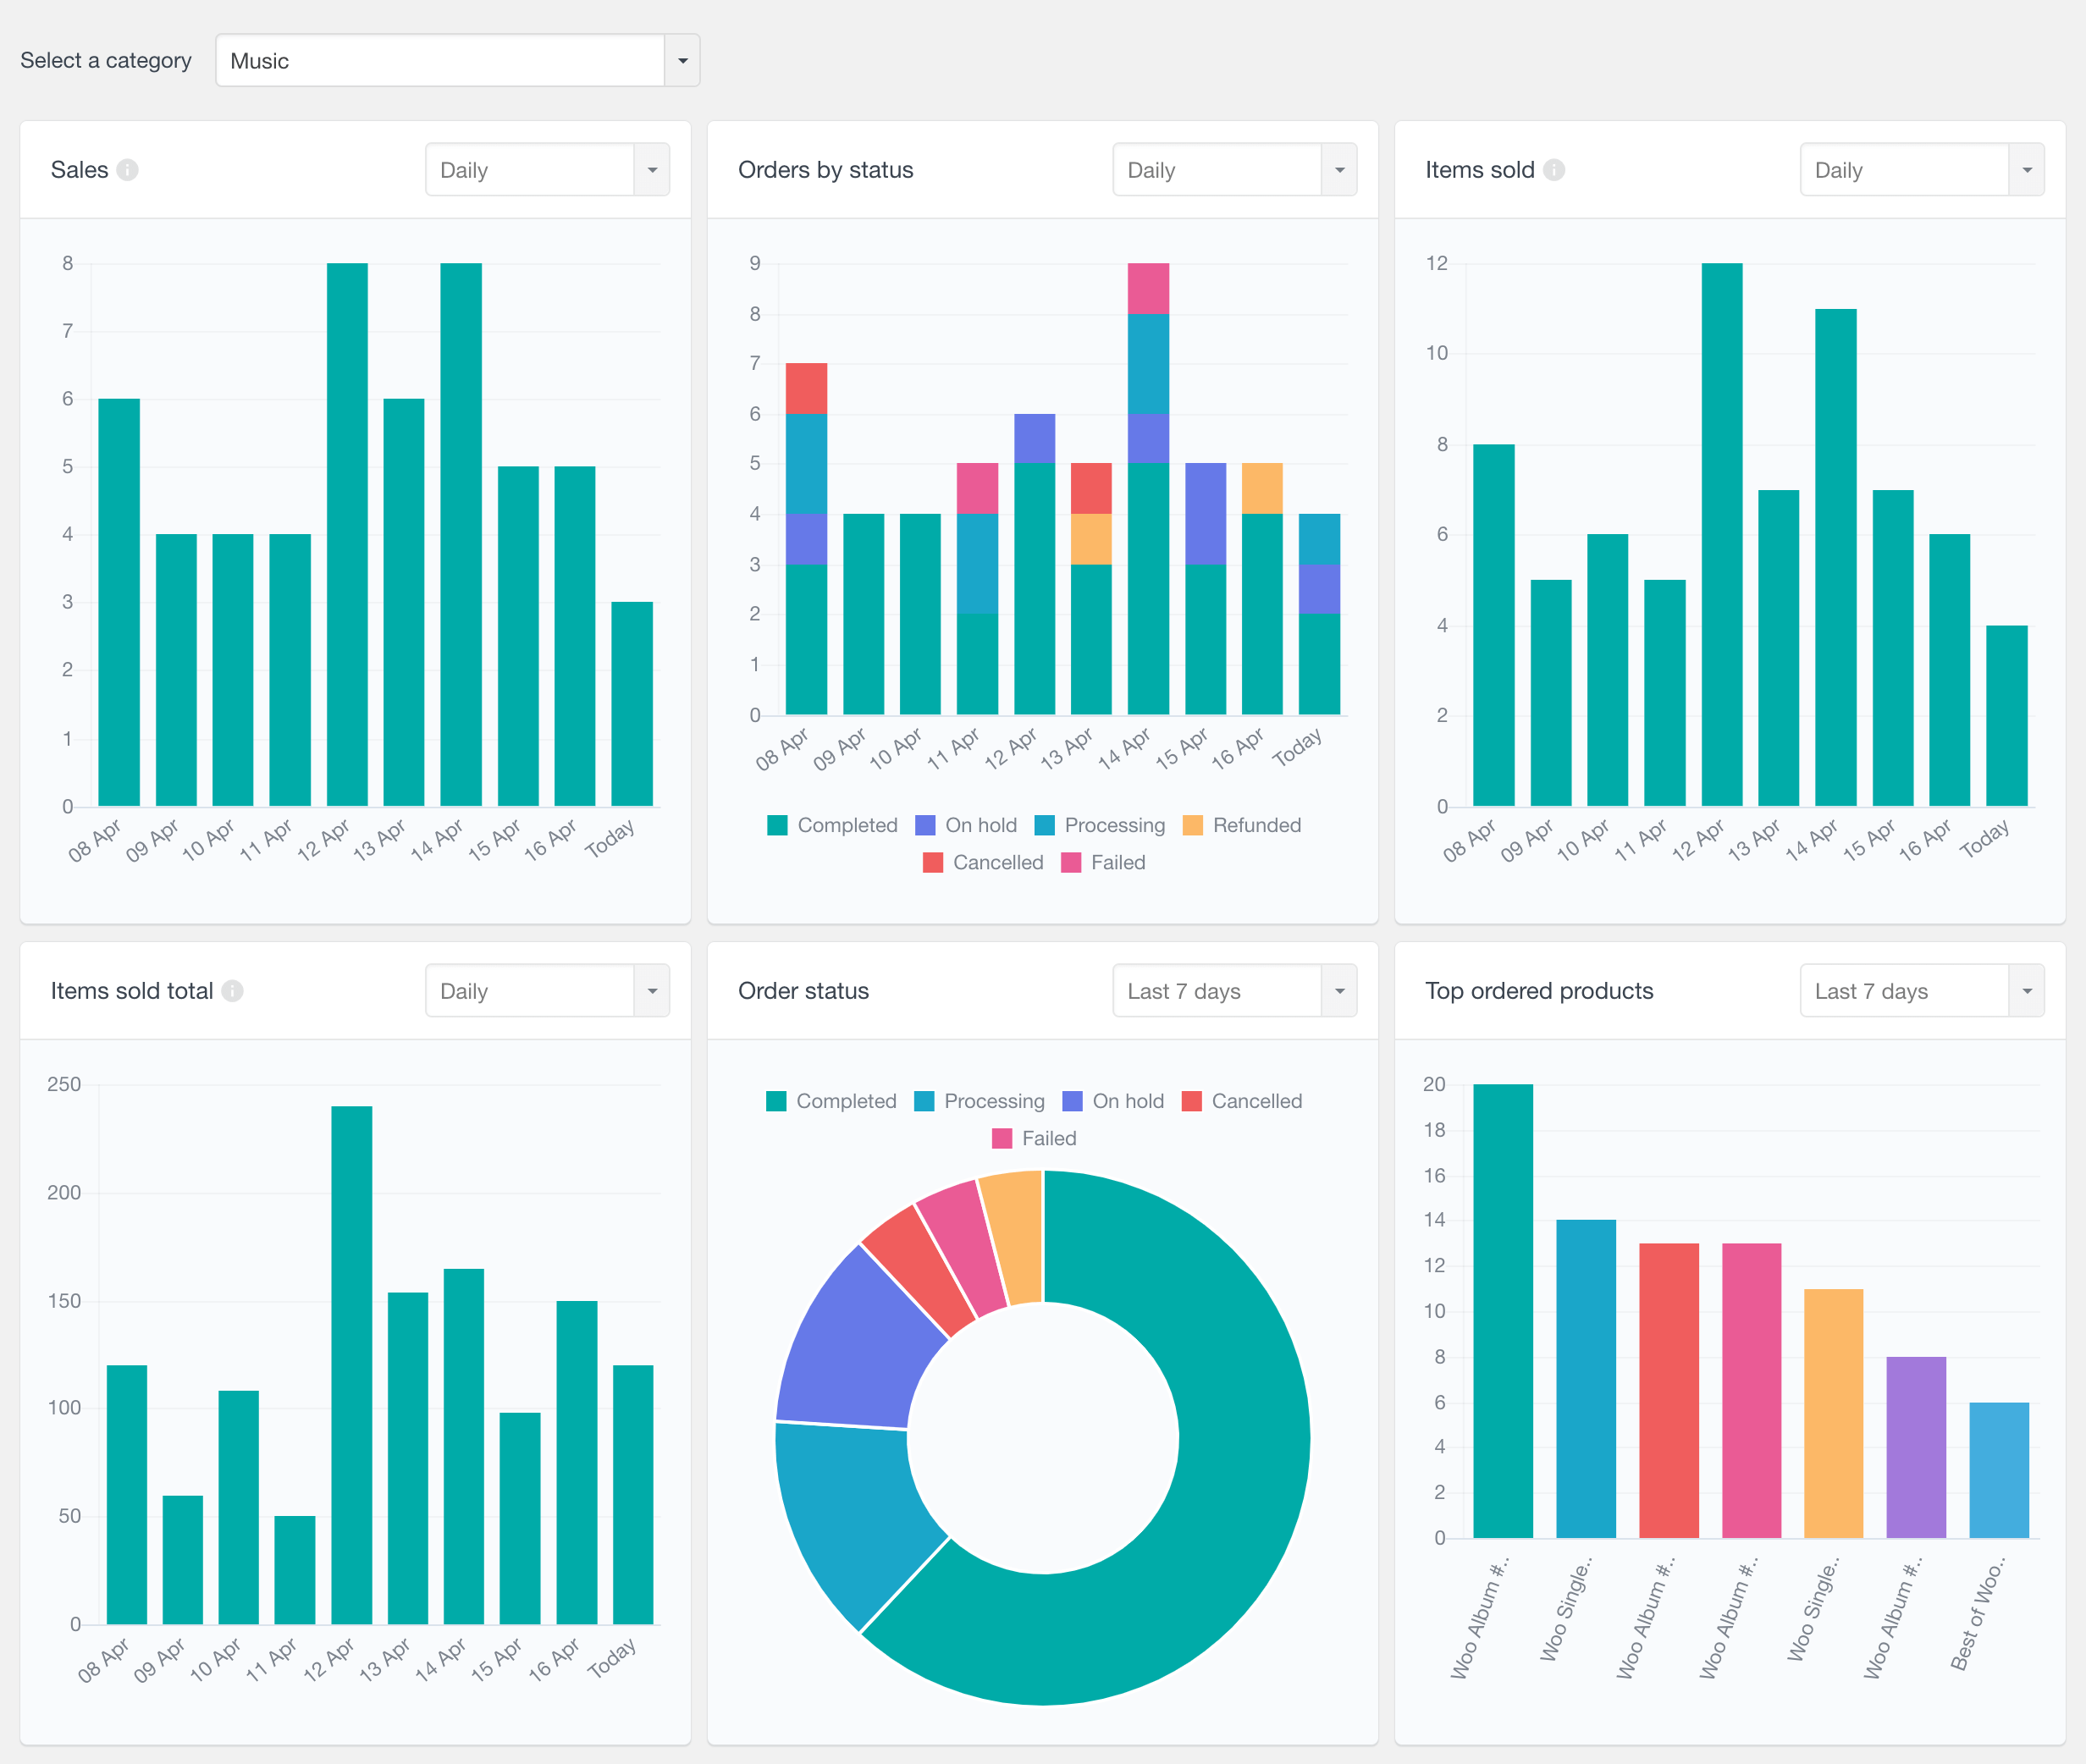
These reports include a range of interactive visuals that display key information, such as:
- Sales: Orders marked as completed, processing or on hold over time.
- Orders by Status: Orders with color-coded segments for each status.
- Items Sold: Total items sold from the category over time.
- Total Items Sold: Total value of items sold from the category.
- Best Selling Products: Top-selling products with the ability to filter by time period.
- Order Status Breakdown: Pie chart of order status for a selected time period.
Selecting a parent category provides data for all products within that category and its subcategories.
Conclusion
This guide has covered various methods to customize your WooCommerce product category pages. We discussed accessing and adding these pages to menus, incorporating text and content, altering templates, adjusting the number of products and columns displayed, and creating custom category pages using shortcodes. By exploring these techniques, you can precisely tailor the appearance, layout, and functionality of any category page in WooCommerce. With these tools and strategies, you can enhance the overall shopping experience for your customers.