How to logout a user in WooCommerce
Ensuring the security of your customers’ information is crucial when running an e-commerce website through WooCommerce. One method of achieving this is to log out users after they have completed certain actions. This guide will demonstrate how to create a logout function in WooCommerce, using a custom menu link and a custom PHP code.
We are going to explore two very different options to logout a user from WooCommerce. The first one is the more straightforward one where we are going to add a WordPress logout link or button to the site navigation menu that the customer can click to log out of his account at any time.
The second method is more technical and involves writing some custom WordPress code that will automatically log out the user after they complete the checkout process.

How to add a user logout link to the navigation menu in WooCommerce
Having a logout link allows customers to easily sign out when they’ve finished their session, helping to protect their account information and personal data.
By default, to log out of a WordPress site, you can click on the logout link located below your profile picture in the top right corner of the WordPress admin bar. But if the admin bar is disabled, you will need a way for the user to directly access the logout link. The logout link in WordPress can be accessed by visiting the URL:
http://example.com/wp-login.php?action=logout
(make sure to replace “example.com” with your own domain name) in your browser. Upon visiting the link, the user will be taken to a warning page and need to click on the logout link to confirm that they want to log out.
Adding the logout link in WordPress navigation menus
Now that we know what the logout link is we need to make it available to WooCommerce users. To make the WordPress logout link easily accessible from any page on your website, you can add it to your site’s navigation menu.
Simply go to the Appearance » Menus page in your WordPress admin, click on the custom links tab to expand it, and add the logout link from the above in the URL field.
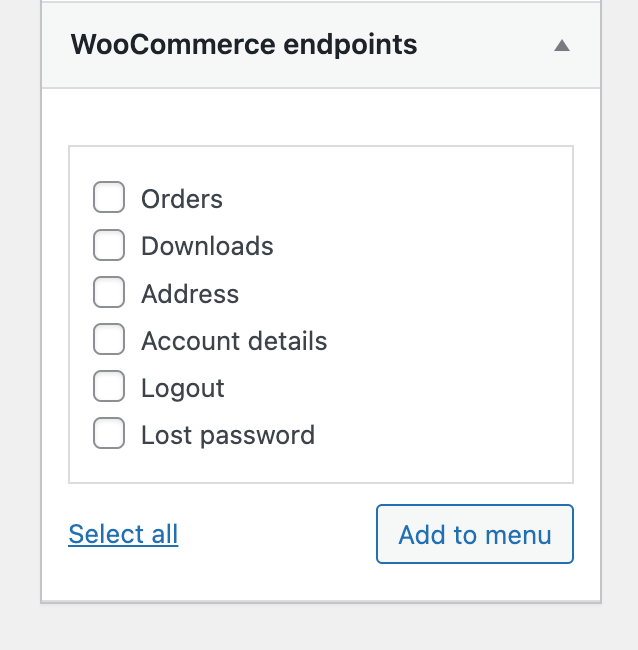
If you want the link to be visible only to logged-in users you will have to ensure you have enabled Display Mode: Logged In Users so that the logout menu link only shows for logged-in users.
Once you’re done, click on the Add to menu button, adjust the link’s position by dragging it up or down, and click on the ‘Save Menu’ button to store your changes. You can now see the logout link in your website’s navigation menu.
How to logout a user after a WooCommerce checkout programmatically
When it comes to running an online store, the checkout process is arguably one of the most important parts. It’s where customers enter their payment information and complete the purchase. But what happens after the sale is just as important. Logging out users properly helps ensure their information remains secure and prevents anyone else from accessing their accounts. This article will explain how to log out a user after a WooCommerce checkout.

Unlock the Full Potential of Your WooCommerce Customer Data
Understanding the WooCommerce checkout process
Before we can implement a logout function, we need to understand how the WooCommerce checkout process works. When a user completes a checkout, WooCommerce creates a session to store information about the user’s order. This session contains data such as the user’s cart contents, shipping and billing information, and payment details.
In addition, WooCommerce can create a user account if the user is not already logged in. This account allows the user to view their order history and manage their account details.
Implementing a logout function
We’ll need to use PHP code to implement a logout function in WooCommerce. Specifically, we’ll use the wp_logout() function and the wp_redirect() function to perform the logout action and redirect the user to a custom page in WooCommerce which in our case is the WooCommerce shop home page. This code implements a function that logs out the user after they complete a WooCommerce checkout and redirects them to the shop page.
// Logourt after checkout and redirect to shop
add_action( 'template_redirect', 'order_received_logout_redirect' );
function order_received_logout_redirect() {
    // Only on "Order received" page
    if( is_wc_endpoint_url('order-received') ) {
        wp_logout(); // Logout

        // Shop redirection url
        $redirect_url = get_permalink( get_option('woocommerce_shop_page_id') );

        wp_redirect($redirect_url); // Redirect to shop

        exit(); // Always exit
    }
}
The above code uses the template_redirect action hook to execute a function that logs the user out and redirects them to the shop page after completing a WooCommerce checkout. The function first checks if the current page is the “Order received” page, then logs the user out using the wp_logout() function, retrieves the URL of the shop page, and redirects the user using wp_redirect() function. Finally, the exit() function is called to ensure that no further code is executed after the redirect.
By using this code, you can ensure that users are logged out after completing checkout and redirected to the shop page, improving the security of your WooCommerce store and providing a better user experience for your customers.
Redirecting to a custom WooCommerce page
In the code snippet above, we used the wp_redirect() function to redirect the user to the home page after logging out. However, you can redirect the user to any custom page by modifying the code accordingly.
To modify the code to redirect to any WooCommerce page instead of the shop page, you can replace the line that sets the $redirect_url variable with a URL of your choice. For example, if you want to redirect to the “My Account” page, you can use the following code:
$redirect_url = get_permalink( get_option('woocommerce_myaccount_page_id') );
This retrieves the permalink of the “My Account” page and sets it as the redirect URL. You can replace woocommerce_myaccount_page_id with the ID of any other WooCommerce page to redirect to that page instead.
Testing the implementation
Once you’ve implemented the logout function, it’s essential to test it to ensure that it’s working as expected. To do this, you can complete a test checkout and verify that the user is logged out after completing the checkout. You can also check the user’s session information to verify that the session has been destroyed.
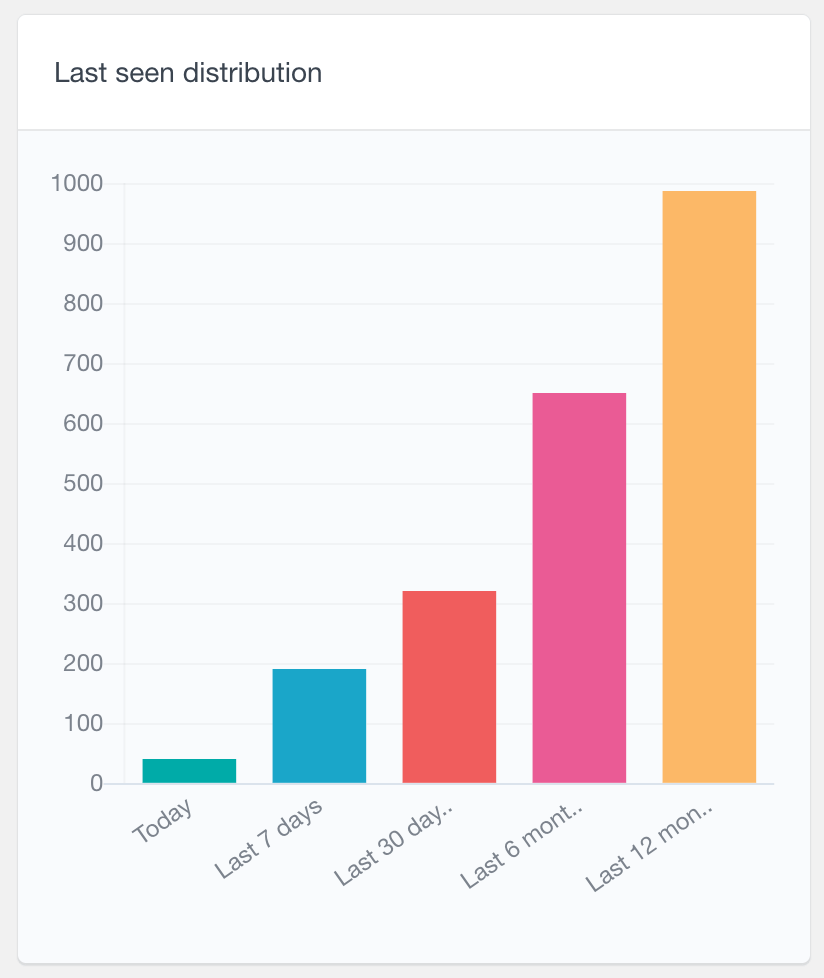
To log out a user in WooCommerce, you can use the Activity module’s “Last seen” user report, which tracks how many users have logged in during recent periods like Today, Last 7 days, and Last 30 days. This helps you monitor user activity and manage logins effectively.
Conclusion
In this article, we have provided a step-by-step guide on how to log out a user from WooCommerce using two different methods. The first method is simple and straightforward and involves adding a WordPress logout link to the website’s navigation menu. The second method is more technical and requires a custom WordPress code to log out the user after they complete the checkout process. By implementing these methods, users can log out safely, improving the security of the WooCommerce store and providing a better user experience for customers.