How to create a custom export of your Gravity Forms user data
Gravity Forms is one of the most popular and versatile WordPress form creation tools. It’ll allow us to store our data like no other. But since its focus is on building forms and storing data, extracting it may not be so easy. Therefore, today we’ll investigate ways to export gravity forms data. We’ll see how you can export your form entries while keeping their connection to the users who submitted them.
Building forms on your website is a great way to engage with your users. It allows feedback and customization. After all, the more we know about our users, the better we can serve them. But after we collect our data, we need to process it. That’s when using tools to better export your data may come in handy.

We sometimes need more than just the data from our form entries. We may need information about the data authors, such as where they are from and if they liked our WordPress website. In addition, we can get a lot of helpful information from other WordPress plugins, like WooCommerce and social network plugins. That’s why it’s so important to find a way to export entries and their authors using Gravity Forms.
Why Export Data From Gravity Forms?
There are many reasons why you might need to export data from Gravity Forms. Perhaps you need to import your form entries into another system, or you need to export your data to Excel or CSV for further analysis.
Moreover, after our data is exported we may need to process it. Therefore, we’ll also find out how to export website data to excel or other spreadsheet software. So, we’ll convert forms into excel format to make our lives easier later.
In conclusion, our goal today is to explore all the different options we’ve got. So, we’ll see how we can use Users Insights and Gravity forms to make the most out of our forms. A quick note, we’ll need to use the User Registration Add-On, which is included in Gravity Forms. This is needed to make sure our form submission is stored as custom user fields as well.
Let’s get started!
Different ways to export your Gravity Forms entries and data in CSV
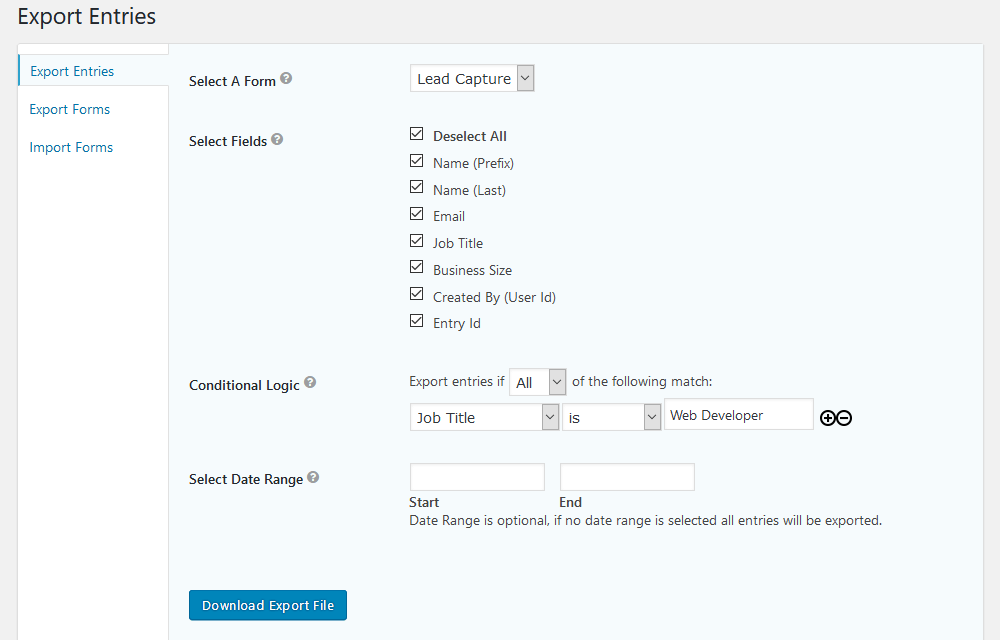
I can imagine that you are already familiar with the Gravity Forms Export function. Well, then our main issue is already covered. How to export Gravity Forms data? Just click Export! Right?
Well, not so fast.
The Gravity Forms export tool can export all form entries. You can even export based on some conditional logic criteria. For example, only export users with the Job Title set as “Web Developer”.
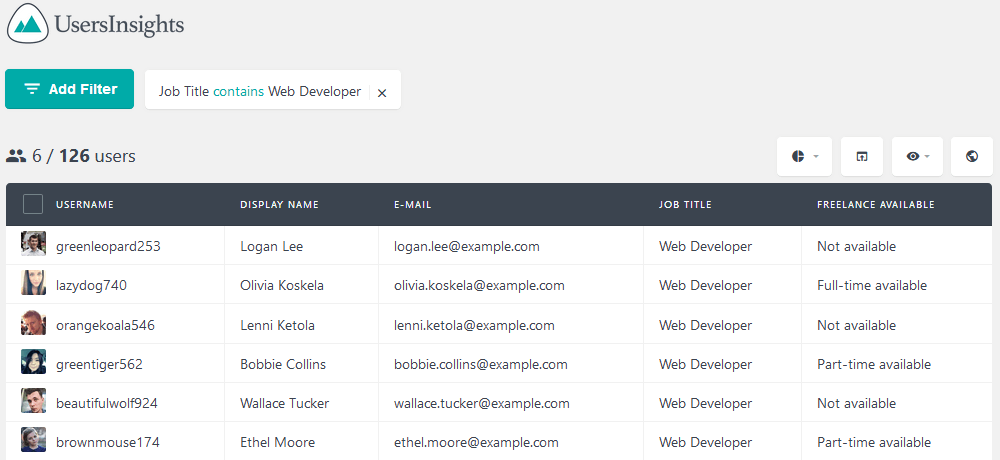
This is nice, but it can be much better. When using a plugin such as Users Insights you still have all the Gravity Forms fields. But you’ll also have all other custom fields from any other plugin.
With the default export tool, you can only apply the conditions and hope for the best. You don’t see the results until you download the CSV file. On the other hand, Users Insights has a filtering tool that auto-updates the user’s table. This means that you are not flying blind when it comes to your conditional logic criteria.
This means that you can create complex filters. Then you can export gravity forms entries to CSV and data right from your WordPress dashboard and import into other systems, such as MailChimp.
Crating Gravity Forms full data export
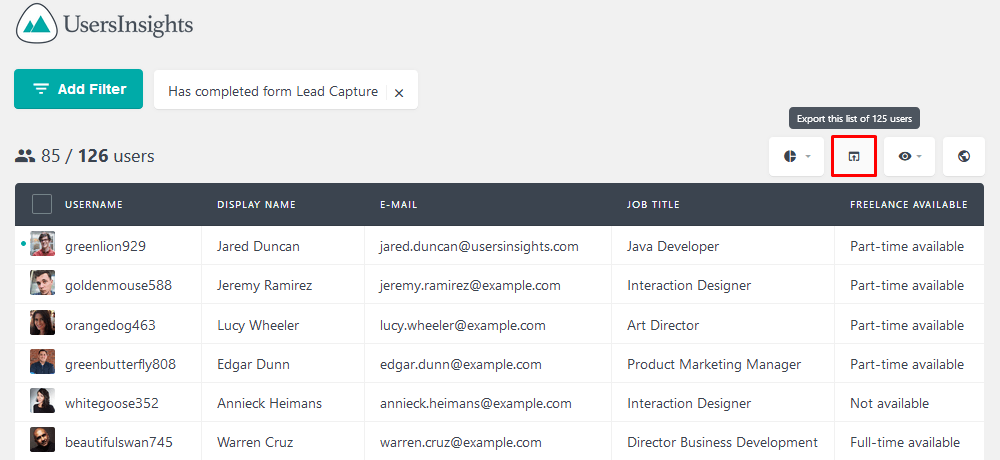
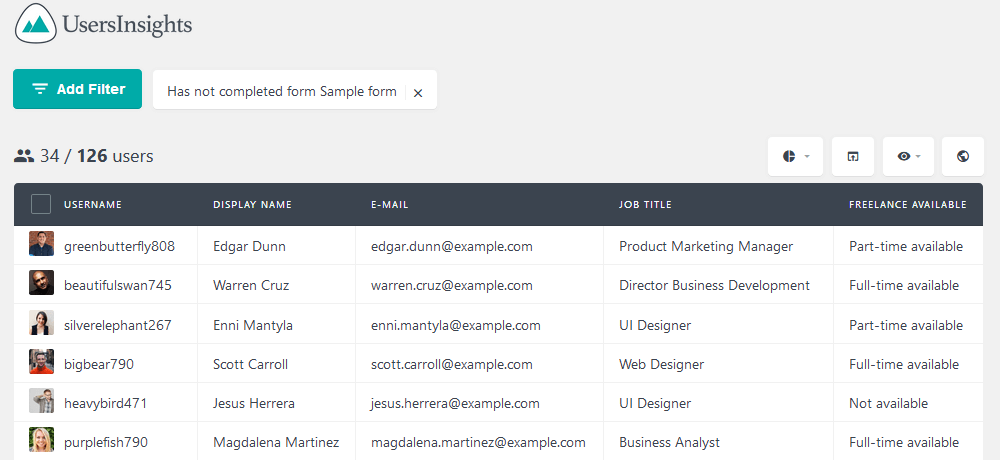
If you just want to export all users who have submitted a form, you can use the “has completed form” filter. Then you just need to click the “export” button.
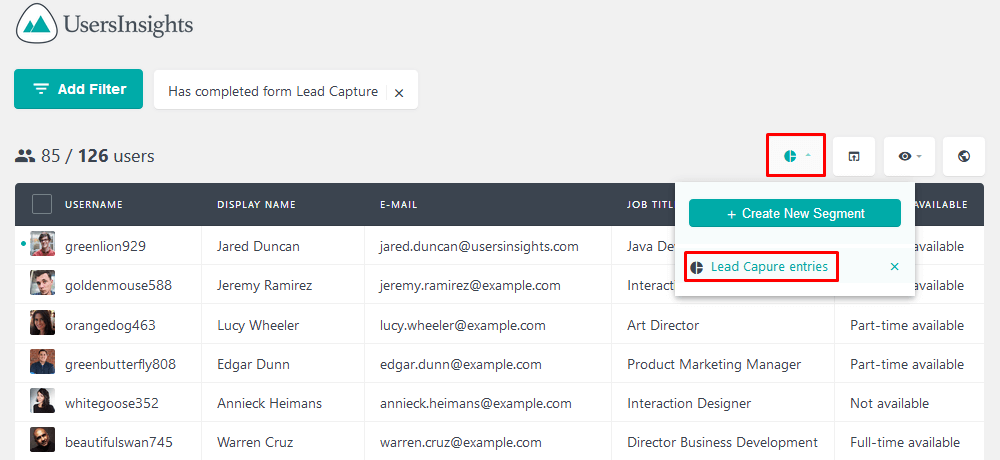
Also, it’s possible to save any set of filters as a Segment. This allows you to save one or multiple filters, and access them with one click. If you have multiple forms, for example, you can export them one at a time, and create a segment for each. This will save you time whenever you need to do this again.
Selecting the custom fields of your export
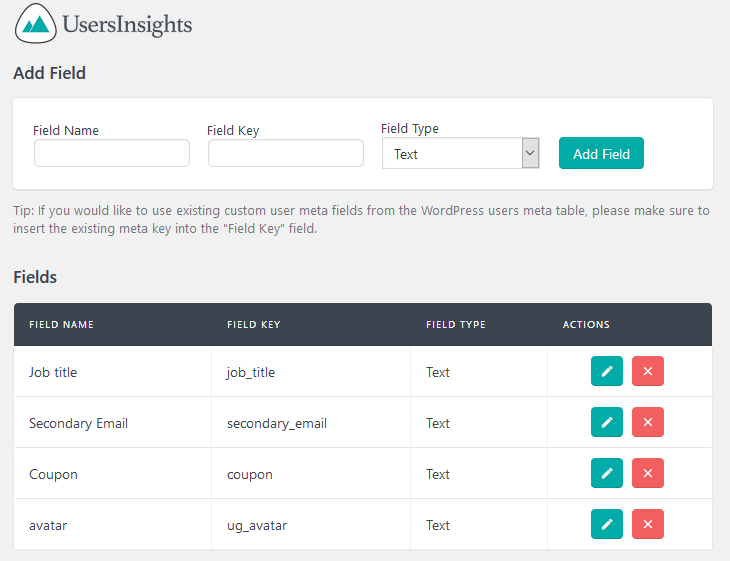
Frequently we collect custom user fields with plugins or custom code. If that’s your case, you can incorporate this data into your gravity forms export file. This can be done by mapping your custom fields.
Therefore, you can just go to Users Insights > Custom Fields and add any fields you want to use there.
If you’re using the exported data to import into another system or tool, you may need to customize the fields you want to export. For example, you may need to add a new field or change an existing one. You can do this by using the ‘Eye” menu settings in Users Insights.
The columns of your export file are the same columns you have visible in your user’s table. Thus, if you want to add more data to your export file, you can select the column visibility options. Just click the “eye” icon, and you’ll be able to hide/show all custom fields:
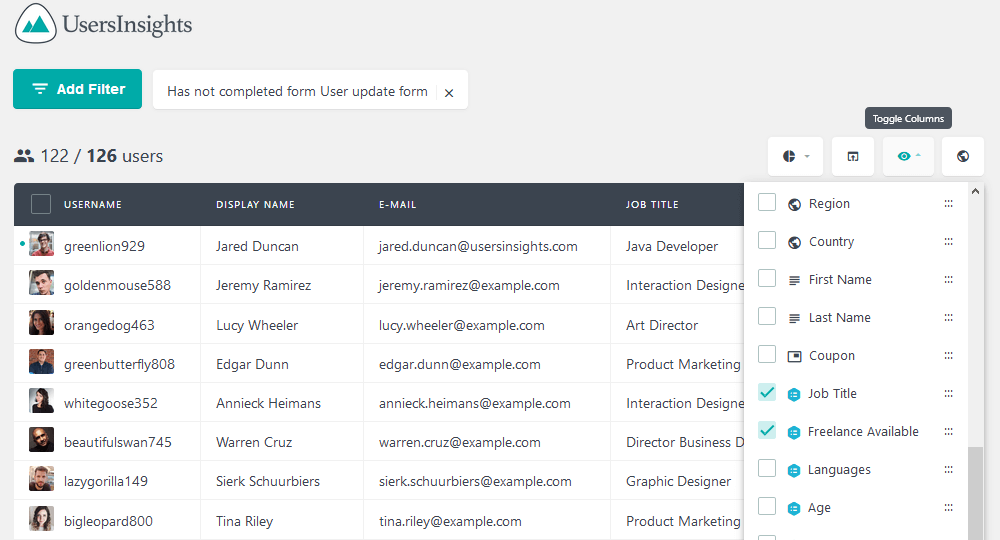
Since we have a Gravity Forms integration module, you don’t need to map these fields. Therefore, if your form contains a “Job Title” field, it can be enabled in your user’s table. Not to mention that it can be used as a filter.
Filtering your gravity forms export
As you’ve seen in the previous section, there are a lot of filtering options for your users. We can filter and export form entries based on any Gravity Forms fields. Also, we can combine Gravity Forms filters with other filters to better understand our users.
For instance, you may have an important form on your site, that you need all your users to fill in. We can filter users who haven’t replied to it yet and let them know that this is important. For that you just need to export your form entries, then use mailing software to do the heavy lifting.
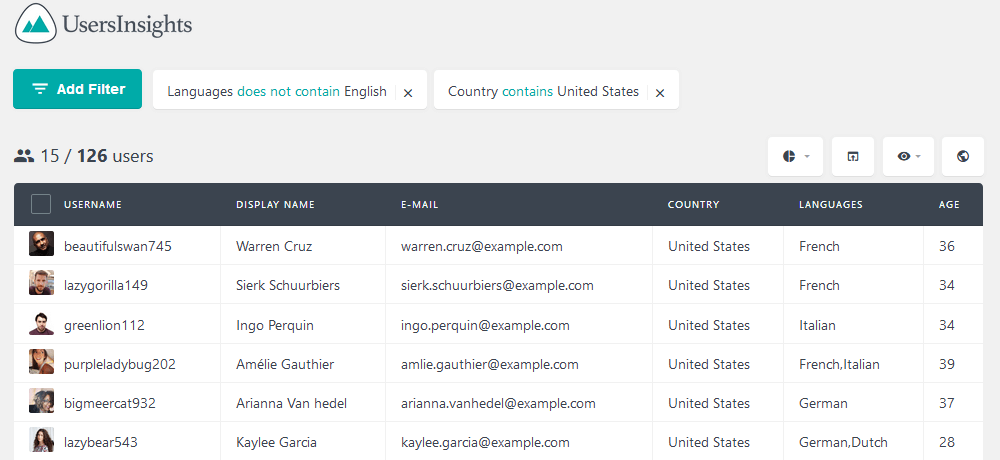
Combining filters is also a good idea for better user exports. This way you can provide targeted messages or measure specific indicators. Here our goal is finding out which are our Spanish Speaking users, who are 30 or older.
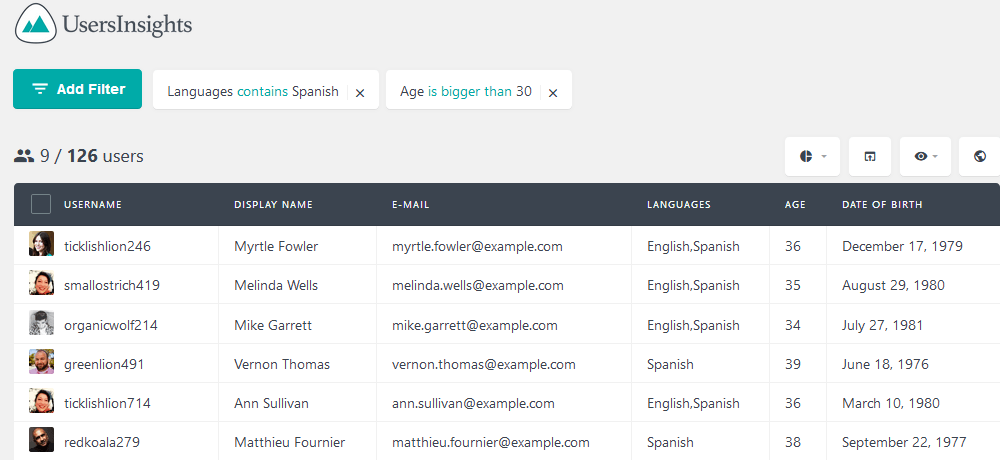
In general, we may also need to combine Gravity Forms data with other WordPress data. This way we can create insightful form exports. The GeoLocation API can be used for that. It’s possible to know the country, region, or even city of your users (with some limitations). This leads to interesting filters, for example finding out non-English speakers visiting our site from the US.
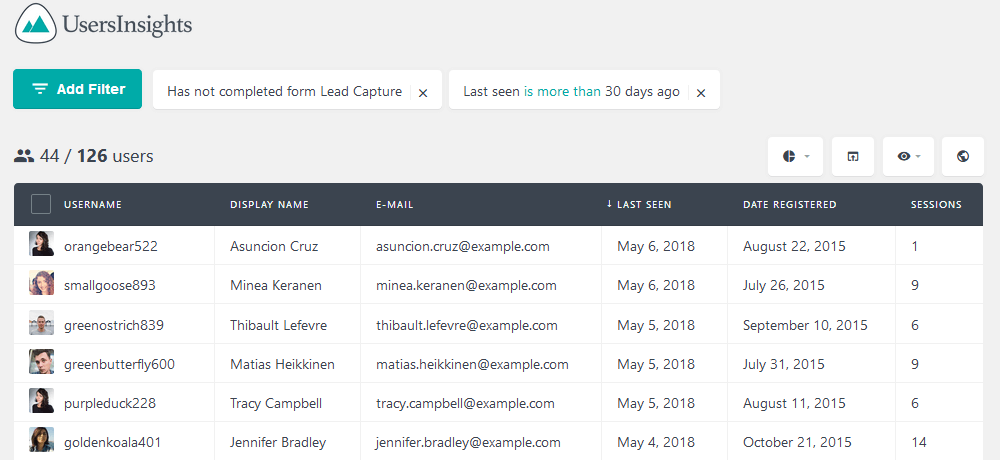
Also, you may want to check users who haven’t filled in a certain form and haven’t visited your site in a while. This can be done with the Last Seen filter.
Previously we have mentioned the segments feature. This feature is particularly useful when you combine a lot of filters, allowing you to constantly export your forms data with ease.
Processing your Gravity Forms in Excel
Now that we have our gravity forms export files we can take it to the next level. Since we have our users, their custom fields, and their form entries we can do some manipulation.
Let’s open our exported forms in excel. Here we can do pretty much anything you want to better understand your user base.
Sometimes when analyzing your forms’ data, the averages may hide some insights. For example, you may think that you have a 50-50 ratio between male and female users. But you may discover that among certain age groups there are relevant discrepancies.
In order to separate our users into age groups, we need to use the COUNTIFS excel function. This function allows us to count how many rows within a range satisfy multiple criteria. In our case, we’ll compare the “Age” column to a number, and the “Gender” with a string.
This is what our form entries look like in Excel:
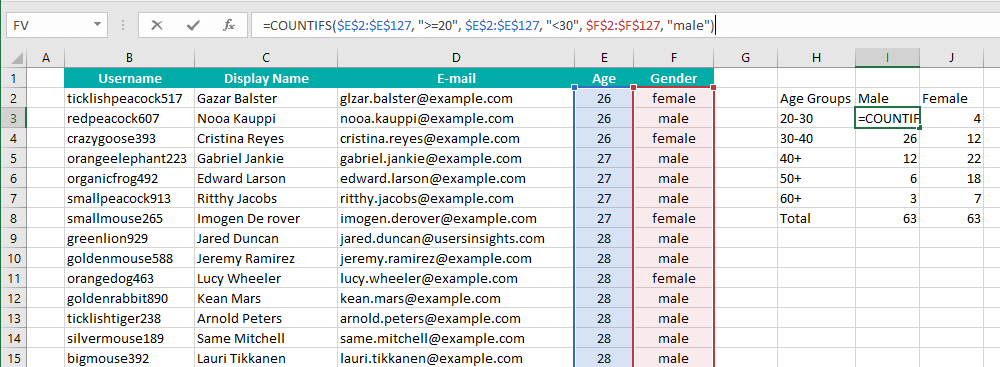
And this is the formula for each of our age groups:
=COUNTIFS($E$2:$E$127, ">=20", $E$2:$E$127, "<30", $F$2:$F$127, "male")
In this formula we are running a few comparisons:
- Check if the Age (E column) is greater than or equal to our age group’s lower boundary
- Compare the Age with our upper boundary as well
- Check if the Gender (F) matches our desired gender (male or female
From this example, you can expand to many other excel manipulations for your form entries. You can create graphs, track down changes and apply statistical methods. The sky is your limit now
Conclusion
Today we’ve looked at different ways to export entries from Gravity Forms. We’ve seen how Users Insights can create better export files right from the WordPress admin. We’ve also looked into many filters and ways to export your custom user fields and export Gravity Forms entries data.
Also, we’ve seen how you can spice up things using external tools such as MailChimp and Excel. We hope you’ve enjoyed and see you again next time!