How to access the Ultimate Member custom fields data
In this guide we’ll dive deep into Ultimate Member custom fields. We look into how to create them on your site, and how you can use them for better user interactions. In addition, we investigate how these fields are stored in the database and how you can access these fields data.
The Ultimate Member plugin is a quick way to create membership sites. But it is a great way to collect user information as well. Since it provides user registration forms and profile forms, it’s possible to tailor it to your needs.
After our setup is ready, we can use the Users Insights plugin to better understand your user base. We investigate how to turn this data into information using many filters and segments.
How to create Ultimate Member custom fields
The Ultimate Member Custom user fields are the element used to add user data. This data is assigned to your users, like labels in a box. You can use them for a wide range of applications. For example, you can store:
- Date of birth – For birthday gifts or discounts. It could be used to calculate the user age
- Occupation – The job title can show for which audience your product is appealing to
- Phone number – It can be used in a wide range of applications. From a direct contact to your user, to area code analysis.
- Gender – Demographic data can be useful as well in your marketing campaigns.
- Newsletter Opt-In – If this user signed up for newsletters or marketing campaigns
- Registration source – It’s very common to ask where the user has found your site, and this can be a custom user field
When it comes to the actual implementation of these fields, it’s quite simple. You just need to create them in your Ultimate Member forms. There are 3 types of forms in the Ultimate Member plugin:
- Registration form – Used for user sign up, it won’t be shown for logged in users
- Profile form – This one is used just to update user information, it’s only visible for logged in users
- Login form – Login forms can be used for a custom login interaction

As you may have imagined, you can use the Registration Forms and Profile Forms to create Ultimate Member Custom Fields. Since the Ultimate Member plugin allows for many user types, it’s possible to create multiple forms. For example, you may have one profile form used for developers, and one for designers. The same goes for registration forms and login forms.
Therefore, the process of adding fields to the registration page in Ultimate Member goes through the custom forms.
In case you are wondering, you can create your forms under Ultimate Member > Forms.
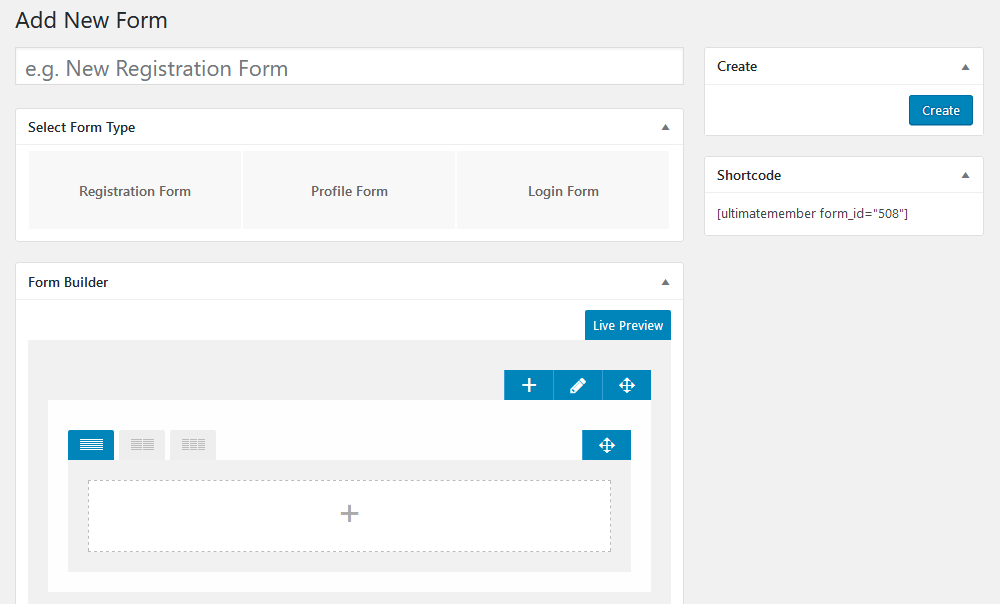
The first thing you notice is that there aren’t many options. That’s because Ultimate Member does a great job of packing a lot of features but display them only when needed. For instance, if you check the “Customize this form” option to yes, you see a plethora of options.
And the same goes for the custom fields. We have the columns options for the form, then a simple plus button. When we click it a whole new world of options appears:
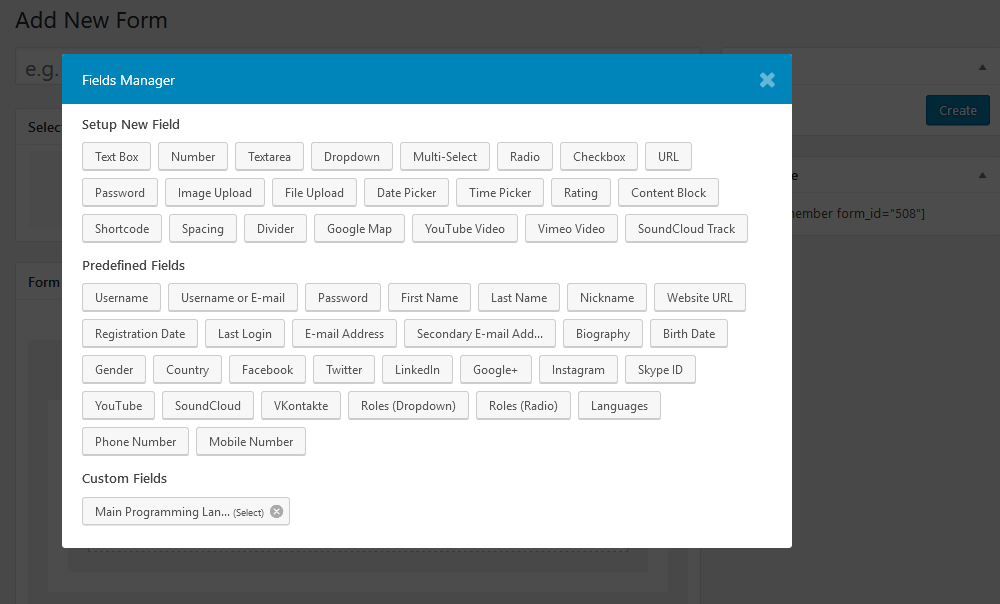
Now let’s explore the custom fields themselves in details.
Main Ultimate Member custom fields and storage
Since our focus here is custom fields in Ultimate Member, we work mostly with the registration and profile forms. Now picking up where we were, we have the custom fields. There are 3 main options for Ultimate Member form fields. Setup new field, Predefined fields, Custom Fields.
Ultimate Member custom fields – Setup new field
The “Setup new field” option, allows you to create a new custom field that doesn’t exist in your site. The main element to keep in mind is using the right format for your custom field. This allows your users to correctly enter information and allows you to understand this information later on.
There are some custom fields that are better for quantitative and qualitative analysis. For instance, while the “text area” is great to store the user’s bio, it doesn’t have much use for you. There are some field types that we use instead:
- Text Box – Simple text fields for qualitative data
- Number – Allow only numbers
- Dropdown / Multi-Select / Radio / Checkbox– Improve qualitative analysis by limiting possible input options
- Image / File upload – Allow custom file uploads
- Date / Time Picker – Select specific dates and hours
- Rating – A quick option to create a 5-star or 10-star rating field
It’s important to notice that each field has its own data type as well. For example, Ultimate Member stores dates in a special format so it can read them afterward. The same goes for fields with multiple values, and other special fields.
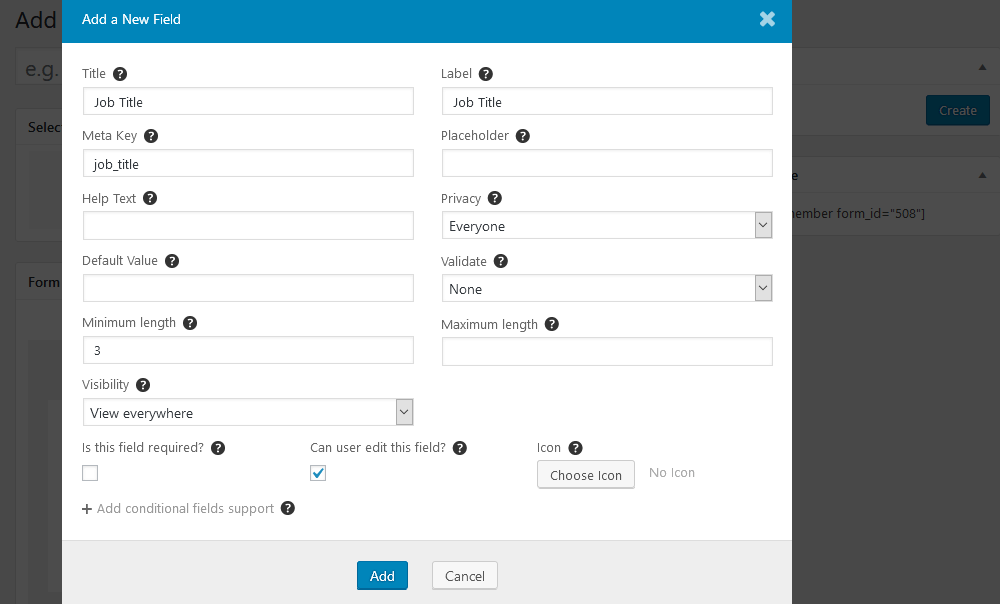
In addition to creating new fields, you can allow custom field edits in your Ultimate Member forms. For example, if you have fields created with other plugins, you can edit them with Ultimate Member using this method. You just need to pick the right format for it and use the same meta key for it. Here’s an example, if we have a Job Title custom field, we can add it to Ultimate Member profiles:
Ultimate Member custom fields – Predefined fields
Next up we have the Ultimate Member predefined fields. These are default fields that Ultimate Member already recognized. Thus, you can add them to your form simply by clicking them. They are just a shortcut for the default custom fields edit.
Therefore, instead of creating a new field, using one of WordPress’ default meta keys, you can use that interface. This reduces the chances of errors when creating the meta key and makes sure the right field is added as well.
Ultimate Member custom fields – Custom Fields
The last section in your custom fields options are the custom fields. These are fields you created in other Ultimate Member forms. Therefore, this makes sure you always have the right custom fields keys. In addition, this works as a shortcut, with all options loaded at once. Thus, you don’t need to add them repeatedly.
How to analyze Ultimate Member custom fields for members
Now it’s time to analyze our custom fields. This time we use the Users Insights plugin, along with the Ultimate Member module. Just make sure you have it enabled under Users Insights > Modules. This process maps all your Ultimate Member custom fields automatically.
For starters, we can filter users based on their text fields. For these fields we search for “contains/does not contain”, “is/is not”, “begins/ends with”. “is/is not set”. For example, you may have a site with many developers and each works with a different programming language. Then we can filter users by the job title using the “contains” filter:
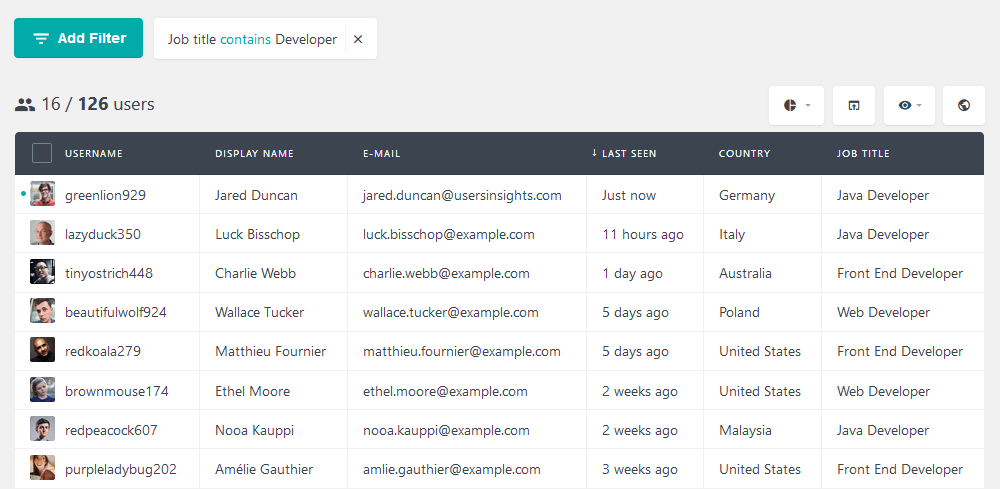
The text fields are great for open exploration, as they provide a wide range of data points. But dropdowns and their variations are better for quantitative analysis. That’s because limited choices ensure that we have all answers in a similar format. For instance, if instead of “developer” someone answers “programmer” our search will fail for the previous example. That’s why limiting choices may be good, whenever possible. This is common in simple questions such as a “yes/no” answer.
Let’s say in our database we have the freelancing availability for our users. The accepted values are “Full-time Available / Part-time available / not available”. Then we can search all full-time freelancers using this filter:
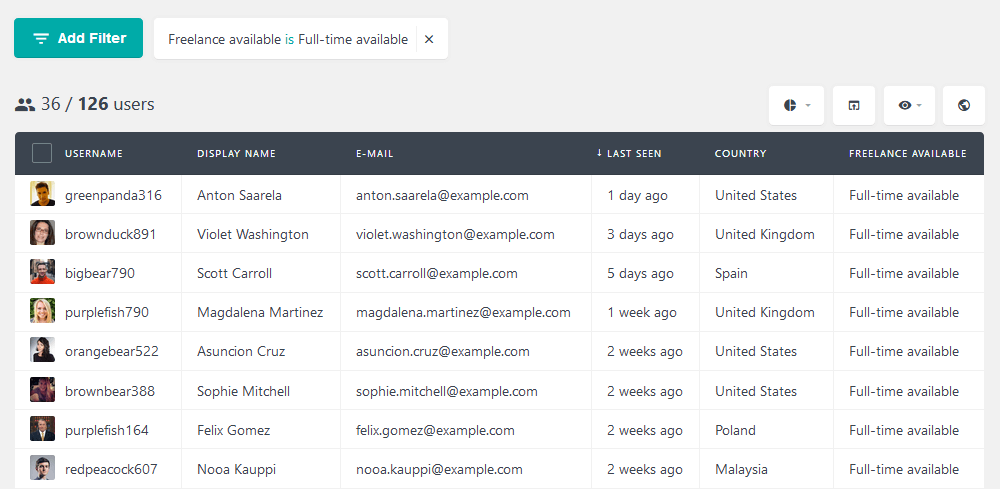
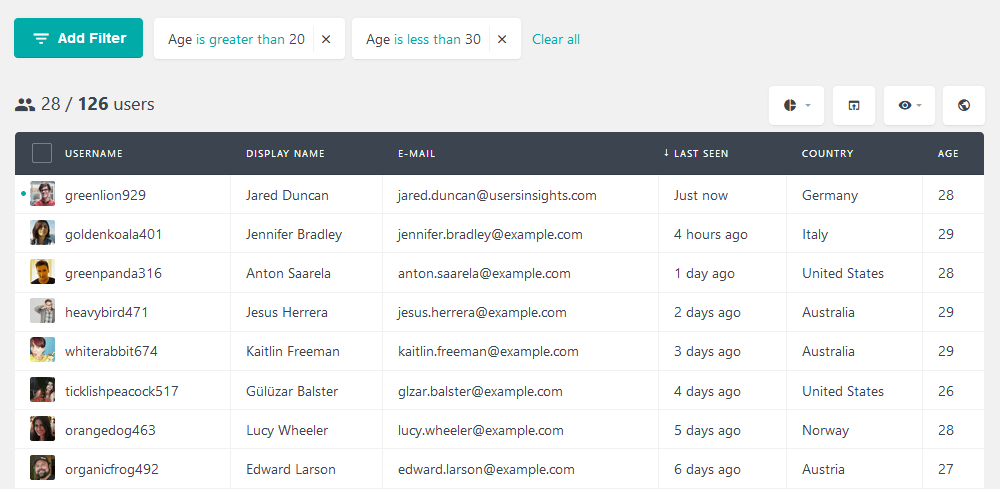
Another common format for Ultimate Member custom fields is the number format. You can do relative comparisons with these fields. Thus, we can use the “is/is set/is not set” filters and “is greater / smaller than” as well. An example of a number field is the user’s age. It’s possible to find out your customer base demographics using that filter. For instance, let’s filter all users with ages between 20 and 30 years.
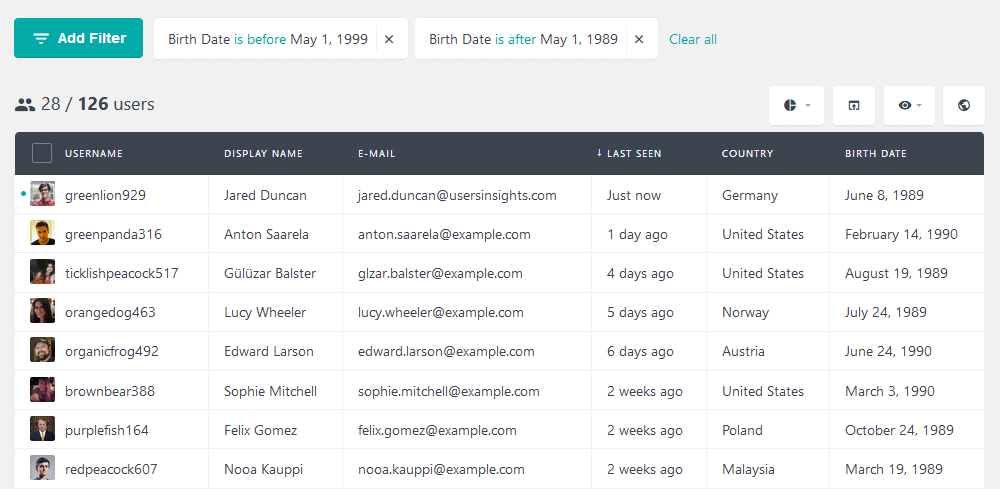
The date field formats provide date range searches. Combined with Users Insights filters for dates, there are many options for user segmentation. These are the filter options for dates:
- Is less than/more than/exactly X days ago
- Is after/on/before DATE
- Is/is not set
If you have stored your users’ ages, it’s wise to store their date of birth as well. This is a good way to ensure that your information will be always up to date. Then we can apply the same user age filter, but using the date of birth. Let’s find out how many users between 20 and 30 years old we have:
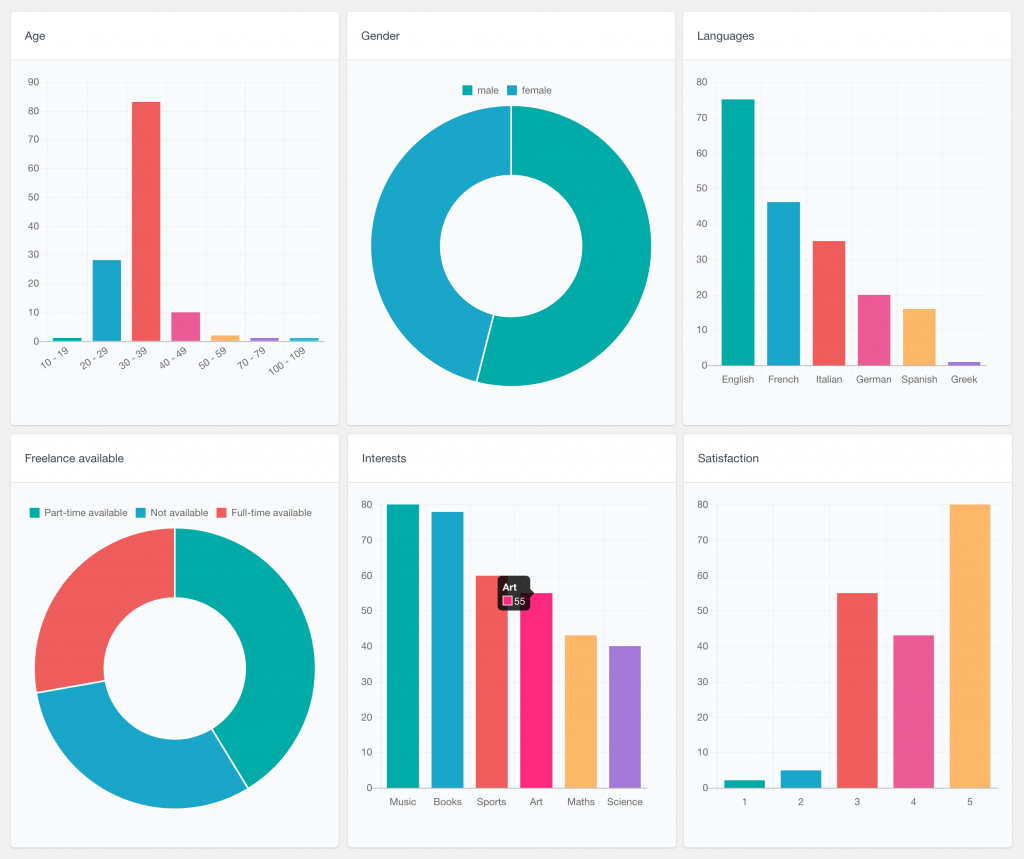
Additionally Users Insights automatically generates reports based on your custom fields. The reports are accessible via the Reports -> Ultimate Member tab. All the fields are organised and displayed based on the type of the field. For example, mullty option fields are represented with bars, while few option fields are presented with bar charts.
Conclusion
Today we looked into Ultimate Member custom fields, as well as their options. We investigated different options in terms of forms and custom fields formats. In particular, we saw how to use the custom fields in your site and how to analyze this information.
We hope you enjoyed and see you again next time!
