WC_Customer class explained
Today we look into the WC_Customer class, and how you can use many of its methods. This article is a quick reference guide, with examples and details of the most common methods.
The WC_Customer class is an interesting way to manipulate your customers data. At its core, WooCommerce customers are just WordPress users. But since WooCommerce has so many functions enabled for order-related data, it makes sense to use the WC_Customer class.
Thus, this article is a quick reference to the most common methods in the WC_Customer class. You can use it to quickly retrieve order data, customer details, set or update user data. In addition, you can combine it with other WooCommerce and WordPress functions to get all your customer data.
Let’s get started!

WC_Customer class overview
The WC_Customer class can be used to get details of WordPress users who bought items in your WooCommerce store. Its basic usage is to initialize the class passing the user ID:
$customer = new WC_Customer( $customer_id );
This code returns a customer object for that particular user ID. If no ID is set, you will still get an object partially filled in with the current query.
Creating a customer programmatically
Now let’s explore two common ways to create a WooCommerce customer.
The first method uses the wc_create_new_customer() function and allows you to pass custom user arguments – it supports the same arguments that you can pass to the List of arguments to pass to wp_insert_user() function.
//METHOD 1
$args = array(
  // arguments that you can pass to wp_insert_user(), e.g.:
  'user_nicename' => $nicename,
  'user_url' => $site,
  'user_email' => $email,
  'display_name' => $display_name,
  'nickname' => $nickname,
  'first_name' => $first_name,
  'last_name' => $last_name,
  'role' => $role,
);
$user_id = wc_create_new_customer( $email, $username, $password, $args );
The second method works the same way, it creates a new user with the ‘customer’ role. It attempts to load some of the customer data from the current query, but you can manually set all arguments using the methods that we are going to explore.
//METHOD 2
$customer = new WC_Customer();
$customer->set_username( $username );
$customer->set_email( $email );
$customer->set_password( $password );
$customer->set_first_name( $first_name );
$customer->set_last_name( $last_name );
$customer->save();
Retrieve and update personal user information
Once you have the WC_Customer instance, you can get and update all the user information with its corresponding methods.
$name = $customer->get_username();
This function loads the login username for the customer. Like we saw before, you can use the set_username with a new WC_Customer class.
This method won’t work with existing users though, it works only before the WP user has been created.
Therefore, some of the set_{data} methods are reserved only for the customer creation. They can’t be used afterwards.
$email = $customer->get_email();
The get_email method retrieves the customer email. It works the same way as the WP function $data = get_userdata($id); followed by $data->user_email.
The set_email method has the same restriction as the set_username, it can only be used prior to the customer creation.
The following methods can be used to get or set the name fields for your customer. When using the set methods you need to use the save() method as well, so your data is pushed to the database.
$first_name = $customer->get_first_name();
$customer->set_first_name('New First Name');

$last_name = $customer->get_last_name();
$customer->set_last_name('New Last Name');

$display_name = $customer->get_display_name();
$customer->set_display_name('New Display Name');

//save all changes at once
$customer->save();
The get_role method returns the customer’s role. The set_role method works only prior to the user creation. To assign a different role to your users after they are created you need to use the WordPress functions, such as set_role for a WP_User object.
$role = $customer->get_role();
The get_date_created method returns a WC_DateTime object with the customer’s creation date.
$date = $customer->get_date_created();
Customer orders methods
There are many methods to get order information directly from the WC Customer class. Let’s see how we can use a few of them now.
The get_order_count() method returns how many order this customer has:
$orders = $customer->get_order_count();
This method gets a WC_Order object for the customer’s latest order:
$last_order = $customer->get_last_order();
You can use this method to get the lifetime value of a customer. Thus it returns you the total dollar amount spent, including taxes, fees, shipping:
$ltv = $customer->get_total_spent();
You can get all orders for a specific customer by using the following code snippet:
$args = array(
  'customer_id' => $customer->get_id(),
);
$orders =  wc_get_orders( $args );
This code isn’t a method for the WC_Customer class, but still an interesting snippet. In this case, we are using the customer ID, but you can use other fields, such as email, first name, last name, billing or shipping address. You can read more about the wc_get_orders() function to see the query arguments available.
Billing and Shipping details
All billing and shipping information is saved as custom user fields. But you can interact with it using the WooCommerce methods, to make sure that you always get the right fields.
Each field has its own separate method, but they all work very similar. Here’s a quick list of all individual methods:
$billing = $customer->get_billing();
/******* returns an array in this format:
Array
(
    [first_name] => First Name
    [last_name] => Last Name
    [company] => Company
    [address_1] => 68 Friar Street
    [address_2] => apt 46
    [city] => My city
    [postcode] => SN8 3EP
    [country] => US
    [state] => NY
    [email] => billingemail@domain.com
    [phone] => 079 3684 1234
)
**************/

$address_1 = $customer->get_billing_address();
$address_1 = $customer->get_billing_address_1();
$address_2 = $customer->get_billing_address_2();
$city = $customer->get_billing_city();
$company = $customer->get_billing_company();
$country = $customer->get_billing_country();
$email = $customer->get_billing_email();
$firstname = $customer->get_billing_first_name();
$lastname = $customer->get_billing_last_name();
$phone = $customer->get_billing_phone();
$zip = $customer->get_billing_postcode();
$state = $customer->get_billing_state();
The exact same methods are available for shipping, except the email field:
$shipping = $customer->get_shipping();
/******* returns an array in this format:
Array
(
    [first_name] => First Name
    [last_name] => Last Name
    [company] => Company
    [address_1] => 68 Friar Street
    [address_2] => apt 46
    [city] => My city
    [postcode] => SN8 3EP
    [country] => US
    [state] => NY
    [phone] => 079 3684 1234
)
**************/

$address_1 = $customer->get_shipping_address();
$address_1 = $customer->get_shipping_address_1();
$address_2 = $customer->get_shipping_address_2();
$city = $customer->get_shipping_city();
$company = $customer->get_shipping_company();
$country = $customer->get_shipping_country();
$firstname = $customer->get_shipping_first_name();
$lastname = $customer->get_shipping_last_name();
$phone = $customer->get_shipping_phone();
$zip = $customer->get_shipping_postcode();
$state = $customer->get_shipping_state();
And each of these methods have their corresponding set methods. Here is an example of how you would edit the billing email:
$customer->set_billing_email('test@test.com');
$customer->save();
Another interesting method is to set the billing or shipping address to match the store’s address. It gets data from wc_get_customer_default_location() and saves it to your user. Usually this function returns just the state and country, but you can add more fields to it using hooks.
$customer->set_billing_address_to_base();
$customer->save();
And here is a quick overview of all the “set” methods for both shipping and billing address in the WC_Customer class. Don’t forget to save your data after you use the set method:
$customer->set_billing_address( $address_1 );
$customer->set_billing_address_1( $address_1 );
$customer->set_billing_address_2( $adress_2 )
$customer->set_billing_address_to_base();
$customer->set_billing_city( $city );
$customer->set_billing_company( $company );
$customer->set_billing_country( $country );
$customer->set_billing_email( $email );
$customer->set_billing_first_name( $firstname );
$customer->set_billing_last_name( $lastname );
$customer->set_billing_location( $array );
$customer->set_billing_phone( $phone );
$customer->set_billing_postcode( $zip );
$customer->set_billing_state( $state );

$customer->set_shipping_address( $address_1 );
$customer->set_shipping_address_1( $address_1 );
$customer->set_shipping_address_2( $adress_2 )
$customer->set_shipping_to_base();
$customer->set_shipping_city( $city );
$customer->set_shipping_company( $company );
$customer->set_shipping_country( $country );
$customer->set_shipping_first_name( $firstname );
$customer->set_shipping_last_name( $lastname );
$customer->set_shipping_location( $array );
$customer->set_shipping_phone( $phone );
$customer->set_shipping_postcode( $zip );
$customer->set_shipping_state( $state );
Customer metadata
You can Interact with your user’s metadata as well. This is possible with these WC_Customer methods:
$meta = $customer->get_meta_data();
This code returns an array with multiple objects, each containing a WC_Meta_Data object for all custom user fields but the ones that are created with WooCommerce.
To add a custom user field you can use the add_meta_data method which also initializes a WC_Meta_Data object for it. The $unique variable is optional, and if it is set as true, all previous data for this meta key is deleted. It doesn’t save this data to the custom user field though. You can do it with the save_meta_data() method:
$customer->add_meta_data( $key, $value, $unique );
$customer->save_meta_data();
The delete_meta_data method removes all custom user fields entries with that particular key:
$customer->delete_meta_data($key);
$customer->save_meta_data();
As we mentioned above, the save_meta_data() method saves all meta data changes into the custom user fields permanently. It is useful in case you are running multiple add/delete operations and you want to push all changes at once:
$customer->save_meta_data();
You can alternatively use the update_meta_data() method as a shorthand for add_meta_data and save_meta_data. This method pushes the meta data directly to your database. You can provide the meta field ID if you want to update a specific value (if not unique).
$customer->update_meta_data( $key, $value, $id );
The read_meta_data method reads data from your database directly, ignoring all the non-saved meta data from the add_meta_data and delete_meta_data methods.
$meta_from_db = $customer->read_meta_data();
The set_meta_data() method is a shorthand notation for multiple add_meta_data instances. You can pass multiple arguments with key/value/id attributes.
$customer->set_meta_data(
   array(
      array(
         'key' => $key1,
         'value' => $val1,
         'id' => $id1
      ),
      array(
         'key' => $key2,
         'value' => $val2,
         'id' => $id2
      )
   )
);
How to filter customers by their metadata
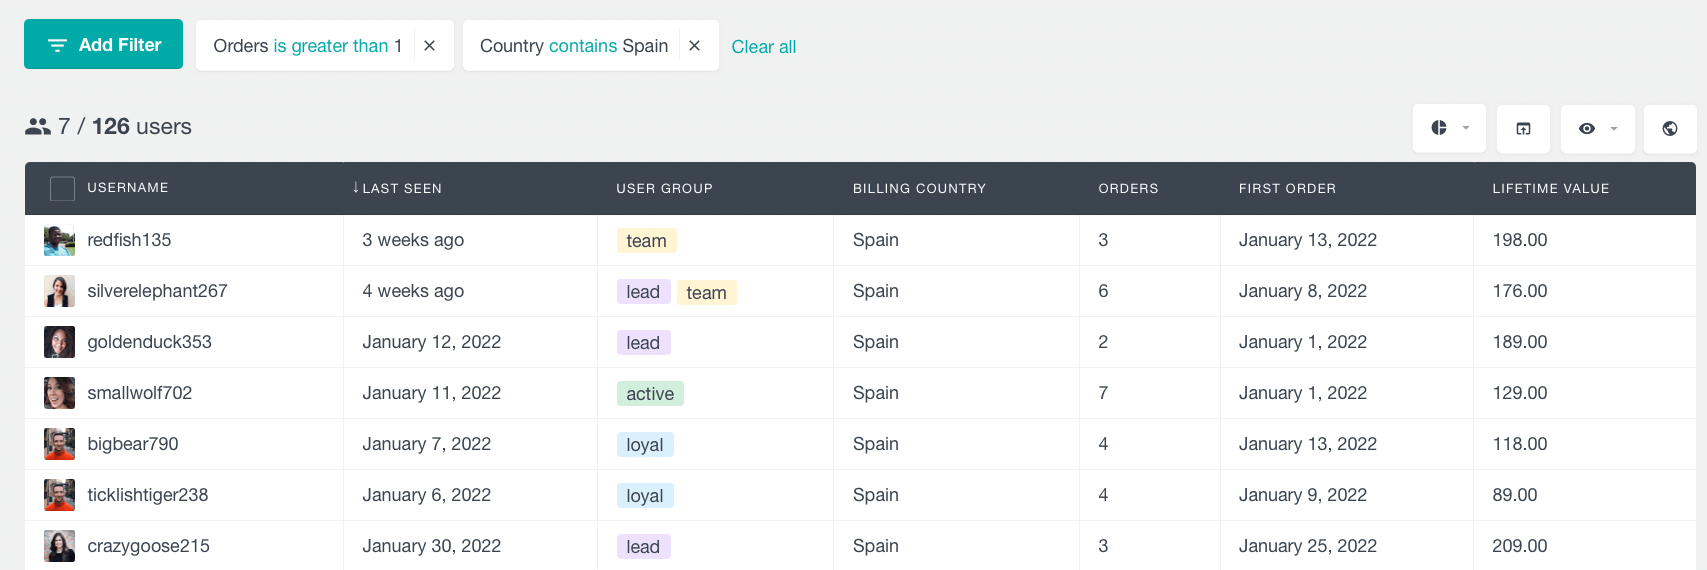
In addition to manipulating your users, you can filter them by their orders, products, location. You can use Users Insights along with the smart filters for that. For example, you can filter all repeat buyers from Spain by using these filters:

Conclusion
Today we looked into how you can initiate and edit your customer data using the WC_Customer class. In addition to simple operations we saw how you can get advanced information such as all orders and even how to filter users.
We hope you enjoyed, and see you again next time!
