Customizing the Ultimate Member profile page
In this tutorial we look into how to customize the Ultimate Member profile page. We’ll investigate how to change the profile tabs, template, and styling. By following through, you should be able to create an Ultimate Member page with all your desired elements.
Ultimate Member is a great tool to create user memberships. In addition, it can be used to track custom user fields so you can understand your audience better. But sometimes the default look or fields that Ultimate Member provides isn’t exactly what you want. Furthermore, we often need to fully customize the Ultimate Member profile template.
Thus, our goal with this article is to summarize many functions you can use to customize your Ultimate Member profiles. There are many coding and non-coding options to choose from. Therefore, in this guide we’ll show you some of the possible profile tweaks:
- Customizing the profile tabs (adding and removing tabs)
- Overwriting the Ultimate Member profile template
- Customizing the Ultimate Member profile page sidebar
- Tweaking the Ultimate Member profile page styles
Let’s get started!

Customizing the Ultimate Member profile tabs
The Ultimate Member profile tabs are a quick way to display your user information. They are set in the user profile and can create different segments for profile information.
The Ultimate Member profile page is set under Ultimate Member > Settings > User Page. This page has 3 tabs by default, “About”, “Posts” and “Comments”. It’s possible to remove these elements under Settings > Appearance > Profile Menu. However adding new tabs is not possible under this section.
Customizing the profile tabs using custom code can be handy, especially if you need to add new tabs. This can be done using the um_profile_tabs filter. It allows you to change the $tabs array, which includes the different tabs for profile elements. Then we use the um_profile_content_{$tabname}_default action to load the tab content.
Here is an example on how to add a new tab for Coding Skills:
/* register our custom tab */
add_filter('um_profile_tabs', 'ui_custom_tab', 1000 );
function ui_custom_tab( $tabs ) {
    $tabs['codeskills'] = array(
        'name' => 'Code Skills',
        'icon' => 'um-faicon-pencil',
        'custom' => true
    );
    return $tabs;
}


/* add the tab's content */
add_action('um_profile_content_codeskills_default', 'ui_codeskills_tab_content');
function ui_codeskills_tab_content( $args ) {
    $id = um_profile_id();
    $skills = get_user_meta( $id, 'skills', true );

    if ( ! empty ($skills) ) {
        echo '<div class="um-item">'.$skills.'</div>';
    }
}
The first element to notice here is the $tabs variable. It is a single array with all possible tabs. We can add new tabs by simply adding new elements to it. Then in our tab’s content, we can use any functions we want. In our case, we used the um_profile_id() to get the user ID. Then we use the get_user_meta() to get the value of a custom field with key “skills”
Upon a second look, you may notice that it is quite easy to remove tabs as well. We can simply delete that element from our $tabs element. Thus you can do something like this to remove the comments tab:
add_filter('um_profile_tabs', 'ui_custom_tab_unset', 1000 );
function ui_custom_tab_unset( $tabs ) {
	unset($tabs['comments']);
	return $tabs;
}
Overwriting the Ultimate Member profile template
The Ultimate member profile template works very similarly to custom page templates. This allows you to create different designs for your Ultimate Member profiles with a unique design and code elements. The best part is that this is quite easy to implement.
To customize the Ultimate Member profile template, you can follow these steps:
- Make sure that you are using a child theme. This will ensure that your changes will remain saved when you update your main theme.e
- Create a ultimate-member/templates/ folder in your child theme’s folder. This /templates folder is going to replace any files that there are in the ultimate member’s /templates folder. This means that if you create a new “profile.php” file, for example, it will automatically overwrite the default Ultimate Member “profile.php”.
- To customize the profile template, create a “profile.php” file in the /templates folder. Here it makes sense to simply copy the original profile.php file, and paste it into your theme’s folder. This allows you to customize that file but still have a good starting point.
In addition, there are sub-folders. They can be used to replace the original subfolders. In particular, notice that the /profile folder is used to customize the profile tabs. Thus, you can add each new tab in a new file and customize them there directly.
Customizing the Ultimate Member profile page sidebar
When it comes to widget areas, Ultimate Member usually has no say. That’s because sidebars creation and loading are usually done in your theme.
Fortunately, a lot of themes already include options for selective widget areas (sidebars) for each of your pages. Thus, you can use this feature in your profile page and have an Ultimate Member profile page with custom sidebars.
In case your theme doesn’t have this, it is still possible. You could use a plugin such as Content-Aware Sidebars. This plugin allows you to create new widget areas and add them to any page you want.
Tweaking the Ultimate Member profile page styles
At this point, you already have custom tabs, custom sidebars and maybe even a custom template. Now it’s time to go further with an Ultimate Member profile styles and custom CSS.
There are some basic styling changes that can even be done directly from your admin panel. Thus, for the most part, you can customize your styles under Appearance > Customize > Ultimate Member > Ultimate member Color.
These colors control most of your Ultimate member design options. They are global changes that are meant to affect all Ultimate Member items with a similar weight. Therefore, if you add a different “UM Button” color, you are changing, in fact, all buttons.
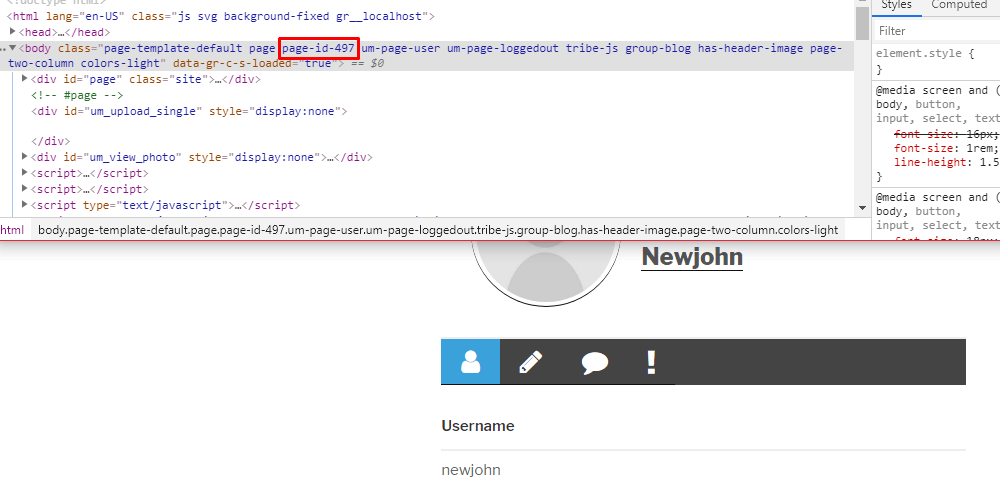
But sometimes we need to change just specific items. In this case, you can use some custom code and rely on your page’s IDs, classes or even in IDs you add. For instance, the profile page carries the page ID that you created for it. This page ID is usually in your body class

Hence, you can add CSS rules and prepend them with “.page-id-497” and they will only be applied in your profiles. For example:
.page-id-497 label {
  color: #888;
}
There are some other elements that you can customize as well. For instance, when we define our custom tabs we set them with an icon. You can change this icon with that same method – rewrite the $tabs array. Or, if you want you can change them using some CSS code.
In order to change them via PHP you do this:
/* register our custom tab */
add_filter('um_profile_tabs', 'ui_custom_tab_icon', 1001 );
function ui_custom_tab_icon( $tabs ) {
	$tabs['codeskills']['icon'] = 'um-icon-alert';

	return $tabs;
}
Just make sure that this code runs after your tabs definition. Therefore, in our case we use 1001 instead of 1000, to make it run later.
If you want to go for a CSS route there are many options. For instance, you can load an alternative font icons set, or simply change their look. For example, you can use the following CSS code to change the color of your Ultimate Member profile tab icons.
.um-profile-nav-item .um-tip-n i::before {
    color: #ccc;
}
You can add this code in your Appearance -> Customize -> Custom CSS field and you are all set!
Conclusion
Today we looked into how to customize your Ultimate Member profile page. Thus, we looked into the basics of creating new tabs and loading content into them. Then we investigated how to completely change the Ultimate Member profile templates. Next, we touched on how to add a custom sidebar to your Ultimate member profile. And last but not least we looked into custom Ultimate Member profile styles.
We hope you enjoyed this article and see you again next time!
