A visual guide to WordPress user login hooks
In this article, we will explore the WordPress hooks triggered during the user login process. WordPress executes a range of actions and filters throughout its login cycle. To effectively customize the default login functionality, it’s important to understand the sequence of these hooks and their role in the code execution process. To simplify this, we’ve created a visual guide to help you see how these hooks fit together and where they can be utilized.
WordPress hooks is one of the most powerful features available to developers. WordPress fires various hooks throughout the request cycle, allowing us to customize almost every aspect of it.
WordPress hooks are functions that allow developers to modify or extend core WordPress functionality. They can be used to introduce new features or adjust how existing processes work. Hooks fall into two categories:
- Actions: These allow custom functionality to be injected at specific points during code execution.
- Filters: These enable modification of data at various stages of the request cycle, such as altering variable values.
This article builds on our previous WordPress user registration hooks guide, offering a deeper dive into login-specific hooks.
WordPress user login actions and filters
In this section, we will discuss the login hooks fired by using the default WordPress login form, assuming a successful login. These apply to the login form at /wp-login.php and any forms generated using the wp_login_form() function. If you use a third-party plugin for your login functionality, the hooks fired might differ. Additionally, WordPress allows plugins to overwrite some of the login functions, which could also change the default hook cycle. So, in this article, we will focus on the default WordPress login hooks, assuming no modifications to the default functionality.
The following graphic illustrates all the main hooks that are fired during the login process:
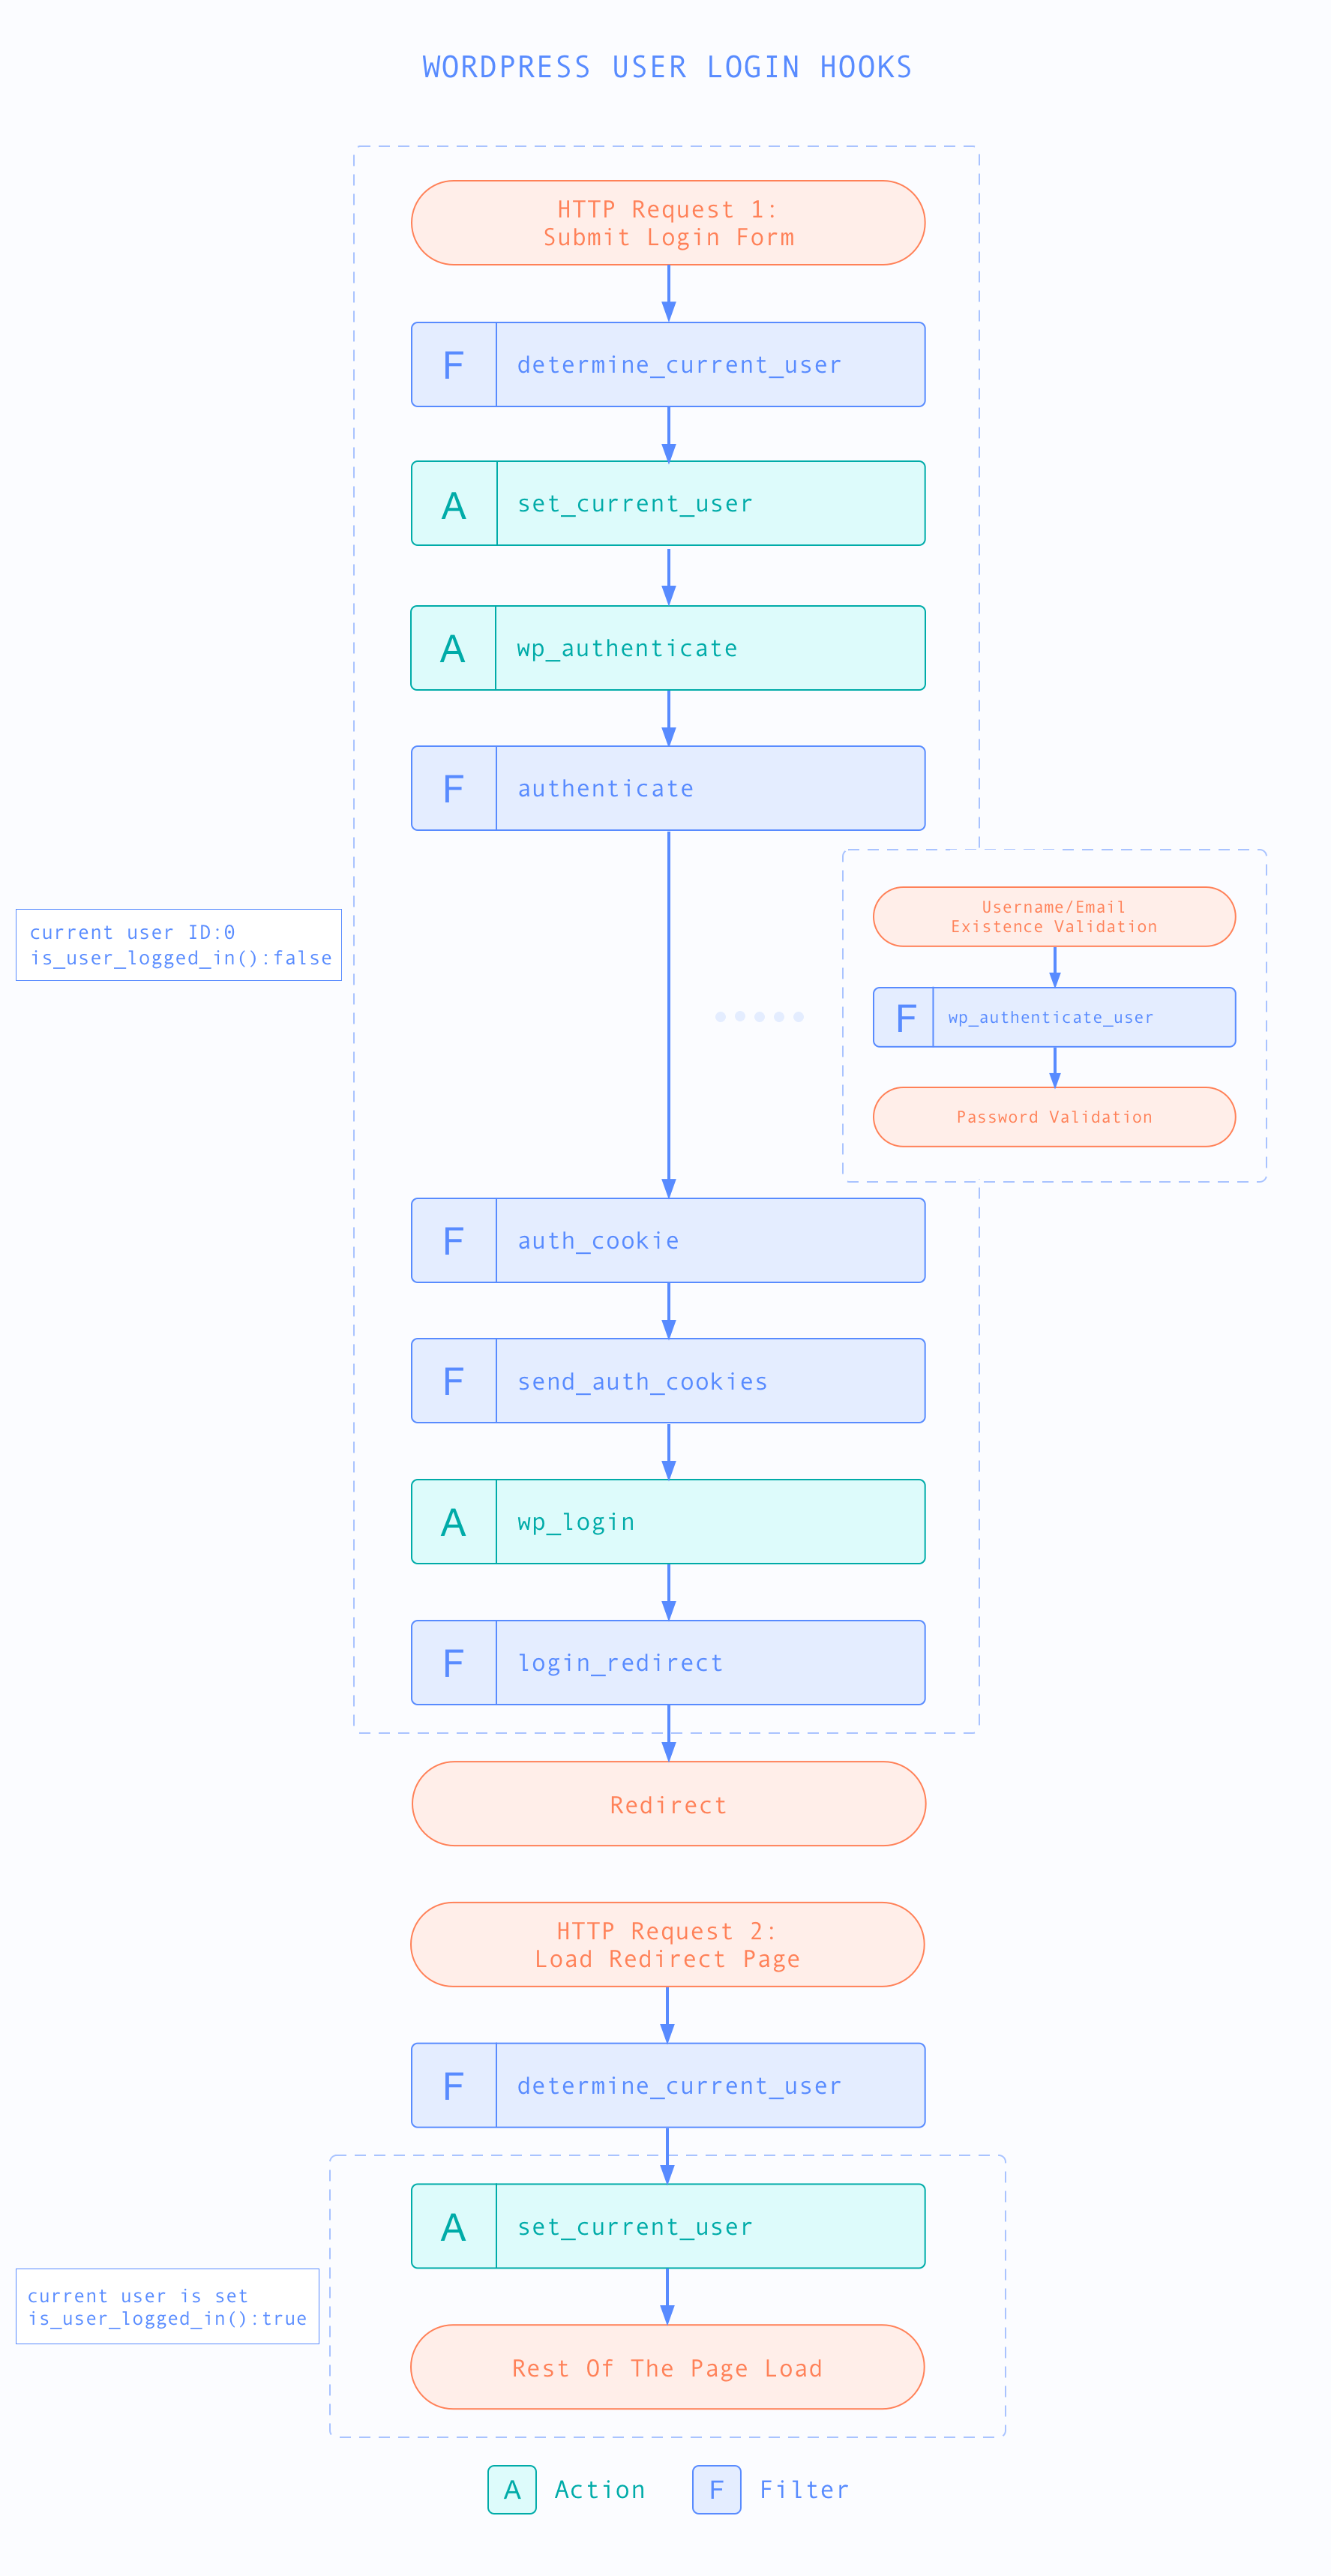
As you can see, the login action consists of two HTTP requests:
- The first request is the one that performs all the login-related actions, such as validation, authentication, and setting up the authentication cookies. Once the login is successful and the authentication cookies are set, WordPress will return a 302 Redirect response to redirect to a selected page.
- The second request is loading the redirected page. If you are using the default WordPress login form, the redirected page will be the admin dashboard, located at /wp-admin. Otherwise, if you are using the wp_login_form() function, you will be able to set a redirect page in its arguments. You can also use the login_redirect filter, which we will discuss later in this article.
Now, let’s go through each of these login actions and filters. We’ll start with the login request hooks.
Login request hooks
determine_current_user filter and set_current_user action
These two hooks are not related with the login process, however, it’s important to visualize them, so you can understand where they stand in this process. The determine_current_user filter allows you to modify the current user that is set. The set_current_user action is triggered after the current user has been set.
Here it is important to mention that these two hooks are triggered before the login authentication. Therefore in this request, if you attempt to get the current user ID by using the wp_get_current_user() function, the user ID will be set to 0. Also, the is_user_logged_in() function here will return false.
function my_custom_user_action(){
    $user = wp_get_current_user();
    $user->ID; // 0
    is_user_logged_in(); // false
}
add_action('set_current_user', 'my_custom_user_action');
wp_authenticate action
The wp_authenticate action is triggered just before the user is authenticated. This action passes the username/email and the password as arguments by reference, which means that they can be modified from a callback.
authenticate filter
If you need to perform custom validation/authentication rules, one of the hooks that you can use is the authenticate filter.
The default WordPress authentication is hooked to this filter. It is not called a function within the login process, but it is executed as a callback of the authenticate filter. Therefore if you are planning to use the authenticate filter, it’s important to understand how WordPress uses this filter. Use this hook with caution, as incorrect usage might mess up the default WordPress login functionality.
This is how WordPress hooks its login authentication functionality to this filter:
add_filter( 'authenticate', 'wp_authenticate_username_password', 20, 3 );
add_filter( 'authenticate', 'wp_authenticate_email_password', 20, 3 );
add_filter( 'authenticate', 'wp_authenticate_spam_check',  99 );
add_filter( 'authenticate', 'wp_authenticate_cookie', 30, 3);
The wp_authenticate_username_password and wp_authenticate_email_password callbacks include the main WordPress authentication functionality. They attempt to authenticate the user by username and email correspondingly. These two callbacks are hooked with a priority of 20. After that, the wp_authenticate_cookie callback is called with a priority of 30. If the username/password verification fails to authenticate the user, this function will check for the presence of an authentication cookie.
The authenticate filter passes three arguments – user object, username, and password. If you hook to this filter with a priority smaller than 20, the user object will be set to null.
function my_authenticate($user, $username, $password){
    // $user here will be null
    return $user;
}
add_filter('authenticate', 'my_authenticate', 10, 3);
However, if you use a priority greater than 20, your code will be executed after the WordPress authentication. If the authentication is successful, then the user object will be set with the corresponding WP_User instance.
function my_authenticate($user, $username, $password){
    // $user here will be an instance of WP_User class, given a successful authentication
    return $user;
}
add_filter('authenticate', 'my_authenticate', 25, 3);
The authentication will be successful if the last executed callback returns a WP_User instance. However, if it returns null, the authentication process will be terminated, and the login will fail. To learn more about this hook, visit the WordPress authenticate filter documentation.
The priority of your custom authentication rule will depend on your desired outcome. If you need to add an authentication method, use a priority smaller than 20. This is because the WordPress authentication callbacks will be executed only when the passed user object is set to null. By doing this, your callback can return a user object and bypass the default WordPress authentication callbacks.
If you want to strengthen your authentication and prevent people from logging in depending on certain rules, you would need to use a priority higher than 30. For example, if you want to prevent someone from logging in when they sign in from a different device, you could use a callback with a higher priority and return null.
wp_authenticate_user filter
As you can see in the graphic above, the wp_authenticate_user filter is fired during the WordPress authentication process. This filter is called just after WordPress has performed the validation to check if a user exists with the given username or email. If a user with this username or email doesn’t exist, this hook will not be fired. It is also important to mention that this hook is fired before password validation. Therefore, at the point of calling this hook, it is still not determined whether the authentication has been successful or not.
This is another filter that you can use to apply custom validations. If your callback returns a WP_Error instance, the login process will be aborted. You can read more about this filter in the wp_authenticate_user guide.
auth_cookie filter
The auth_cookie filter is called after successful authentication. You can use it to filter the authentication cookies. WordPress sets two authentication cookies – “auth” and “logged in”, and therefore the filter is called separately for each of them. The “auth” cookie is mainly used for authentication in the admin area. The “logged in” cookie, on the other hand, is used throughout the site to identify the logged in user. You can read more on the WordPress Cookies codex page.
The authentication cookies are unique strings, that consist of the user’s username, cookie expiration date, session token, and a hash. It’s generally not recommended to modify this string unless you really know what you are doing. Also, if you need to modify it, consider using more specific filters. For example, if you need to change the expiration date, you could use the auth_cookie_expiration filter instead.
Just after this filter, the set_auth_cookie and set_logged_in_cookie actions are also called, passing the cookie details as parameters. These actions are called just before the cookies are sent to the client.
send_auth_cookies filter
This filter is called immediately before the authentication and logged in cookies are set. If for some reason you need to prevent the cookies from being sent, you can use this filter. The filter sends a boolean true as an argument. If your callback returns false, the authentication cookies will not be set. Use this filter with caution, as improper usage can lead to disabling the login functionality on your site.
wp_login action
The wp_login action is called after a successful login. Therefore, if you need to perform a certain action only after a successful login, this is the hook that you can use. One important thing to mention is that if the send_auth_cookies filter is used to prevent sending the authentication cookies, the wp_login would still be triggered.
The wp_login hook passes the username and the user object as parameters to the callback. For more information and examples on how to hook to this action, visit the WordPress codex page. This is how it is invoked in WordPress:
do_action( 'wp_login', $user->user_login, $user );
login_redirect filter
The login_redirect filter allows you to change the page that the user is redirected to after a successful login. This is the final hook that is executed before redirecting the user after a successful login.
Login redirect request hooks
Now let’s take a look at the user-related hooks in the second request that performs the redirection. As you can see from the graphic above, WordPress calls the determine_current_user filter and the set_current_user action, just like on the previous request. These two hooks are called on every request. This time, however, if you hook to the set_current_user action, you will have access to the current user object.
So, the set_current_user action in the redirection request is the first action where you can access the current user object after a successful sign in. By hooking to this action or any other actions/filters fired after it, you can now use functions like wp_get_current_user() to get the logged in the user object.
function my_custom_user_action(){
    $user = wp_get_current_user();
    $user->ID; // 123 (current user ID)
    is_user_logged_in(); // true
}
add_action('set_current_user', 'my_custom_user_action');
WordPress User Login Activity: Last Seen Filter and Report
With the Users Insights plugin installed, WordPress automatically tracks user login activity, logging key data such as last login time and the number of sessions in the WordPress user activity log. This enables you to monitor user login history.

Filtering users by their last login date provides a simple way to identify who has recently visited your site. You can easily filter active or inactive users based on their login activity. For instance, if you need a report of all users who logged in during the last month, you can apply this filter for quick insights.
The “Last Seen” report
The “Last Seen” report in the Activity module provides insights into WordPress user login activity. It tracks the number of users who have logged into your site during recent periods, including Today, Last 7 days, Last 30 days, and more.
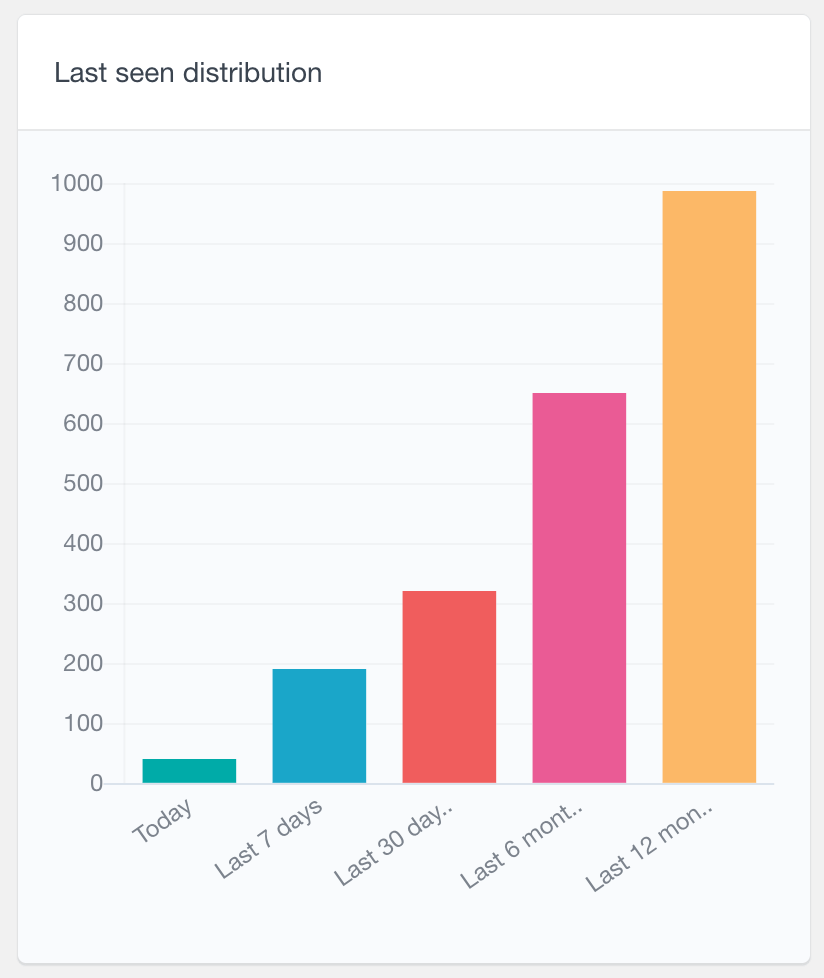
This report helps monitor user login trends and engagement.
Conclusion
This article explores some of the most important hooks that WordPress fires during a successful login. We already know that the login process for WordPress is quite involved and consists of various different elements. The two different requests that WordPress makes can sometimes be confusing, especially when you access the current user object. Therefore, if you need to modify the login functionality, it’s essential to understand how everything fits together, so you can choose the right hooks to accomplish your task.
We hope you’ve found this article helpful, and see you again next time!