How to customize the BuddyPress profile page
Creating user profiles in BuddyPress is easy. But when it comes to BuddyPress and custom profile fields our choices may be limited. Therefore, today we’ll look into different ways to load custom profile fields on your BuddyPress profiles. Additionally, our goal is to understand how to edit and customize your field display.
Adding BuddyPress Custom Pages to Profiles
Buddypress Custom Pages are a great way to add extra content to profiles and give users more control over their profile pages. This can be used to add an additional layer of customization, or simply to make the profile more informative.

Adding the new profile fields (BuddyPress Xprofile Custom Field)
BuddyPress Xprofile Custom Field Types is a powerful feature that allows you to add custom fields to your user profiles. With this tool, you can easily add text fields, checkboxes, radio buttons, select boxes, and more to your profile fields. Depending on your setup, the members can populate these fields on user registration or by editing their profile page.
The BuddyPress xProfile fields are great for storing custom user fields. It’s a simple and effective way to create powerful user profiles. The problem comes when you want to customize it.
Chances are you already know what the default BuddyPress profile pages look like. But often this default look won’t match your needs. You may want additional profile fields or tabs. Additionally, you may want different design options for your fields. And depending on your site you may even want different designs for each profile type.
If you are facing any of the issues above this tutorial is for you. Our goal today is to explore different options for better user profiles. We’ll also see other coding paths you can follow for custom shortcodes and custom templates.
Then let’s get started!
BuddyPress: Custom profile fields with a custom design
Before diving into our code, let’s see a glimpse of the final result.
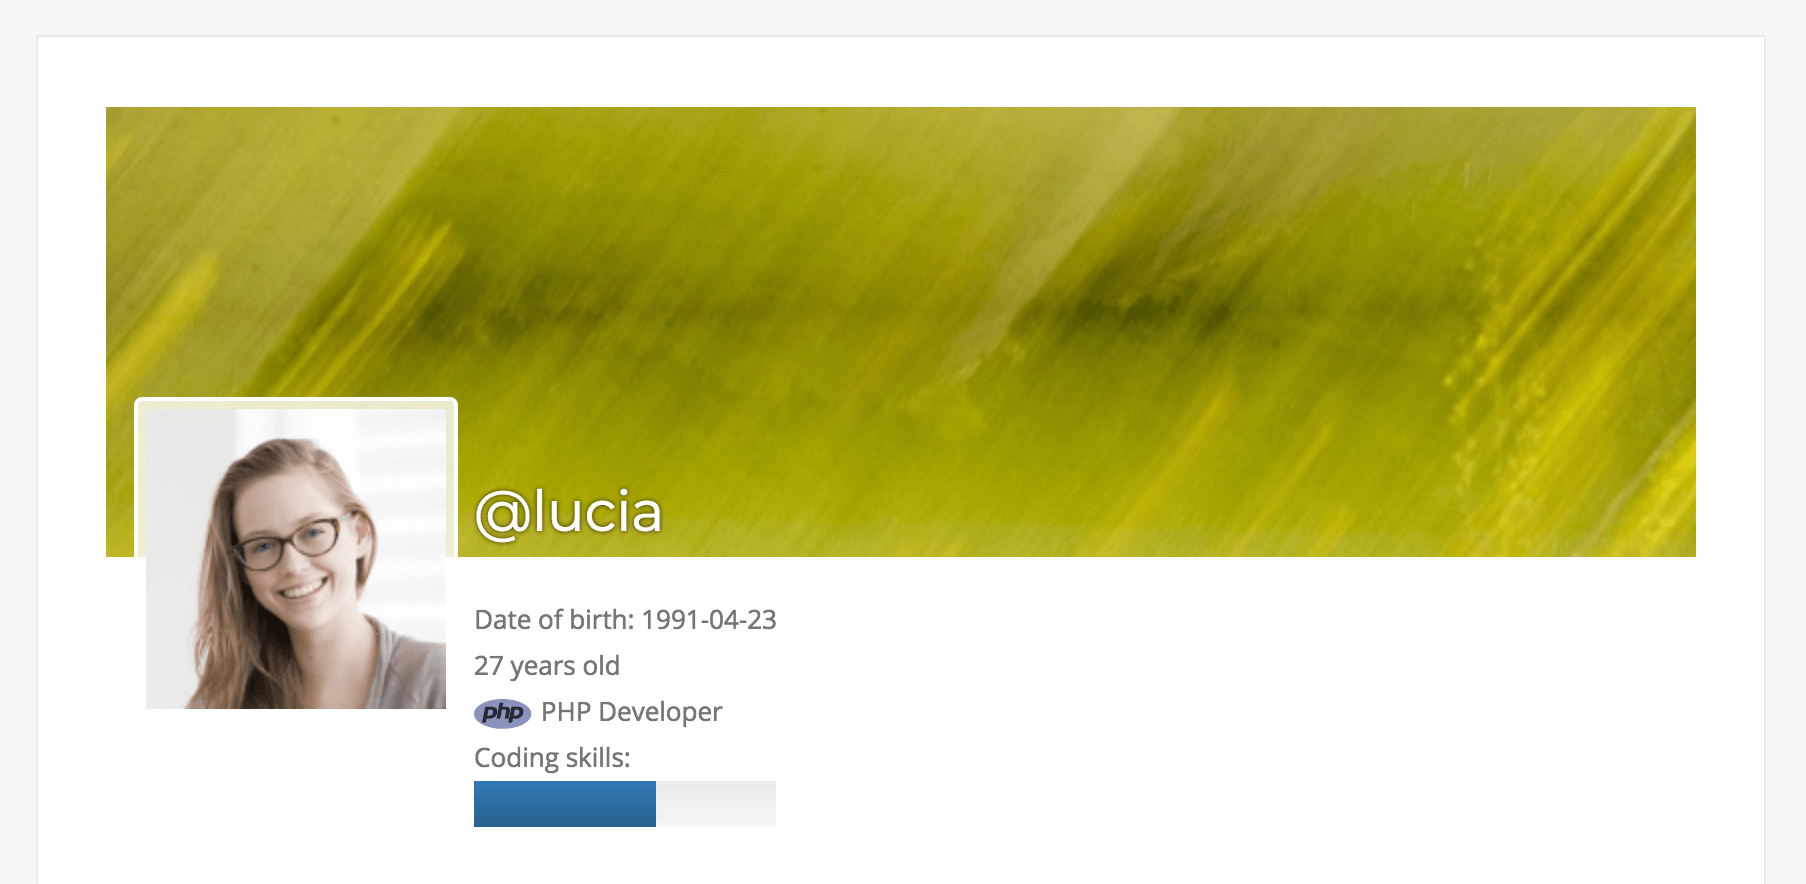
As you may imagine, this is just one of the many options for profile customization. Using the snippets and ideas here you’ll be able to do this for the default profile. Additionally, you’ll be able to do this for custom pages and add profiles via shortcodes.
Setting up your BuddyPress Custom Profile fields
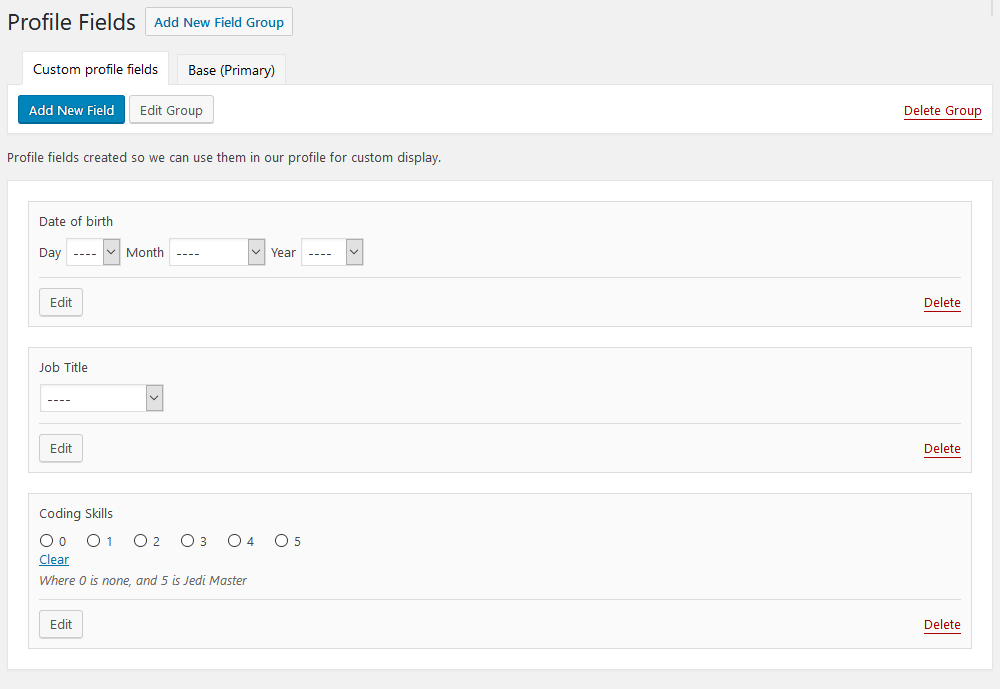
Since our guide revolves around customizing custom fields, we need some data to work with. In our example, we create the following fields:
- Date of Birth – Date
- Job Title – Dropdown
- Coding skills – Radio buttons
Once you have BuddyPress active you can edit your profile fields under WordPress Dashboard > Users > Profile Fields. Then we add our sample fields there so we can have our demo data.
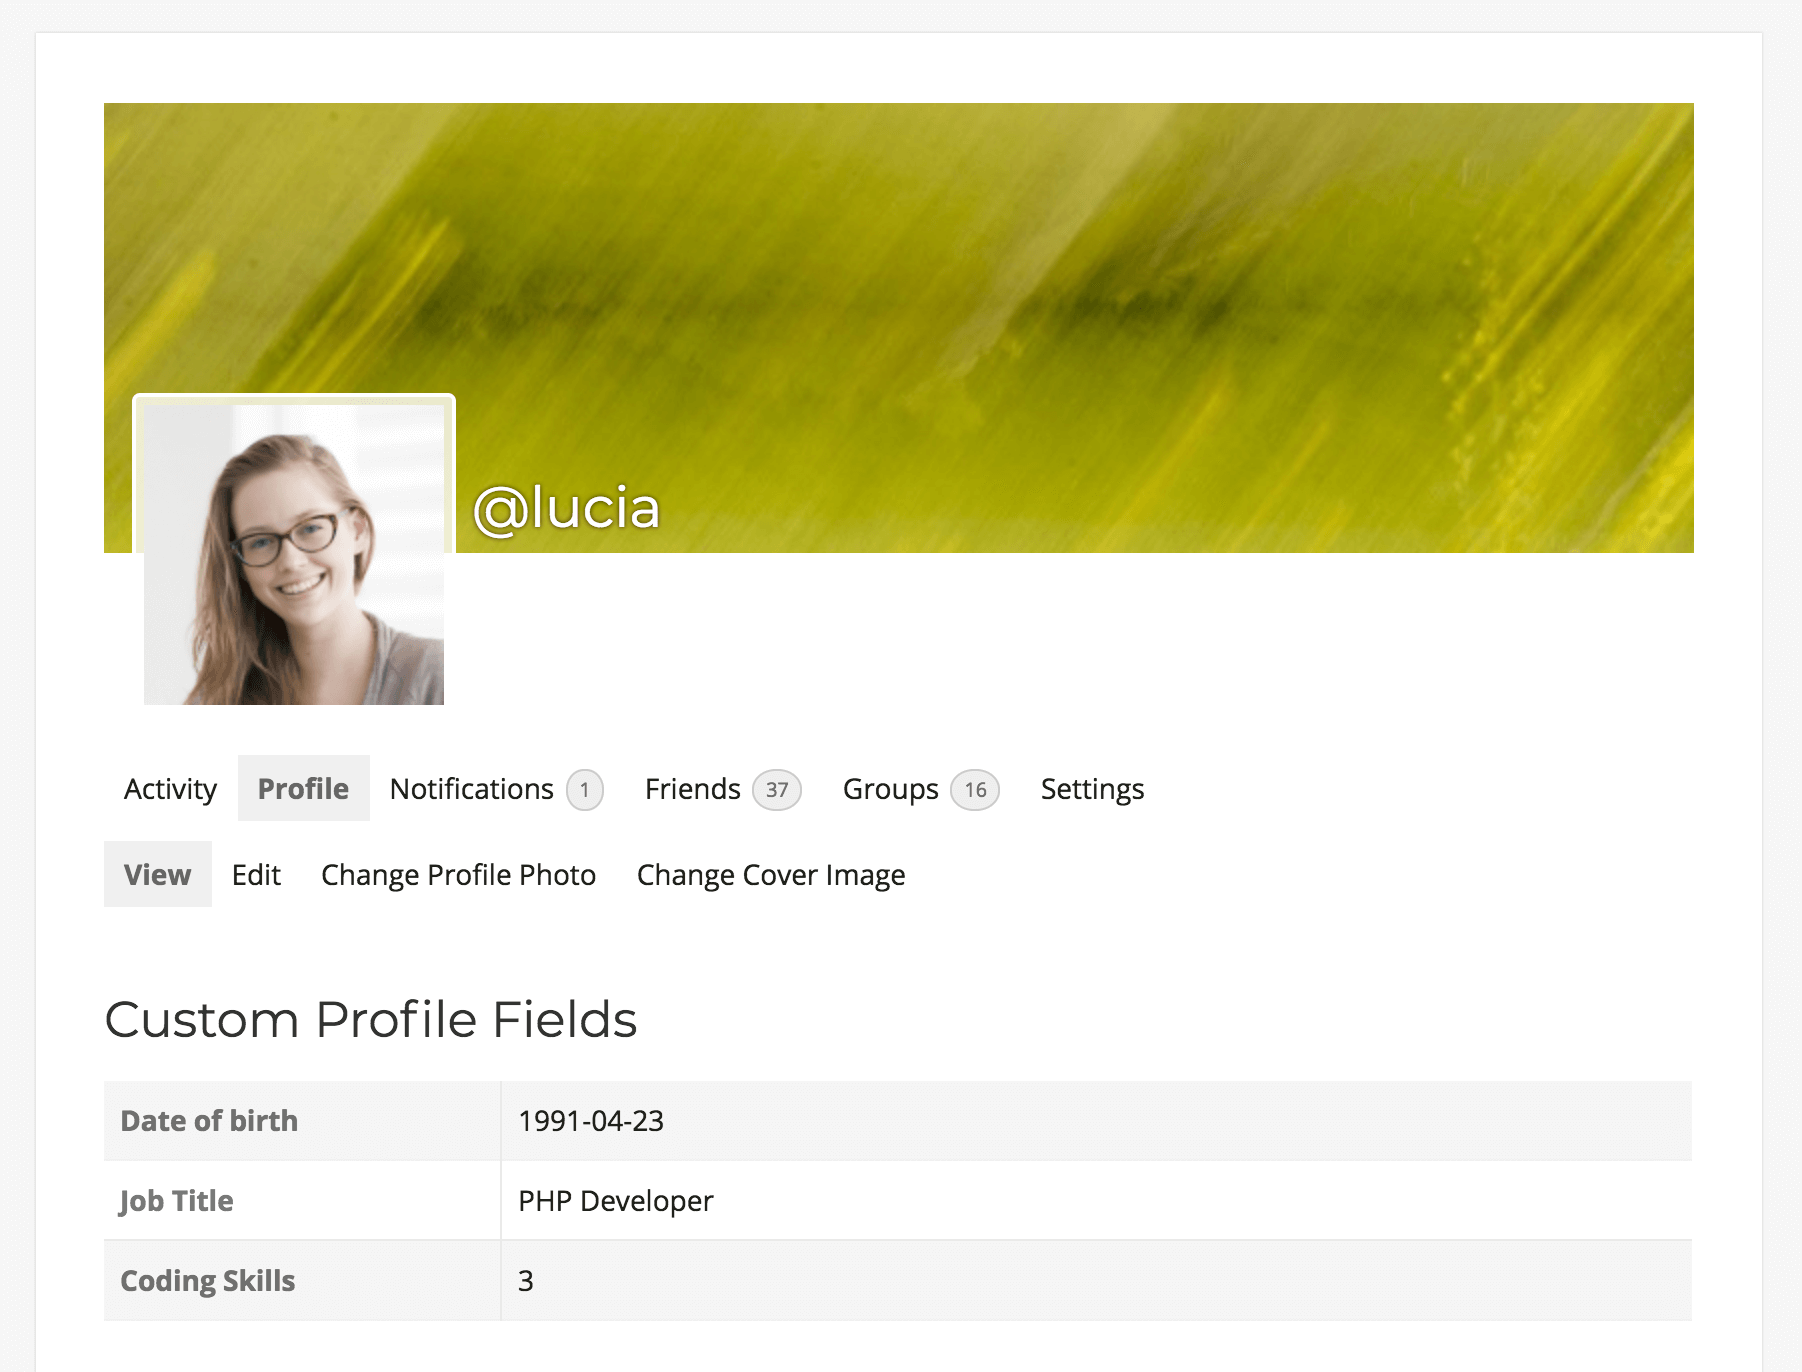
Next, we add some demo data into these fields. Here is the default profile with our demo data:
Now it’s time to start coding our custom display for these fields.

Create your own custom WordPress user profiles packed with details
How to edit the BuddyPress profile page
There are many routes we could go by in terms of customizing the BuddyPress profile. Your first option is just to create a new template for your profile. This is a great option, but it can be quite scary if you just want a simple edit.
Another idea is using hooks. That’s the route we go for. That’s because it allows us to create our desired effect and still be open to new options. For example, if you want to use our custom functions in a shortcode, that’s fine. If you want to add them to a template file, that’s good as well. You can even add them into a custom tab with some additional coding.
Since we want to use hooks for a custom BuddyPress profile page, we need to find the right one. There are many options such as:
- bp_before_profile_content – adds our content into the “Profile” tab, which is the same tab BuddyPress uses for custom fields
- bp_before_member_activity_content – this one adds our content inside of the “Activity” tab, which is the first one visible
- bp_profile_header_meta – As for this one, it adds our content in our header, and it’s visible no matter which tab the visitor is on
Since we want something different, let’s go for the bp_profile_header_meta hook.
Now we need a function to gather our custom fields for the current user. BuddyPress has the bp_get_profile_field_data function, which is a great way to load data. Since this function accepts arguments as an array, we wrote a simple function to make our code easier to read. Here is our base code:
add_action( 'bp_profile_header_meta', 'ui_custom_profile_display' );

function ui_custom_profile_display() {
  // this is where we'll add the custom elements
}

//helper function
function ui_bp_get_field_for_current_user( $field ) {

  //usually we need the UID as well, but since this runs into the profile page we won't need it
  $args = array(
    'field'   => $field, // Field name or ID
  );

  //just return whatever the BP function finds
  return bp_get_profile_field_data( $args );
}
Now it’s time to create our functions to customize our data. But first, have a look at what we are going to do with our data points:
- Just display the Date of Birth (no modifications)
- Display the Age, based on the Date of Birth
- Display the Job Title along with an icon
- Show skills as a progress bar
If we just want to display our custom fields, it’s as simple as using our helper function. Thus, to display the Date of Birth you can use this code:
$dob = ui_bp_get_field_for_current_user( "Date of birth" );
if ($dob) {
  echo "Date of birth: ".$dob;
}
This could be just a one-line function. But to make things nicer we add a simple check if the current user has a DoB stored. Otherwise, if the DoB is empty that line won’t show up.
When it comes to dealing with an “age”, things can get confusing. That’s because this field changes from time to time. Therefore, if we store the age as a number this would be outdated quite fast. Hence, we use the DoB as a starting point to calculate the Age. This is how we do it:
//turn DoB into UNIX time so we can manipulate it
$age = strtotime($dob);
//get today's UNIX time and subtract today form it
$age = time() - $age;
//now we have the age in seconds, let's turn it into years
$age = floor($age / 31536000 );

echo $age." years old";
Next, our mission is to display icons along with our options. There are many ways to do it, depending on the number of options and icons you’ve got. But usually, a switch is a good way to solve this:
  //get the job title!
  $job = ui_bp_get_field_for_current_user( "Job Title" );
  //avoiding empty results
  if ($job) {
    switch($job) {
      case "PHP Developer":
        echo "<img src='phpdev.png' /> ".$job;
      break;
      case "Web Deisgner":
        echo "<img src='webdes.png' /> ".$job;
      break;
      case "Web Developer":
        echo "<img src='webdev.png' /> ".$job;
      break;
	}
    echo "<br />";
  }
For simplicity, we have only set the name of the image (such as phpdev.png), however, you’ll need to place the full image URL instead in your code.
Now we are one step closer to our customized BuddyPress Profile! This code just checks our current value (job title) against many options. If it finds a match we run the code for that case.
Our last task for today is replacing a number with a design element. Therefore, for the coding skills, we won’t even display the actual number, but rather a progress bar. This is the code to do it:
$skills = ui_bp_get_field_for_current_user( "Coding Skills" );
//if you've got skills...
if($skills){
//let's convert into a 0-100 scale
$skills = $skills * 20;
//using the bootstrap code for this
echo '<p>Coding skills:</p>
<div class="progress">
<div class="progress-bar" role="progressbar" aria-valuenow="'.$skills.'" aria-valuemin="0" aria-valuemax="100" style="width:'.$skills.'%">
<span class="sr-only"> </span>
</div>
</div>';
}
Here we’re using the BootStrap CSS library for styling. This way we can just add a few lines of code and have a nice progress bar. The main issue there is converting our 0-5 scale into a 0-100 scale.
Below is the full BuddyPress custom profile fields code in case you just want to copy & paste it:
add_action( 'bp_profile_header_meta', 'ui_custom_profile_display' );
function ui_custom_profile_display() {
// this is where the magic happens
$dob = ui_bp_get_field_for_current_user( "Date of birth" );
//let's double check if it's empty
if ($dob) {
echo "Date of birth: ".$dob;
echo "<br />";
//turn DoB into UNIX time so we can manipulate it
$age = strtotime($dob);
//get today's UNIX time and subtract today form it
$age = time() - $age;
//now we have the age in seconds, let's turn it into years
$age = floor($age / 31536000 );
echo $age." years old";
echo "<br />";
}
//get the job title!
$job = ui_bp_get_field_for_current_user( "Job Title" );
//avoiding empty results
if ($job) {
switch($job) {
case "PHP Developer":
echo "<img src='phpdev.png' /> ".$job;
break;
case "Web Deisgner":
echo "<img src='webdes.png' /> ".$job;
break;
case "Web Developer":
echo "<img src='webdev.png' /> ".$job;
break;
}
echo "<br />";
}
$skills = ui_bp_get_field_for_current_user( "Coding Skills" );
//if you've got skills...
if($skills){
//let's convert into a 0-100 scale
$skills = $skills * 20;
//using the bootstrap code for this
echo '<p>Coding skills:</p>
<div class="progress">
<div class="progress-bar" role="progressbar" aria-valuenow="'.$skills.'" aria-valuemin="0" aria-valuemax="100" style="width:'.$skills.'%">
<span class="sr-only"> </span>
</div>
</div>';
}
}
//helper function
function ui_bp_get_field_for_current_user( $field ) {
//usually we need the UID as well, but since this runs into the profile page we won't need it
$args = array(
'field' => $field, // Field name or ID
);
//just return whatever the BP function finds
return bp_get_profile_field_data( $args );
}
How to use the custom fields data to manage your BuddyPress members
Once you have your custom fields created and filled with your BuddyPress members data you can use the Users Insights plugin to search and filter your members based on this data.

Since the plugin automatically detect the field data type it will apply the proper filter for the different data types:
Conclusion
Today we saw some coding examples that you can use to customize your BuddyPress profile fields. We went through a few options and snippets that you can take advantage of on your site. These snippets can be used to replace fields, extend their functions, and customize your display.
In addition, you can use some extra code for other functions. Here are some ideas:
- Show the total post count by users
- Use font icons for easier implementation (rather than images)
- Use animations and animation libraries
- Include badges and other rewards for users, depending on their loyalty or achievements
- Replace simple fields with icons, such as tracks run, goals scored, events attended
- Load and interact with data from other plugins, such as WooCommerce, LearnDash, bbPress
- Add design customizations depending on certain fields, creating different profile page designs for each user types
That’s it! We hope you enjoyed it and see you again next time!